Wednesday 15 December 2021

A Christmas Card for Someone Special

Just popping by to share a card I made for our son and his lovely girlfriend. I've made a few using this design over the years, it makes a nice change to the standard 5inch square base. 


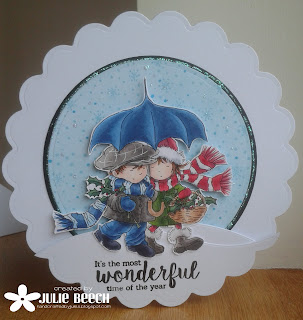
To begin, I cut out 2 large scalloped circles from white card and part of one from some matching scrap.
From some more white card, I cut a circle and a slightly larger one from black.
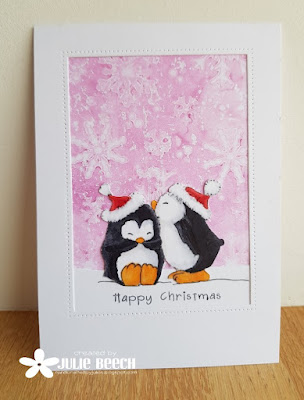
My cute couple are from LOTV, which after printing out, I coloured with Copics before fussy cutting out.
Taking the white plain circle, I inked with Tumbled Glass DI and stamped a snowflake pattern with an ancient red rubber stamp from I don't know where, in the same ink and layered it over the black one. This was then centered on one of the large scalloped circles and a line of crystal Stickles added around the edge of the inked circle and left to dry. Well you've got to have a little bit of sparkle on a Christmas card, it's about the only embellishment I add!
OK, now to making the cardbase. I made sure that 2 of the scallops were square to my scoreboard edge, then scored the scalloped circle without the layers about 2cm from the top parallel to the table, to make a hinge which I secured to the front with liquid glue and left to dry, matching the scallops. 
To assemble the front, the part circle was added, after cutting a snowdrift shape into it and from another bit of leftover white cut another drift and glued it behind the scalloped edged one, matching the scallops.
My sentiment from Uniko was stamped in black and then the whole snowbank was added to the scalloped card base. Finally my couple were added to complete the design.
I might have time to share a few more Christmas makes before the big day so watch this space!

Joining in over at:-

Meet me under the Mistletoe


Favourite Christmas embellishment
You've got to have a bit of sparkle at Christmas and being a CAS girl at heart, Stickles are the nearest I get to embellishments!

Tuesday 14 December 2021

A LOTV Snowman

Good evening folks.
It's the middle of the month and just time for a final challenge of the year from Perfectly CAS.
Here's my take on the new theme.


I chose SKY and went with a snowy one for this quick Christmas make.
My sky is a strip of leftover DP from NitWits that has been trimmed to be just less than 1/3rd of the card front before being added to the left hand side. I used one of the cute snowmen from LOTV that I found printed out in my bits box. He didn't take too much time to colour with Copics before fussy cutting him out and added to the base of the DP panel. To keep my card CAS, I added the sentiment from a Woodware set under the snowman, he doesn't need anything else. All my design is in just 1/3rd of the card front with no embellishments, Perfectly CAS!

So where will the cue words take you? Hopefully you'll have lots of time over the Christmas holidays to have a play and join in. Maybe you'll get to use some new goodies that Santa brought too!!
So for more CAS inspiration check out the rest of the team here and have a happy holiday season!

Joining in over at:-

Anything Goes, option of CAS

Christmas

No option for me this time

Jolly Santa

Good morning folks, thanks for dropping by at this busy time of year. Today sees the beginning of the final challenge of 2021 at Cardz4Guyz. Our theme for you this time is:-

CONTEMPORARY CHRISTMAS

Here's my take.


I think that the easiest way to make a contemporary Christmas design is to keep it CAS, well I would, wouldn't I! This card was made for my eldest Grandson, who is getting far too street wise for the cute and cuddly Christmas of his younger days, so this fun MFT Santa was just the ticket.
I was influenced by this card on Pinterest, I love the way the cheeky Santa is peering around the edge of the card. For mine I took the masked circle idea and added the Santa character, together with 3 HOs from the same set on a die cut Lawn Fawn speech bubble. The stamp comes with a small 3 which I didn't need, so using a black watercolour marker pen I inked just the HO and stamped, the punctuation was added by hand. The trimmed down panel was added to a white A6 note card and a little bit of Stickle glitter was added to his hat.
Hope you can join us for this final challenge, there's always one person you forgot to add to your Christmas card list!
For more contemporary, masculine, Christmas ideas, check out the rest of the team here and then why not join in?

Friday 10 December 2021

Festive Friday @ Uniko

Morning all. Just popping by to share one of a couple of cards I made for my Festive Friday BA Inspiration over at Uniko and to link up to a couple of challenges.


Pop over to the Uniko blog to find out more about how this and the other card was made.
Don't forget there's still time to join in the latest Uniko challenge.


Joining in over at:-


I was inspired by the theme and the colours of the picture to make this Mixed Media Card.


Friday 3 December 2021

Uniko Challenge, a reminder

 Just a quick reminder that you still have time to enter the latest Uniko challenge.

Here's my take on the theme.


Using some die cut strips of red and green card stamped with Christmas Sentiments and heat embossed with white EP, I created a tree. I was inspired by one of Therese Calvird's same but different Christmas You Tube videos where she used sentiments to create a tree, of course if you don't want to think it out you could use the ready made elements from the Pattern Building Christmas tree set.
I finished of my tree with a punch star and die cut snowflake in gold mirror card and a free hand cut brown card tub.
So why not have a play, see what you can come up with, we'd love to see your take in the challenge gallery. Check out the rest of the team and our GD for more inspirational makes.

Joining in over at:-

Thursday 2 December 2021

Penguin Family Christmas

Good evening folks.
Well December is here and I am so not ready for Christmas, in whatever guise it comes in this year! Anyway the overseas cards have been posted and most of the others too, so that's one job ticked off, still the shopping is still to be done!
As it's a new month we have a new challenge at HLS CAS. Here's my take on the new cue card.


Love these cute LOTV penguins and they were prefect for my daughter and SiL's Christmas card as Joe loves penguins and they have two lovely boys.
Once printed off, I coloured with Copics, blue and white for Nich and red for Joe, the other two coloured to match. The sky was also Copic coloured but with a sponge and re-inker. Added to a 5 x 7 white base card, a Uniko sentiment stamped in blue and a few strips of twinkly blue glitter paper later it was complete.
For more Christmas Character inspiration check out the DT here and then why not join in? Please keep your card CAS though!

Wednesday 1 December 2021

Color Hues #31

 Good afternoon, as it's the 1st of the month there's a brand new colour combo from Color Hues which is the last one of the year. 

As it's December and we know you are all going to be busy, so we are leaving the link open until Dec 29th. We have a lovely festive colour duo for you too but you don't need to go down that route, here's my take using the retired Uniko Pure Florals Poinsettia, I must try to persuade Bev to reissue this beauty!! 

I apologise for the picture quality but the light was playing up when I needed to take the photo!
This large image is a dream to colour. For this card, I embossed in gold EP then washed in colour using my Zig watercolour brushes. To get the depth of colour, I used 3 shades of both colours and a brown-grey for the shadows on the leaves. The center of the 'flower', the actual flowers of the poinsettia, were coloured with a gold glitter pen as I wasn't allowed to use yellow, it's not one of our colours or neutrals!!!
The bold greeting is also from Uniko and is embossed using gold EP. My panel was trimmed when the image was complete and added to an A6 side fold note card.
So where will you go with this latest combination? We'd love to see what you make of our colours in the gallery. For more red and green inspiration, check out our GD and the rest of the team here.

Why not link your celebratory red and green creations to the Uniko challenge  as well.

STAMPlorations December Challenge

 Good morning. A new month, so a brand new challenge at STAMPLorations Theme and Photo. Here's my take on the new cue card.


Using the theme, I used the single candle stamp from the Kathryn's Big Wishes stamp set and some paper piecing to create this festive array. All the candles were stamped onto a panel of white card and then repeatedly again onto a piece of striped DP I found at the bottom of my Christmas paper box. It was part of a set from over 10yrs ago so no idea of the make but I also had some coordinating plaid from the set left too which I used to back my base card. I quite like the more subtle colours used in the striped paper, including lots of festive elements, Christmas puddings, not used, candy canes and stockings, snowflakes, ornaments, holly as well as plainer stripes. Before adding the paper piecing, I coloured the candle flames with Copic markers.
I started off trying the camouflage technique with the Season's Greetings Phrase Die but didn't like the effect so added a further plain white Season's Greetings over the top. It would have been so much easier and taken a lot less time if I'd decided to do that straight off!!
So that's my take, what's yours? We'd love to see your ideas on the cue picture and theme in the gallery.
For more inspiration, check out the rest of the DT here.

Tuesday 30 November 2021

Enjoy the Season

Good morning, time for a new challenge at Cardz4Guyz where our theme is:-

SHADES of BROWN

I went with a vintage feel for my take.


The LOTV image was stamped in Memento Rich Cocoa and then coloured with Copics using the E group. Snow was added with a white pencil crayon.
The finished image was trimmed and then added to a 4" x 4" cream base card. The greeting, from Altenew, was also stamped with Rich Cocoa.
A very simple, masculine card.
For more masculine inspiration check out the rest of the team here.

Joining in over at:-
Use a hand stamped or digital image


Friday 19 November 2021

Uniko Challenge

Morning all. It's time for a brand new challenge at Uniko.
Here's my card based on the twist this time.


Its a very simple card, just a couple of stamped holly leaves and berries from the Winter Foliage stamp set and the matching dies. the leaves were stamped on green card and although the veins showed up to begin with they had faded by the time I took the photo! The berries were stamped with red on red and then some Glossy Accents added on top.
From a panel of red card, I cut a curve using an Avery Elle set and knocked back the colour with some Rusty Hinge and Barn Door DI around the edges, before adding it to a white, A6 note card. The thread is 1/3rd of a strand of twine as it was too thick originally. I made a rough bow and glued it to another die cut set of berries. The leaves were added and then sandwiched by the glossy accented berries and glued along the edge of the join after I'd stamped the greeting from Christmas Sentiments.
So where will the theme take you? We'd love to see you in our gallery. For more inspiration please check out the rest of the team and our GD here

Joining in over at:-

Wednesday 17 November 2021

Stencil Monoprint Penguins

 Morning, I've another Christmas card to share with you today using a mono print from a stencil.
I was pleased to see that this month's CAS Mix Up was to use a stencil to make a mono print, I had loads of them after playing around with my Gelli plate for my bauble backgrounds here.
Here's what I came up with.


My monoprint was made as a bi product of the Gelli plate process. After inking up the plate with Picked Raspberry DI and laying down the stencil, Let it Snow from Uniko, and taking a print, the stencil has lots of ink on the surface and being from Yorkshire I had to use rather than waste all that juicy ink. So on some scrap white paper, I laid down the stencil and pressed all over with my hand and some kitchen roll to mop up any seepage!
I love the smooth effect you get doing it this way compared to direct inking to stencil which can get a little blotchy and the small details tend to get lost. It even picked up some marks from the Gelli plate left from a previous experiment which reminded me of falling snow.
Always on the look out for a challenge combo, I added these two cute penguins, found in my odds and ends box, coloured with Copics and fussy cut. I cut away the background as it wasn't needed and added back the snow drift with some scraps, all framed with a leftover from my bits box. The sentiment is from Woodware.

Joining in over at:-

Tuesday 16 November 2021

Color Hues #30

Good afternoon. We are half way through November already and no Christmas shopping done. The road into town has been closed since the beginning of October for sewage replacement and was due to open at the weekend but is still closed until the beginning of December. The diversion is awful, takes about 20 minutes extra and is single track with very few passing places. As a result my forays into town have been limited to the basics of supermarket and hairdressers! I suppose I have had plenty of time to make my Christmas cards and I've used the new colour combo at Color Hues to make another for the stash. I'll have to take my overseas cards to the PO when I go for my hair cut at the end of the month or they wont get there in time! Anyway, rant over here's my card.


The starting off point was the wreath die from Joanna Sheen that I think I got free in a mag some time ago, but I may be wrong. I did win a few of her dies a couple of years ago so it could have been then!!
Anyway, its been in my die cut stash unloved so I decided to dust off the cobwebs, of which we have plenty I can tell you despite my daily spider patrol, and use it to make a wreath style card. I cut it from gold mirror card but instead of the little bits that come with the die, I added some bits I die cut from bits of silver and white card and the tiny snowflakes I punched from a scrap of holographic silver card.
To make the spray, I punched a small circle of gold card and added the foliage to it and to cover the joins, I added a punched snowflake in gold. 
My base card is made from a piece of hammered, dark, silver grey card that's been in my stash for years with a few dots of white gel pen to break up the starkness of the background. The gold die cut wreath was added then the spray. A few of the punched snowflakes were added too before the sentiment from Uniko was stamped and embossed in Platinum EP on a strip of white card and added.

So where will these latest colours take you, we'd love to see your takes in our gallery.
For more inspiration check out our GD and DT here.

Joining in over at:-
Christmas


Birthday Plaid

Good morning folks, time for a new challenge at Cardz4Guyz.
This time we would like to see your masculine cards that feature:-

GINGHAM, CHECKS or PLAID

Here's my card for your inspiration.


My starting point was the plaid DP from NitWits and the cute digi image from LOTV, Big Gift.
I was looking for an image for my Grandson's birthday and remembered this that I bought awhile ago. He comes in 3 different forms but I used the simple Big Gift Boy Alone. He reminds me of the comedian Harry Worth, if you are old enough to remember, who used to approach a glazed corner of a shop and raise one of his arms and legs. The effect was that he looked as if all four of his appendages were moving at once! Hands up if you've tried that when you were a kid, I know I did!!
This is a fairly simple design, I placed the digi to one side of a square on the computer and printed him off. I don't have the skills or programme to add details to the image so they are either die cut, freehand or stamped. Once coloured with Copics, I fussy cut part of the little boy and cut the square using my trimmer adding the lines and stars to match.
The NitWits DP was trimmed to size and added to a 7 x 7inch base card and the coloured, stamped panel was added on top with foam pads.

That's it from me but please check out the rest of the DT for more masculine inspiration and then why not join in?

Joining in over at:-

Monday 15 November 2021

Uniko BA Inspiration - Pastel Baubles

I'm over on the Uniko blog today with a little bit of festive BA inspiration with these two cards using the floating strip technique. 


You'll find all the details on the make there.

Sunday 14 November 2021

You Are So Sweet

Evening folks, time for a new challenge at Perfectly CAS!
Here's my CAS take on this month's theme.


When looking through my stash for a stamp to use for this challenge I found this fun pineapple stamp that came free with a mag quite a few years ago. I think pineapples are quite tropical so I went with it!
After colouring the pineapple body and foliage with Copics, I fussy cut them out as the die that came with the set gave too large a border around the edge. My sentiment is from an Avery Elle set which I stamped on a die cut panel in Altenew's Sea Forest ink, then added the fussy cut pineapple. The panel was then added on pads to a white, linen effect, A6 top fold card.
So where will the cue word take you? We'd love to see your take in our gallery but please keep it CAS!!
For more CAS tropical inspiration check out the rest of the DT here.

Wednesday 10 November 2021

Look what the postman brought!

 Morning folks. I've been playing with my newly acquired Altenew's Happy Together stamp set. I won it over at the Flower challenge together with a die cut thank you for their 5th Birthday celebrations with this card, thanks Viv. It dropped into the postbox on Friday so I've had some time to play and here is what I came up with.


I was influenced by the colours over at Altenew's November challenge and to start I made a background using the solid bloom stamp from the set and some DIs, blending out the stamping with a water brush. The finished panel reminded me of all the leaves in the cue picture but I wasn't satisfied so put the large panel to one side and had a play with the outline bloom spray.
Going for a no outline effect, I stamped with Altenew Limestone ink on MM paper and used a bright pink Zig marker to paint each petal which gives a more life like look. It's painstaking but so therapeutic, I get lost in the moment. I did the odd bit of Family History on the laptop whilst the petals dried, so I didn't smudge them! Some shadows were added with a purple Zig marker to give my bloom and bud some depth, before fussy cutting it out once dry. The rest of the panel of MM paper, I smooshed with a mix of Mustard Seed and Wild Honey DI and die cut a panel from it. The sentiment, I stamped on black and heat embossed with white EP and fussy cut.

I played around with both completed panel and rather liked the yellow panel over the fussy stamped background, so I die cut the panel to leave a border on an A6 note card, popped the smaller one up on pads and added the sentiment. It's not your typical autumnal thank you card but I was a bit orange and browned out!

Joining in over at:-


Wednesday 3 November 2021

Gnome for Christmas?

 Good morning. I was flicking through my bits n bobs box the other day and came across a coloured panel using Stamping Bella's grumpy gnomes. I think I originally wanted the gnomes that were stacked up on top of one another but went with the side by side ones as the other was out of stock. Still I had a play and tried my hand at making my own gnome tower. What do you think?


I decided to put them to good use by taking part in AAA's and The Male Room's latest challenges of a sketch with the option of gnomes and just gnomes.


I had a little bit of the stencil background from here, so trimmed it down to create the horizontal element from the sketch and popped the gnomes on top, the sentiment is Uniko.  A very quick card once the idea was sparked! 
Another Christmas card for the stash.

Joining in over at:-