Tuesday 29 June 2021

A Daring Adventure

Good morning folks.
It's time for a brand new challenge over at Cardz4Guyz. We would love to see your cards on the theme of -

TRAVEL

Here's my take.


The latest challenge at Inkspiration is 'Maritime', so I decided to use this image from STAMPlorations from the Born to Roam set. There is also a sketch challenge at AAA Cards, so put the two together and I came up with this design.
Instead of using the sketch as is, I flipped it top to bottom, you can't really have a ship sailing in the top third! The image was stamped and the horizon line extended with a black fine liner to match the sketch. I stamped the image again on some masking paper and fussy cut it out and used it as a mask and a soft layer of Salty Ocean DI was inked over the ship. The horizon was then masked and the sea added below with a mixture of Mermaid Lagoon and Peacock Feathers DI. Once the masks were removed, I used a damp, coarse haired brush to dab onto the 'sea' to create a bit of texture and added some white gel pen around the ship to suggest movement. The little bit of shading on the ship was added with Copic markers.
The sentiment, also from the same set, is rather ambiguous, so the could be used as a leaving, gap year, graduation or simply as a birthday card.
So where will the cue word take you, we'd love to see your ideas in the gallery. For more inspiration on the theme of travel, check out the rest of the team at the Cardz4Guyz blog.

I'm joining in over at:-

No twist for me

Monday 28 June 2021

STAMPlorations 8th Birthday Celebrations, Day 1 Blog Hop and Giveaway

Today at STAMPlorations we are celebrating our 8th Birthday with some fabulous new items.
Here's my first card using the Birthday Bundle #1, which includes Blossoms Spray #4, Radiate Happy stamp set, Art Border #1 and Design Blox template #5.


Firstly I experimented with the Design Blox template #5, adding DI in Mustard Seed, Picked Raspberry and Salty Ocean over a panel of white card to achieve a diagonal pattern. It looked too good to cut into but I bit the bullet and trimmed it down to fit my stamped Blossom Spray#4, which I simply stamped in black on white and fussy cut. The template is a large stencil 6"x10" so you can get more than one background from each inked panel. A simple message from Radiate Happy was stamped and heat embossed with gold EP and the inked panel and spray added above on an A5 white note card. I kept the spray white so that it didn't distract from the background and I think it looks all the prettier for that!

My second card uses a watercolour technique to showcase the fab blossom spray.


On some MM paper, I stamped the spray with Versamark and heat embossed with clear, glossy EP before adding watercolour with my Zig watercolor markers. When dry I added the trimmed down panel was added to an A5 note card. Rather than simply stamp the sentiment from Radiate Happy, I stamped it twice, first with black on white then again with Versamark on black and Gold EP. When inking up the second time, I tried to just ink the radiate, masking the happy element with Post it tape. The happy element was fussy cut and added over the panel on pads and the black and gold radiate was glued flat onto the panel.
There is also a border die in the set which I didn't use in these designs but is included in the bundle.

All the details about the various Birthday Bundles and ways to win are over on the STAMPlorations blog, where you'll also find all the Ts and Cs. 
So for a chance to win a $25 prize code don't forget to leave a comment! The event ends on July 8th and winners will be announced on July 10th.

Thursday 24 June 2021

Uniko Brand Ambassador Inspiration - English Country Garden Stencil Bundle

Morning all, I'm up at the Uniko blog with a little bit more inspiration using the English Country Garden stencil bundle.


It's a bit like this card I made for the reveal day. By the way there's still time for you to join in our release day blog hop, check out here for more details.

All the details of the make can be found here.

I'd like to join in over at:-


Happy 9th Birthday!

Sunday 20 June 2021

Uniko Stencil Release Day and Blog Hop

So it's time for the full release at Uniko
Hope you've enjoyed the new stencil release so far so why not grab a cuppa and join in our 9th Birthday Blog Hop. Here are a few more cards I made with the brand new stencils.

The first one is made using the fab Rose stencil. 


I was trying to find different ways to use this fab large rose and came across a card by the talented TaeEun Yoo on Pinterest. Her gorgeous card uses a different stencil but I used the same technique, I think. 
On a panel of dark pink card, I inked through with some white pigment ink, removed the stencil then left it to dry. When fully dry, I went in with my Polychromo pencil crayons to give definition to the petals. I don't use them quite as often as I should so I hope the effect looks OK.  I am ashamed to say that after colouring the flower I was left staring at it for a couple of days trying to decide how to make a card. In the end I gave in and CASEd TaeEun's card layout. 
I trimmed down the panel, added it at a jaunty angle and trimmed off the excess before adding a sentiment strip that I had in my stash, made by putting a couple of small sentiments from Pure Florals-Peony together. When I do something like that I make quite a few using different colours and EP and save them for later use as getting the elements lined up is time consuming. To lift the strip I added a bit of gold glitter paper from the stash, a few PPP gold sequins complete.

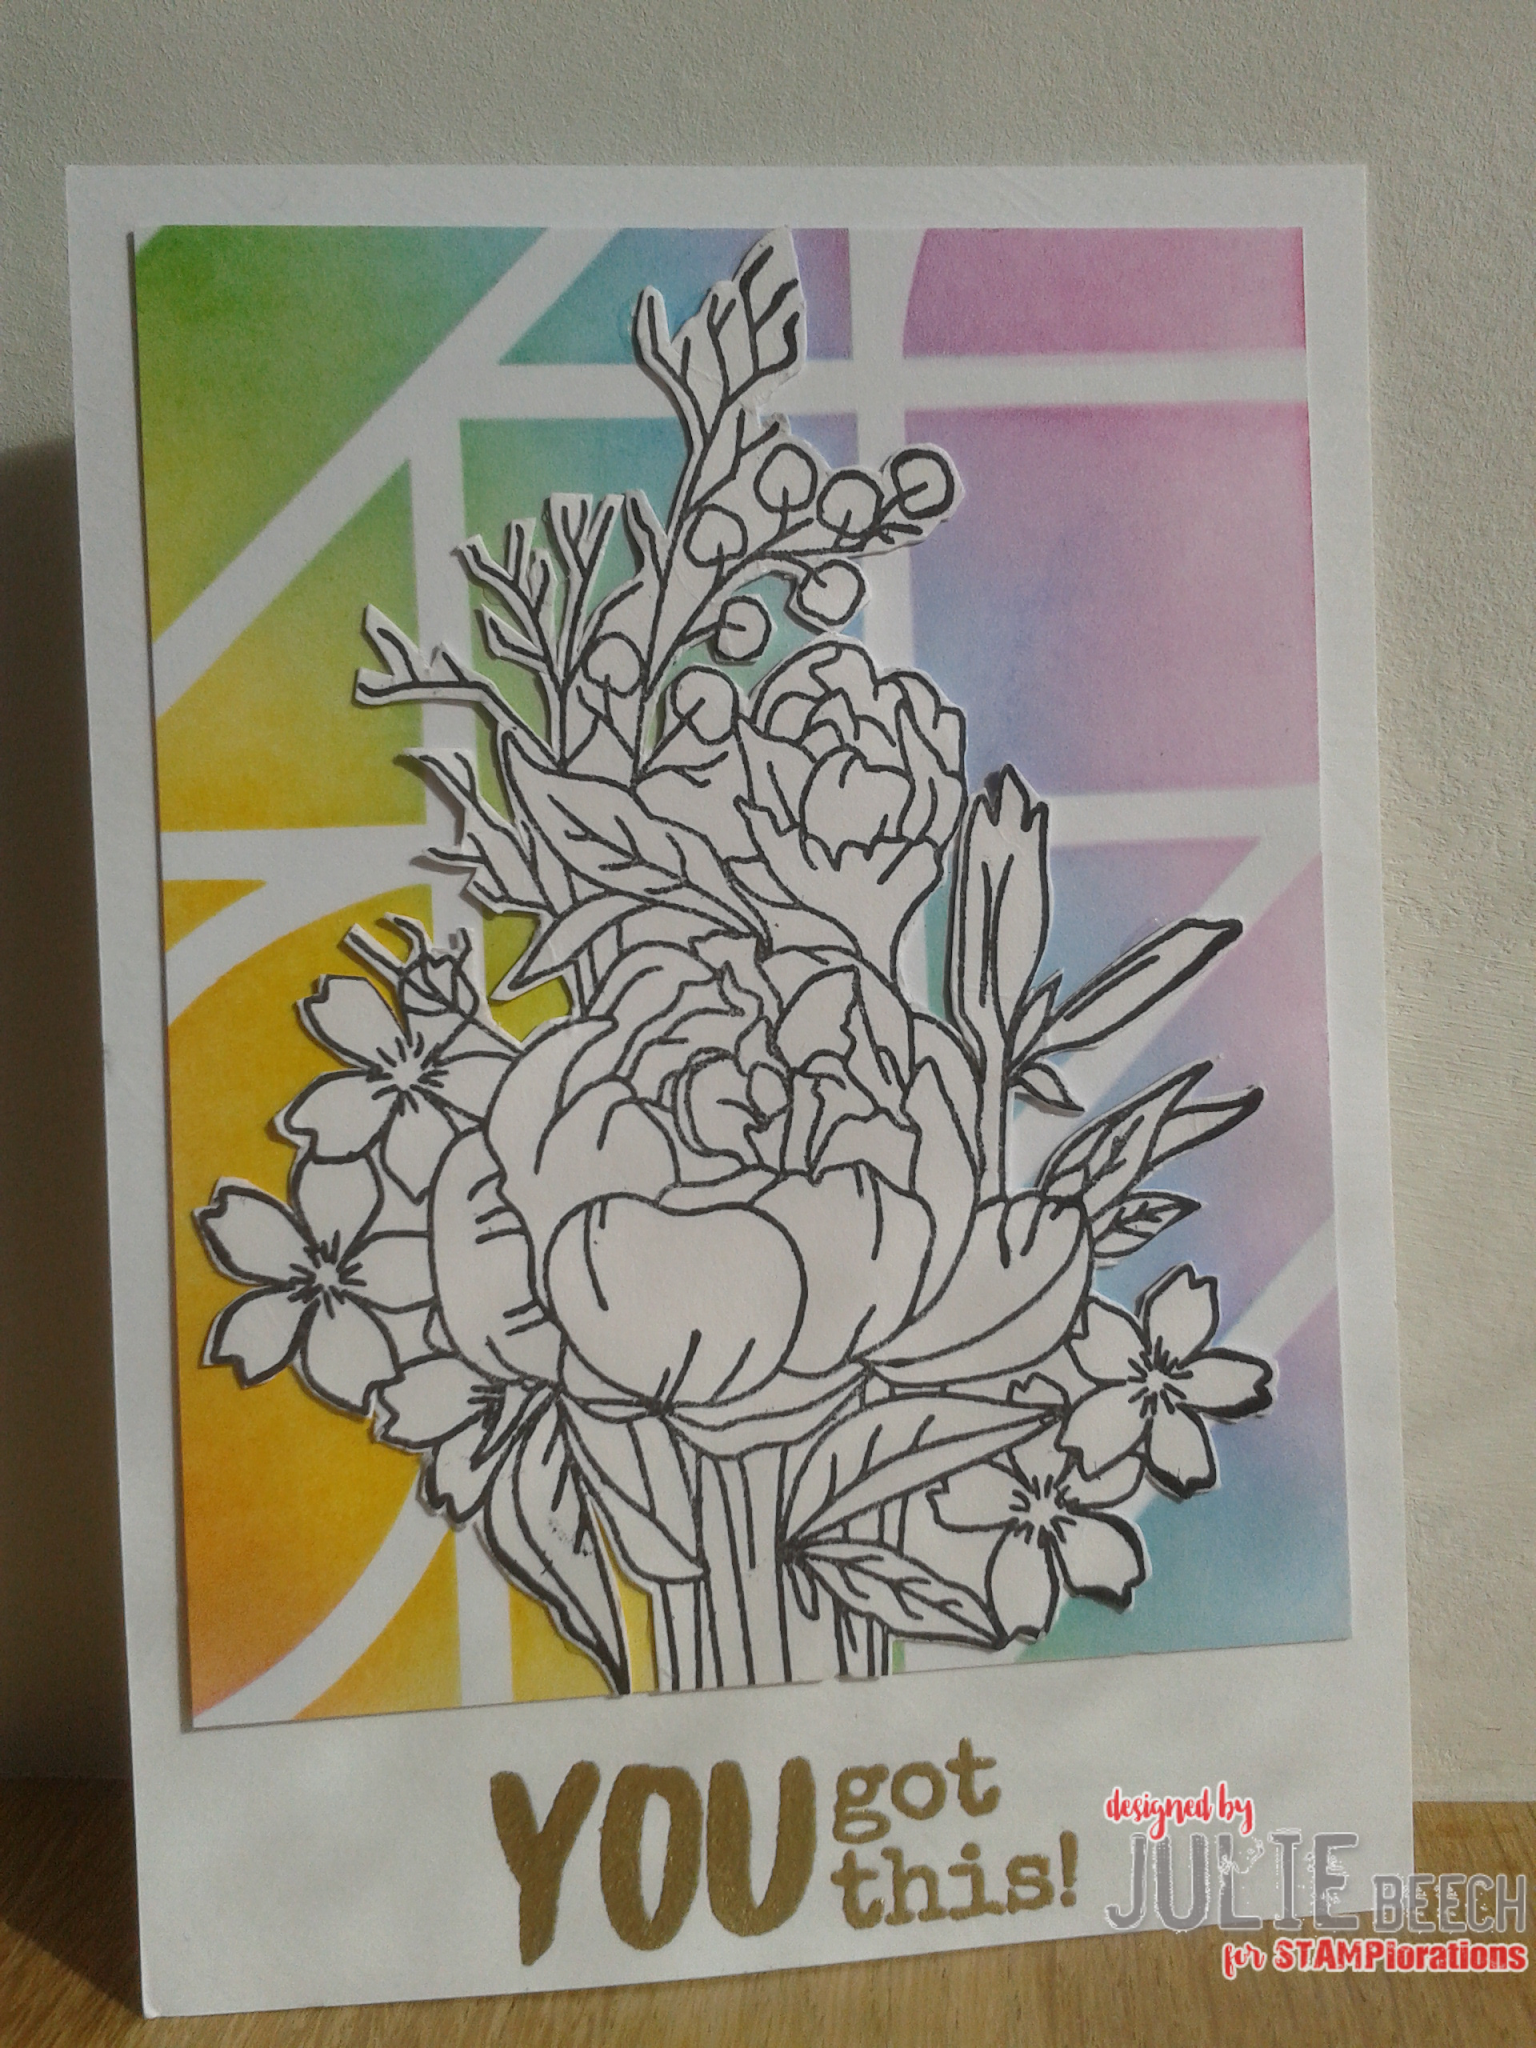
My second card took inspiration from the rainbow wall in the latest Time Out challenge.


After inking my rainbow through the mini Mix Geometrics stencil with DI, I die cut the large English Country Garden butterfly die and popped it up with a second one cut from fun foam. The sentiment strip from Pure Florals - Cosmos was stamped on a die cut banner and embossed with white EP, before adding it across the middle of the butterfly. With all the hot weather we had last week there have been lots of butterflies fluttering around the garden, so I thought it would work well.

Finally, this card also features a butterfly but this time it's the stencil variety. The colours chosen being the latest ones over at JUGS.


To begin, I placed the open butterfly stencil over a piece of white card and inked through with Dried Marigold DI. Removing the stencil revealed a soft, solid, orange image. Carefully laying the detailed stencil over this, I added Picked Raspberry to the outer edges and Candied Apple DI to the center.  Before removing the stencil, I added some Black Soot DI to the body and antennae ends. I love the way the soft orange shows in the fine lines of the butterfly's wings and the way the wings appear to almost shimmer. The body didn't look dark enough, so I added some Zig watercolour pen detail in black as well as the antennae ends.
I decided to have my butterfly flying out of the panel, so I laid my rectangle die over the image and marked where it crossed the wings, then fussy cut towards the center of the image, just enough to allow the die to slip under, then secured with tape and die cut as normal. Once cut, I removed the die and fussy cut the rest of the wings. The sentiment, from Birthday Wishes was stamped in black then embossed with clear EP.
I thought a thin frame of gold glitter paper hi-lighted the orange shimmer of the wings so added it under my butterfly panel, before finally adding it to a black 5 x 7 card base with pads. I was going to add some sequins but in the end left them off.

So for a chance to win some Uniko goodies, leave a comment here then hop along following the links below. If you loose your way just head back to the Uniko blog where you'll also find all the links and the Ts and Cs.
Don't forget to comment along the way, as there will be one lucky winner from those comments left, selected to win ALL the stencils released today. You have until 10pm BST Sunday 27th June 2021 to leave a comment. Winner will be announced on the blog on or around the 28th June 2021.

Jane 
Julie -that's me

Happy hopping


I'd like to join in over at:-


Saturday 19 June 2021

Introducing - Stencil, English Country Garden Bundle

Morning everyone, we're introducing Uniko's English Garden Stencil Bundle today.


The English Country Garden set consists of the 2 outline stencils and a mask that fits into the righthand outline butterfly.
This is another card using embossing paste, this time Ranger opaque white texture paste.
The resultant image is much rougher than the glossy embossing paste I used here, so it is better suited to colouring with pencils or in this case, watercolour markers. I kept the design pretty simple, blending the Zig watercolour brush markers to get the soft look I was after. A blend of purples and blues remind me of one of my favourite Holly Blue butterflies. A simple embossed sentiment from the Simply Said Blocks II completes.

So why not head over to the Uniko blog for more ways to use this fab new stencil, or check out the links below.

Friday 18 June 2021

Introducing -Stencil, Mini Mix Geometrics

Good morning, it's day 2 of the June stencil release from Uniko. This time we are introducing the Mini Mix Geometrics stencil.


For this design, I used some glossy white Dreamweaver embossing paste through the stencil onto black card. It was left to dry overnight and then each shape was coloured in a different colour, except the hexagons, with a Copic marker and trimmed down to be 1/2cm smaller than A6 on all sides. I haven't found a better way of adding bright, intense colour to a dark background than this, so long as you don't mind the odd bit of white showing! I've tried using Versamark and EP but sometimes the EP is not opaque and the colour is dulled, sometimes almost indistinguishable!
On a die cut rectangle of white card, the sentiment from Birthday Wishes was stamped in black ink, then glued over the stencilled panel. The finished panel was then added to a white A6 base card. The colours I've used suggest a masculine card but change the colours and the background and it would work for a female.

Why not head over to the Uniko blog for more ways to use this fab new stencil, or check out the links below.
Jane 
Julie -that's me


I'd like to join in over at:-

Favourite Tip -
Colouring Embossing Paste with Copics to add colour to dark backgrounds
I haven't found a better way of adding bright, intense colour to a dark background than this, so long as you don't mind the odd bit of white showing! I've tried using Versamark and EP but sometimes the EP is not opaque and the colour is dulled, sometimes almost indistinguishable!

Thursday 17 June 2021

Introducing - Stencil Pure Florals Rose

Good morning peeps. It's time to visit one of the brand new stencil designs from Uniko's June release. First off the blocks is this fab mega rose stencil to go with the equally fab Gerbera and Chrysanthemum ones. Here's my take on it.


As it's such a massive bloom, it really doesn't need much else to make a card.
This example was started by inking lightly through the stencil onto white card with Picked Raspberry DI. Once complete, I removed the stencil and went in with matching Zig watercolour brushes to create some dimension. The panel was then cropped when dry and added to an A6 note card, adding a strip of DP from the bits box along with a sliver of embossed silver card from another project that was lurking by the cutter!
My sentiment from Birthday Wishes was stamped in black and heat embossed with clear gloss EP. I find this much better than using black EP as you don't get the little specs of black EP on your project, even with using an anti-static pad!

Why not head over to the Uniko blog for more ways to use this fab new stencil, or check out the links below.
Jane 
Julie -that's me


I'd like to join in over at:-

Wednesday 16 June 2021

Color Hues #20

Good afternoon folks.
We are over halfway through June already so it's time for a new colour combo at Color Hues.
Here's my take on the latest colours.


I saw this video by Jennifer McGuire, where she uses metallic card and embossing folders, I loved the layout of a couple of her cards and ran with it. I also felt sympathy for her as she, like me has been suffering with a bad back. I hope she is better, 'cos mine is still a little twingey and it's over 2 weeks since I pulled a muscle in my lower back doing something and nothing but don't know exactly what! It's kept me from doing any heavy lifting and sitting for any length of time was excruciating. Anyway I appear to be on the mend, fingers crossed.
Still on my crusade to use my stash of card, I found some black semi gloss card and embossed it with a rose EF, not sure of the make as there is no mark on it. From a scrap of Aqua coloured satin finish card, I cut my foliage out using Memory Box's Fresh Foliage, I certainly have had my money's worth from this die! The white panel was cut from scrap using an MFT pierced rectangle die.
Once layered up on a white A6 base card, the sentiment from an MFT set was added and a few Copic coloured pearls in a darker Aqua complete the design.
So I hope you will be inspired by this new colour duo, we'd love to see your take in our gallery at Color Hues.

Stencil Sneak peeks

 Morning all. It's time for a few sneak peeks of the new June release at Uniko.

Bev has designed some fab new stencils for you to extend the use of your stamps!

Here they are!!


Pop back tomorrow for the first of the Stencil introductions by the Uniko team.

Tuesday 15 June 2021

STAMPlorations, a reminder

Good afternoon, we are half way through June s so it's time to remind you that there is still plenty of time for you to join in at STAMPlorations Theme and Photo Prompt Challenge. Here's my card based on this months theme and photo.


I went with the image of watercolour pans again but this time used the theme of two colours, this time green and blue.
To begin I took a panel of watercolour paper, and over laid the Placid stencil, traced the shapes onto the card with a pale green fine liner pen and filled in the shapes with various colours of blue and green to create a watery feel. I used Zig watercolour brushes but you could just as easily have used DI or regular watercolours, I'm a bit lazy about getting my watercolour pans out!
On a scrap of white card, I stamped the flower spray from Bloomfully: Kindness and just coloured in the leaves, using some of the same greens as the background, then fussy cut it and popped it up over the background on pads. Using the Happy Birthday from Balloons and Banners, I stamped a black banner strip and heat embossed with gold EP.
That's about it from me but for more inspiration and for all the Ts and Cs please check out the STAMPlorations blog here, then what are you waiting for?

Best Buddies

 Good morning, it's time for a brand new challenge over at Cardz4Guyz. This time our theme is:-

DOGS and/or PUPPIES

Here's my take using this cute MFT little boy and his pups.


I'm still trying very hard to use up all my scrap bits, so the little boy and pup were stamped on a scrap, coloured with Copics and then fussy cut. The small panel was languishing in my stash but the large panel and card base were made from a panel of A4 white linen effect card.
I added a little bit of colour with blending brushes to the small panel, for the main image to stand against before adding the fussy cut elements. On my background panel, cut using a MFT stitched rectangle die, I stamped some paw prints going diagonally, using an old freebie stamp in Altenew's Silver Stone and then added it to the base card. My sentiment strip is another MFT die but the sentiment is Uniko.
So where will our theme take you? We'd love to see your designs in the Cardz4Guyz gallery.

I'd like to join in over at:-

CAS or Fully Fancy
CAS, it has to be every time, loads of embellishments are far too fussy for my tastes, it's also the perfect way to go for masculine designs. With a CAS style it makes you work harder to get a design that works without all the added extras! Once you have the idea for a CAS card nailed down there is something rather satisfying about it. 

Monday 14 June 2021

Clara Corner

Good evening and welcome to a post to announce the start of a new challenge over at Perfectly CAS.

Have you ever seen something either online or in a shop, that you love and think you have a use for but when you get it home it just doesn't quite work, well this is what happened years ago when I bought this Clara Corner die by Poppystamps. Full of great ideas and none of them came to anything. Looking around on t'internet didn't help either, obviously other people had had the same mental block when it came to it's use it as I had done. I came up with TWO examples and it looks like it's now discontinued as it's not on the Poppystamps web page either.
Well not willing to be defeated and with the latest PCAS theme in mind, I produced this card.


I die cut the corner of an A6 white card panel with my Clara Corner, then using my silicone mat, embossed it to give some extra interest and dimension but keeping the design CAS. I trimmed the die cut panel down to give me a 5cm border all around the finished card and stamped my sentiment (a magazine freebie) in Altenew Industrial Diamond to match my base card, made from some charcoal sparkly card, and popped up my trimmed down panel on pads over the top.
SIMPLES!
So where will the cue word take you? We'd love to see, but don't forget to keep it CAS!

I'm joining in over at:-

No twist


Flowers


Friday 4 June 2021

Uniko challenge, reminder

 Good morning folks, time to remind you that there is still time to join in over at Uniko for our Anything Goes, optional twist of dies, challenge. Here's my take using a few Uniko Goodies.


I took inspiration from a card I made at the start of my time at Uniko here,  I love the contrast of the black oval with the white embossed sentiment with the soft hint of green in the stencilling. I think it has a definite air of sunny days, just like we had for the Bank Holiday when I made it, and how unusual is that here in the UK?
For this take, I started by stencilling over the front of my white base card with Twisted Citron DI with the Mid Century Modern Squares stencil, letting the colour fade out towards the edges. Then, on a die cut black oval, I stamped and embossed with white EP, the fab sentiment from Birthday Wishes. The die cut elements come from Originally Organic Additions stamps and dies and I used the mirror stamping technique to get the foliage element to face the opposite way, just like my original card. I tend to die cut the shapes then use a homemade jig in my MISTI to stamp them before colouring with Copics.
Arranging the blooms into a pleasing form I added them to my black oval and the adhered it all over the stencilling.
So for more fab inspiration from the rest of the team and our GD Elaine, Please check out the Uniko blog here. You'll also find all the Ts and Cs there too.
Happy crafting!

Joining in over at:-