Showing posts with label Christmas Sentiments. Show all posts

Saturday, 26 July 2025

Introducing Stencil - Layering Christmas Bauhaus Blocks

 Good morning, today we start the introductions for the Christmas in July release from Uniko. Today we are focusing on a fabulous stencil that will pair well with the previously released Bauhaus stencils or just on it's own as I have done here.

My first idea shows what you can do if you cut up the squares and rearrange them into your own pattern.


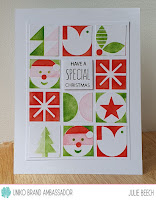
When I first got the stencils, there are 3 parts to this one, I covered an A5 panel of white card by inking with the stencil. Each layer was a different colour, I used Mowed Lawn, Candied Apple and Worn Lipstick DI, but I masked off some elements to change up the design, leaving the bird and parcel ties white and the 2nd half of the tree a pale shade of green. From the finished panel I cut a couple of 3 x 3 squares and then cut up the rest into 1 inch squares.
On a panel of white card, I assembled the inchies along with a die cut white panel stamped with the greeting. The white panel was then cut down and added to an A6 base card.

This second card uses one of the 3 x 3 squares I mentioned above, mounted on matching green and red card and then onto a small, square, white, base card.


I've kept the design clear of any sentiment, it's quite obvious that it's a Christmas card!
The other square and inchies I will keep for use later.

What do you think? For more ideas about how to use this fab new stencil set check out the BAs and Bev below.

 Anita


See you back here tomorrow for more Christmas in July fun.


Joining in over at:-


Tuesday, 1 July 2025

Color Hues #113

Afternoon all. A new month has begun, so it's time for a new challenge at Color Hues but it's also Christmas in July over at Uniko! What says Christmas more than a Christmas sweater?


The Color Hues pairing chosen by Tracey had me reaching for the Background Builders Christmas 2018 set to create a fun sweater!

I simply stamped and embossed in white, 3 of the Scandinavian star strips and bookended them with the diagonal stripe one. I cut away the neck opening with a circle die and cut a welt with two more circle dies from the leftovers, trimming the panel down to reveal a white border when added to my white base card. I finished it off with a simple sentiment from Uniko's Christmas Sentiments.

So what will the new colours inspire you to create? Looking forward to seeing your makes in the Color Hues gallery. For more red and white inspiration why not check out the rest of the team and our GD here?


Tuesday, 31 December 2024

Uniko January 2025 Release - Introducing - Layering Picked Posies Stencil

Good morning. 
As promised today sees the introduction of the first of Uniko's January 2025 release.
This new stencil is based on the Craft Stash release of a year ago but in stencil format.
Here's my first card idea channeling an idea I saw on Pinterest here.


I used the 4 part stencil to create a panel on a piece of A5 white card, before cutting out part of the panel with a rectangle die. I'll use the leftovers for another card. Using the blending brushes I'd used for the inking part, I carefully added a soft layer of the same colour over each element.
Next I stamped Happy from Christmas Sentiment in black followed by birthday from the Birthday Sentiments set. Using a white gel pen, I traced around the letters with a steady hand to make the black letters pop against the soft background. My completed panel was then popped up on pads onto an A6 top fold card base.

This next card used the Black Magic technique of white pigment ink on black followed by colour.


To start I used the four stencils to create a white on black image and left it to dry completely overnight. I then repeated the process using coloured inks. I trimmed the panel to leave a border on my A6 white base card and added a sentiment panel from my stash made using Doodle Flowers. I always make a batch of these whilst the stamps are in my MISTI, saves a lot of time. The hi lights on the flower centers didn't show up too well so used a gel pen over the top.

So two different looks using the same stencil but why not check out what ideas the rest of the team have come up with.  

Bev

Izzy

Julie -that's me


See you back here same time tomorrow for another introduction!

Joining in over at:-


Friday, 15 November 2024

Uniko Poinsettia

Morning all. I'm back with another of my inspiration cards for Sparkles. This month we are looking for your makes on the theme of -

CHRISTMAS FLORALS

When I read this I knew exactly which stamp I was going to use, the fab Uniko Pure Florals - Poinsettia. I was unsure about what design I would use until I caught a You Tube video by Michelle Short CASEing Therese Calvird and the rest as they say is history!


In the video, Michelle used some pretty marbled DP but I Didn't have any, so decided to make my own using alcohol ink and Yupo paper, I used what inks I had including Valencia, Flamingo, Dandelion and Coral, with a little bit of gold foiling.
The rest was pretty simple, two large images, black on white, fussy cut and mounted over the inky panel. The Uniko stamped sentiment was embossed with gold EP on black card before being fussy cut. The sentiment was popped up with foam tape and some silver crystals coloured with yellow Copic marker were added to the centers to complete.
That's it, a really simple make, even easier if you have some suitable DP!
For more inspiration please check out the rest of the Sparkles team and then why not join in?

Joining over at:-

Christmas

Sunday, 3 November 2024

It's Beginning To Look Like... Uniko October/November Reveal, Release, Brand Ambassador Blog Hop & GIVEAWAY!

Good morning, time for a few more ideas using the stamps from the new release which are available on the Uniko page now.

My first card is simply another way to use the Framed Fairy Lights.


Once the lights were stamped with Versamark and heat embossed with white EP, I added dark blue watercolour to the background and coloured the lights with Zig markers. The panel was trimmed to the edge of the embossed frame and added to a note card, a simple white embossed sentiment from the set completes.

My second card uses the BB Snow Flurry and Christmas Pop stamp sets to create this little scene.


The Trees were stamped with Versamark and heat embossed with white EP before cutting out, the snow flurry was simply stamped in dark blue ink and cut to leave a small border. A small panel of matching white card was scored using a scoreboard and added to the Snow Flurry panel and the trees added on top. The sentiment from Peace on Earth was with Versamark and Silver EP.


This next card was inspired by a comment my daughter made when she was over about it being the lines of a carol so why not include some music in the design.


On a panel of white card I stamped the JOY from Big n Bold with Versamark and heat embossed with gold EP. I then added the text and music in black and a couple of holly sprigs for added festive charm. I hope I haven't infringed any copyrights with my stamped snippet of score!!

My final card uses that fab poinsettia stamp. 


I have to admit that this should have been used in a card earlier this week but life got in the way as well as an inky splat on the OLC I was making!! Anyway I decided I had spent too much effort on colouring it to not make a card and while pondering what to do I came across the Case a DT member at JUGS. When I saw Elizabeth's card I knew I could use my poinsettia!
I used the same orientation as her card, the circle aperture, the floral motif, red and green colours along with gold embossing on the flowers but put my own spin on it.
I stamped the poinsettia with  Altenew Silver Stone ink first as I wanted to colour it with Copic markers and they don't mix well with EP, so I left the stamp in my MISTI whilst I coloured it.
Once coloured, I placed it back into the MISTI and stamped over it with Versamark and embossed with gold EP and fussy cut it out, that got rid of the red inky splodge!
The top panel I had in my stash and I used the Festive Foliage stencil to emboss a panel to put behind the opening. The Merry, instead of a die cut, was stamped, embossed with gold EP and fussy cut and the Christmas part stamped onto the embossed panel. 
My fussy cut poinsettia was added to the aperture so that a few sepals were hanging over the edge and then the whole panel was added onto a base card with foam tape. I know the original card had layers of die cuts to give dimension but you can't do that with fussy cutting so easily, the foam pads have the same effect.

So that's all from me but please check out the rest of the team to see what they've been up to. Don't forget to leave some love along the way for a chance to win the entire release!!! The winner will be announced on November 11th 2024.

So what do you think about the new release? Looking forward to seeing what you all think in the comments!

Joining in over at:-


Friday, 1 November 2024

It's Beginning To Look Like... Introducing Uniko's BIG & BOLD Joy

Morning all. It's the penultimate day of the new release introductions from Uniko.
Today we are introducing another in the Big n Bold series, Big n Bold Joy.
Here's my first idea using this set.


Using the sketch from The Paper Players, I started by embossing a panel of white card with my Winter Foliage stencil. This was then cut in 2 and added to my base card, as per the sketch. On a circle of matching white card, I stamped the JOY with Versamark and heat embossed with gold EP before stamping the small leaflet repeatedly to create a wreath. A few red berries were then added with a stamp from BB Vines Winter Additions.
On a strip of black card, I stamped the To the World with Versamark and heat embossed with gold EP, adding it to the joy wreath. Finally using the Peace on Earth set, I stamped a further sentiment. 

My next card mixes Christmas Pop, In the Forest stencil, Big n Bold Joy and Christmas Sentiments.


On a panel of white card, I started by adding some lime green trees in a grid using the small tree from Christmas Pop, I then added more, firstly with a dark green, then a mid tone green. I wasn't completely satisfied so used a small section of the stencil to fill in the gaps. I centered the similar shaped stencil tree over the palest tree in each group, before softly inking through with Twisted Citron DI, moving the masked stencil until I was satisfied with the coverage.
The JOY was stamped in red on some scrap white card and fussy cut before gluing onto my tree panel and the sentiment strip was stamped with part of the Wishing You A stamp from Christmas Sentiments and then embossed with  gold EP.

Why not check out what ideas the rest of the team have come up by clicking the links.


Julie -me


So that's it from me for today, see you back here tomorrow for another brand new release from Uniko.

Joining in over at:-


Saturday, 5 October 2024

Uniko Release Day Blog Hop and Giveaway

Good morning, it's time for our Uniko release day blog hop and giveaway!
So here are a few more ideas using this fun stencil release.

First off is this Christmas card I made using the Geometric Christmas Tree stencil set.


On some white card, I inked the tree with Mowed Lawn DI but on the second pass I wiped the stencil clean then replaced it and added some Cosmic Shimmer Aurora Sparkle embossing paste over the top to give my tree a little extra oomph. When dry, I cut up the tree and glued the pieces over a strip of gold mirror card, adding a freehand cut pot and a punched glitter star. The finished tree was then popped up on pads over a white base card to which I had added a stamped sentiment panel from my stash. I make loads at the same time as it takes ages to set them out even in a MISTI!

 Stencil - Ink & Flip Layering Geometric Christmas Tree £8
Copyright Uniko Ltd 2012 - To Date

Next is another piece of my Cobweb panel made using the Cobweb stencil set.


This time I simply added it to an A6 white, side fold card after adding some glitter EP to the back lines in the web.
On some scrap white card, I stamped HAPPY using Alphabet Outlined and filled in with a web effect pattern, fussy cut them out and glued underneath the panel. I stamped birthday in black then drew the spider dropping down from the Y freehand.

Finally another cobweb based card using the same LOTV image as Thursday's card.


For this card my starting point was the panel I made when first trying out the stencil pair. I used some Hickory Smoke DI to ink the background before adding the two cobweb layers to complete the panel.
I had the top panel in my stash from another project, so slipped the cobweb background underneath then added the sentiment by masking off WISHING so that I could write WITCHING and added Happy Birthday. I had this little girl on my desk as I was initially going to use her for my DT post at Color Hues. I simply added her to the front and drew in a few lines to ground her to replace the ones I cut off.

 Stencil - Ink & Flip Layering Cobweb £8
Copyright Uniko Ltd 2012 - To Date
That's it from me but please check out the rest of the team to find out how they've used their new stash!
Don't forget to leave a comment for a chance to win a prize!


Julie -
me


Make sure you've commented along the hop as Bev will be giving away 3 Ink & Flip Stencils of the winners choice. Comments will close for the chance to win at midnight Sunday 13th October 2024 with the winner announced on Monday 14th October 2024. Any comments left after this time will not be included.

Joining in over at:-

Thursday, 3 October 2024

Introducing the new Ink n Flip Layering Cobweb stencil set

Morning all.
I'm so excited to reveal the first of the new Ink n Flip stencil sets, Cobweb.
Here are a couple of ideas using bits n bobs from my stash as well.

This is my first idea using the web part of the stencil.


I took an A5 panel of black card and went mad adding cobwebs all over it with Hero Arts Unicorn White ink! Then I filled in the gaps with a light covering of the white ink. Spiders are a real problem here in the countryside and I am forever evicting them and removing their webs from windows and doorways. This year seems the worst ever, so webs are very common, in fact the other day I opened the blind in the kitchen window to reveal a huge web complete with giant spider, across the outside of the glass shimmering with dew. They are beautiful and I'm OK with them if they would only stay OUTSIDE!
Anyway as I was looking at the finished panel I thought I would extend the threads from each web and add some extra bits of web with a black fine liner.  I cut an A6 sized panel from the larger one and attached it to an A6 base card. Then, I stamped a large black dot, form MCM Floral on some scrap white card and added some legs before fussy cutting it and adding googly eyes. The BOO was cut from white card using an alphabet die set. 

I had plenty of 'web' back ground left over, so added a narrow panel to some purple card to create a background for this LOTV image coloured with Copics and fussy cut.


This time my sentiment was made by stamping FABULOUS from You Are, Yes You and cutting away the BU section, replacing it with die cut BOO. The rest of the sentiment was made up various Uniko sets, Christmas and Birthday Sentiments.

So what do you think?
That's all for now from me but please check out the rest of the team to see what they've been up to.


Julie -me


See you back here same time tomorrow for another stencil intro.

Tuesday, 1 October 2024

Flippin' Seasonal Fun at Uniko Day 2, Snowflake Revisit

Good morning, over at Uniko we are continuing our Ink n Flip revisit with a new look at Snowflake.
Here are a couple of ideas I came up with.

Firstly I used a similar technique to the Christmas Star card from yesterday but used a stamp this time.


On a panel of white card, I stamped the BB Falling snow stamp over it with Hero Arts Unicorn White ink, then when completely dry inked lightly over both sides of the stencil with Salty Ocean DI to create the snowflake.
The panel was then trimmed down, added to a top fold A6 card, a strip of holographic card and sentiment complete.

This second card uses the Framed Snowflakes and I repeated the technique.


This time I trimmed away the excess and mounted the stencilled panel onto silver card and then onto a side fold blue card. I found a die cut snowflake in my stash and added it to the center before my sentiment, stamped in black on a strip of white card.

For more fab ideas why not pop along to see what the rest of the team have been up to.


I'll be back tomorrow with a sneak peek at the new release.

Wednesday, 6 December 2023

Introducing Uniko Background Blocks Perspective

 Good morning. It's day 2 of the latest release introductions from Uniko. Here's my idea using the new BB Perspective.


This is basically a lesson in single point perspective and I often used to use the idea to create some fun lettering. Here I've stamped the image then coloured each section with pencil crayons in festive colours.
A simple sentiment from my stash, I create lots whilst I've got the stamps in my Misti, mounted on gold and a couple of die cut holly sprigs coloured with Copics complete.

My second card uses the same stamp but I stamped it twice, rotating it 90' so that the centers matched.


I drew in some extra lines to each shape obeying the single point perspective, then coloured using Copics in a rainbow of colours. The outline letters, create a simple sentiment.

That's all for today but I'll be back tomorrow with our final introduction before Release Day.

Friday, 4 August 2023

Introducing… Background Block Art Deco Christmas and Everyday Family

Morning and welcome to another introduction for the latest release at Uniko. Today we are focusing on the Art Deco inspired Christmas block and the add on stamp set of sentiments that will enable you where ever you live in the world to personalise your sentiments.

The Art Deco Christmas Block reminds me of stained glass windows, so here I've tried the cheats version of a stained glass panel.


The block was stamped onto card, then coloured with Zig Markers. The whole panel was then covered in Versamark and clear EP added and heated. This was repeated a couple of times to get the coverage before I went in again and stamped the block in black and heat embossed with clear EP.
Once dry, I trimmed it down and finished the edges with a blue black Copic marker and mounted it onto a black base card. The sentiment from Christmas Sentiments was added on a matching strip of black, after embossing with silver EP.

This next card is based on a card I made many years ago when I first started card making.


I stamped a scrap of dark red card with a selection of stamps including the new Everyday Family, the ones referring particularly to Dad and embossed with gold EP. 
On some scrap white card, I stamped a pattern using the tree from MCM Christmas in red and green. After cutting out an isosceles triangle from the stamped card, I then cut across it to make 6 panels.
To assemble, I added the sentiments to a white base card and added a strip of gold linen textured card, then the cut up tree on pads. A fussy cut pot and punched star from some ancient green holographic card in my stash, were added to complete.
So what do you think? Why not check out the other BAs for even more inspiration. See you back same time tomorrow for the final into.

Thursday, 3 August 2023

Introducing… Ink & Flip Stencil Christmas Star

Morning all, time for a look at the stencil in this weeks introductions over at Uniko.
Here's an idea I came up with.


When you first open it up the stencil is nothing special BUT flip and turn it and you can create this fab star focal point.
This panel was inked once with Salty Ocean DI and then the stencil wiped and flipped over and inked again to reveal the white star in the center! I jazzed the outline up using some of the stamps from Stunning Snowflakes set with more DI and added another circular sentiment made from Doodle Flower and Christmas Sentiments. Think I went a little mad with the snowflake/star confetti!

Check out what the rest of the team have be up to here and I'll see you back here tomorrow for another introduction!

Wednesday, 2 August 2023

Introducing… Mid Century Modern Christmas

Good morning and welcome to the second of the introduction days at Uniko. Today we focus on another Christmas one with a retro vibe.
My first card uses MCM Christmas to create this CAS design.


In keeping with the theme of a MCM, I kept to a retro colour scheme, stamping the tree with a pale ink and colouring with a selection of Copics. The trunk and star were added and the panel placed onto an A6 base card. The sentiment from Christmas Sentiments added with gold EP.

Check out what the rest of the team have made with the set and I'll be back tomorrow with another introduction.

Tuesday, 1 August 2023

Introducing… Mid Century Modern Wreath Builder

Morning Uniko fans, happy Yorkshire Day and welcome to the first introduction of the new August release. It's all about Christmas with this release so time to get ahead with your Christmas makes with this new stash!

Today we are starting the ball rolling with the fab MCM Wreath Builder stamp set. Here is my first take on the new set.


I've combined the outline and solid wreath stamps for a funky take on a wreath along with a sprig of holly and a circular sentiment.
I stamped the outline wreath with Versamark on an A6 white base card and embossed with gold EP, then stamped the solid wreath to fill in the gaps, more or less. The sentiment was one of my go to ones made up from Doodle Flower and Christmas Sentiments elements. Die cut with a small circle die and mounted on a slightly larger gold mirror card one. A couple of the small holly leaves were stamped and fussy cut along with the small berry cluster and placed alongside the sentiment.

Here's another idea just using the solid wreath stamp.


This is my second go with this card but a couple of splodges sent the first spinning into the waste basket but I did learn from the experience! The second time I started, I stamped the berries first! I know it sounds counter intuitive but my red EP was semi transparent and the green inking showed through! This time I stamped out 5 sets of the small berries from the set in red and again in Versamark before heat embossing with clear. I repeated this step to ensure full coverage.

Then I took the solid wreath stamp and stamped with a mid green, Altenew's Bamboo, carefully removing the ink on the berries with a piece of kitchen paper. The stamp was repositioned and stamped again with Altenew's Moss ink, repeating with the kitchen towel. Finally I rotated the image again and stamped with Altenew's Bamboo and removing the excess ink.
The solid bow from the set was stamped with Versafine and embossed with gold EP and fussy cut. A little bit of shaping and then it was added to my wreath. The completed panel was cut using a die and added to square matching base card.


See what the rest of the team have done with this set and I'll see you back here tomorrow for more introductions.