Tuesday 29 November 2022

Fishing Penguin

Good morning folks. As we head towards the end of the month there's a brand new challenge at Cardz4Guyz. This time our theme is

BIRDS

Now it's up to you but as Christmas is hurtling towards us you may want to consider what I did and turn the theme into a Christmas card. Not Robins or Cardinals but a PENGUIN!


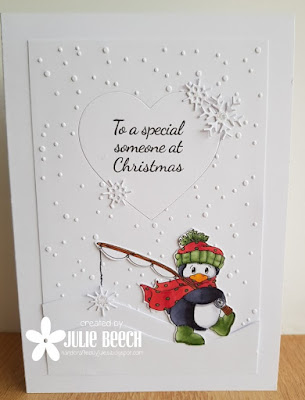
This cutie is from Hobby House crafts and I cut him out from the printed panel to sit him in a snowy landscape after I'd coloured him with Copics. I didn't cut the fishing line with the snowflake but added my own snowflake and doodled line! This will probably end up for my OH as he loves fishing. 
I used a layout I've used a couple of times before, with the die cut stamped heart in the middle of the dry embossed snow background. To ring the changes, I added a few extra snowflakes and a tiny bit of sparkly Stickles to their centers.
So how will you interpret the theme? We'd love to see your take in the gallery at Cardz4Guyz.
There are lots of other masculine bird themed cards on the blog if you need anymore inspiration!

Joining in over at:-

W is for White and/or
X is for Extra Special 

Tuesday 22 November 2022

Simple Watercoloured Trees

 Good morning, I'm up over at Uniko today with a little bit of artsy Christmas card BA inspiration using Christmas Pop Trio stencil and Christmas Pop stamp set.


I've used the simple outline from the stencil to draw the triangle with a soft pencil and some freehand drawn pots to create these little water coloured trees.

Here's a close up of them all, and a link to the Uniko site for all the details on how I made them.


Joining in over at:-


Wednesday 16 November 2022

Color Hues #53

Afternoon folks. Halfway through November already and Christmas is about to sneak up on us but before that we have a brand new colour combo from Color Hues. This time it was my choice and I went with a very festive colour theme. Here's my card using my two colours!


The other week, I had a video pop up in my You Tube feed that inadvertently sent me down a rabbit hole of water coloured goodness. Following a link on my side bar took me to a video about painting berries and foliage for a Christmas card and nothing says scarlet and green more than that! 
The video by Wendy Powell Jones, showed you how to create a cluster of berries and foliage in a loose style, then turn them into cards. So I thought as it was bucketing down with rain last Sunday and feeling the after effects of my flu booster, I would have a play. I did 3 sprays and the one here was the brightest and fit best with the scarlet and green theme.

I drew some small circles freehand to represent my berries on some MM paper and masked them with masking fluid, along with a few splodges to create some open space amongst the foliage. When dry, I got the w/c paints out and mixed up 3 shades of green using Cadmium Yellow and Prussian Blue, a dark, a mid and pale one. I then roughly washed in some foliage shaped areas using a wet in wet technique and left to dry. 

Carefully removing the masking fluid, I added some Cadmium Red to the circles, then some shadow using a hint of Paynes Grey added to my red, careful to leave a spot of paper showing as a hi light. More Paynes Grey was used for the berry stalks and twigs. To add some festive snow, I used some Stampendous chunky white EP scattered over the image and heated from below.
The finished panel was trimmed down and an MFT die cut frame added on foam tape. The sentiment is from a Uniko set, Festive Sentiments. The whole was then glued to a 5 x 5 off white card.

So where will my colours take you? We'd love to see, of course you don't necessarily need to go down the festive route. Why not check out the rest of the DT and our GD for more scarlet and green loveliness?

Tuesday 15 November 2022

Waste Not Want Not!

Good morning, time for a new challenge at Cardz4Guyz. This time our theme is 

THANK YOU CARDS

Here's my take.


For this quick card, I used a leftover panel from an earlier project from my stash, hence the title of the page! My leaf panel uses the embossed resist technique, you can find out the details of the technique here.
I started by taking a piece of A6 dark cream card and stamping a selection of solid leaf stamps and embossing with clear EP, then inking the panel with Scattered Straw DI and when dry added further clear embossed leaves. Next I inked the panel with Spiced Marmalade DI and repeated the embossing. Finally I added some leaves with Memento Morocco ink. It was then time to iron off the embossing to leave the finished panel. The rusty red looks a bit more subdued in the finished panel except around the edges of the orange embossed leaves, not sure why.
The original panel was cut with an MFT stitched rectangle, this left over was glued flat on a cream base card. Thank You was then stamped in Memento Rich Cocoa.

So where will go with this new theme, we'd love to see your takes in the gallery, just don't forget to keep it masculine! Should you need more inspiration there's plenty over on the Cardz4Guyz blog.

Joining in over at:-

#441

Monday 14 November 2022

Brusho and White Embossed Snowflakes

Good evening folks.
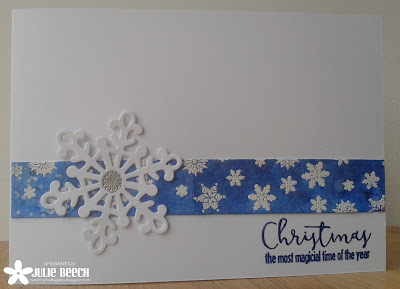
Time for a new challenge over at Perfectly CAS. Here's my take on this month's theme.


I started by making my inky resist panel using an old STAMPlorations snowflake background stamp and stamping several times in Versamark along a strip of white card before embossing with white EP.
I then sprinkled some Prussian Blue Brusho and spritzed with some pearlized water to get the twinkly, mottled effect. It doesn't show very much in the photo but IRL it does! I trimmed it down and added it to an A6 white base card, then stamped my HLS sentiment in blue to match. A die cut snowflake from the stash was added, after I'd added some sparkly, silver EP to the center. Simples.

For more CAS inspired makes, please check out the rest of the DT and then join us in the gallery!

Joining in over at:-

Sparkle

Thursday 3 November 2022

Uniko's Stencil Release Day & GIVEAWAY!

Good morning it's release day over at Uniko. 
Here a few more ideas using the November release stencils.

First off the block is the MOD background Builders.
For this example I've used some more purchases from Ruthin, some WOW foil and WOW Bonding powder.


Don't you just love the sheen, well until you try to take a pic that is, then it's an absolute nightmare!!

The bonding powder is so easy to use, inking through the main part of the stencil with Versamark on black, the bonding powder is added and heated, as with EP, before adding the foil and running through any old laminator. I did try to make a pattern with a mix of rose and plain gold foil, cutting small pieces of the rose gold and then overlaying a larger piece of gold, then running it through a laminator in a piece of A4 copy paper folded as a carrier. You can see where one of the small pieces shifted 'twixt desk and laminator but it still looks so pretty!! The sentiment was done the same except it was first stamped with Versamark. I only bought a couple of colours of foil so may have to hunt out a few more, it is addictive.

My second card uses the Flower Power stencil, concentrating this time on just the leaf elements


After masking off the solid leaves a random selection of leaves were inked with a light covering of Spiced Marmalade, Festive Berries and Vintage Photo DI before inking again with the detail leaf stencil and the same colours. Gaps were filled with dots from the large detail leaf stencil. Another of my Doodle Flower sentiments complete.

My next card uses Large Snowflake #1 and the Large Snowflake die.


Using the Large Snowflake #1 stencil over navy card, I spread white embossing paste and left to dry. I found this silver die cut snowflake in the stash and thought it a great way to amp up the design. I simply added it over the embossed snowflake, followed by a sentiment from Christmas Sentiments on matching navy card.
Finally here's a card using the other Large Snowflake stencil #2.


Simply inked in Altenew's Aqualicious ink over pale turquoise card, then again slightly off with Unicorn pigment ink to create the shadow. A few sequins from the stash and a sentiment from Simply Said Blocks Christmas complete

That's all from me but the rest of the team have come up with some fantastic ways to use these fab new stencils, so why not check them out on their own blogs.
Be sure to leave a comment on all our blogs or social media post as Bev will be randomly selecting one lucky winner to receive all of the stencils being released today. You have until Midnight Wednesday 9th November to leave comments and I will announce the winner Thursday 10th November 2022. 

Wednesday 2 November 2022

Autumn Birthday Wishes

Good evening. The clocks here have gone back so it's a little darker at tea time and finally the trees are colouring up, those that are still on the branches that is!
We start a new month at HLS Birthday with a brand new challenge, as usual it's-

ANYTHING GOES

well so long as it's birthday themed!! Here's my card for your inspiration.


I was inspired by a video on Copic colouring by Marker Geek Elaine, one of the Stamping Bella ladies. I didn't have the stamp she used but I had this one of Uptown Quinn and her Boots. The image was stamped and the background drawn freehand around her. All the colouring was done using Copics, not something I'd done before so I stuck pretty close to the video where I could without copying it. Not to blow my own trumpet but I was fair chuffed with the end result!
The coloured panel was trimmed down and added to a 5 x7 white base card that I had added some brown card strips and some NitWits DP, a Uniko sentiment completes.

We'd love to see your birthday cards in our November gallery, just follow the link. While you're there check out the rest of the team!

Joining in over at:-

#700 Let's Celebrate any Occasion 


Introducing Uniko's... Stencils Large Snowflake #1 and Large Snowflake #2

Morning all, time for another stencil introduction at Uniko, well actually 2 Festive/Winter ones.

First off is this fab Large Snowflake #2 with the matching mask. For my card I've teamed it with a couple of stamp sets that feature snowflakes, Snowflake Serenade and Stunning Snowflakes.

Taking a panel of white card, I stamped the large element from Swirling Snowflakes a couple of times, embossing with white EP. I then filled in some of the gaps with snowflakes from the same set and Stunning Snowflakes and heat embossed those to match. The large snowflake stencil was added over and inked with Altenew's Ultramarine, fading out to Iceberg ink. Placing the mask into the stencil, I then carefully removed the stencil to leave the mask in place and inked with Weathered Wood DI over the top, blending out from the center to reveal the embossed snowflakes. 

The sentiment from Pattern Building Christmas Tree was stamped in Ultramarine too and added along with a few silver sequins. The finished panel was trimmed and added to an A6 base card to leave a slight border.

In my second card I started by inking over the mask of Large Snowflake #1 with Altenew Galactic Stream, blending out to Aqualicious on white card. Placing the stencil over the inked snowflake, I then stamped some more snowflakes from Snowflake Serenade and Stunning Snowflakes in Dew Drops through the opening, except for the central one which I stamped with Galactic Stream.


Again a few sequins and the sentiment from Pattern Building Christmas Tree,stamped in Teal Cave complete the card. Trimmed down again it was added to another A6 base card to leave a slight border.

That's all from me for today but why not check out what the rest of the Brand Ambassadors have been up to? I'll be back tomorrow with the full reveal.

 Anita

Jane

Julie - that's me


I'm joining in over at:-

                                                  Winter

Tuesday 1 November 2022

Color Hues #52

Good afternoon!
It's the 1st of the month so it must be time for a new colour combination over at Color Hues.
This time Hannelie has chosen a cheery one and here's my take.


I had to think about this combination, are we thinking Dijon or English mustard? Well I chose the English, of course!
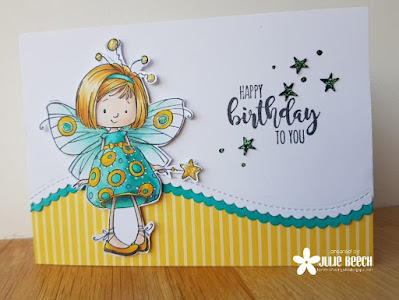
I selected a few different images but finally settled on this Whimsey Stamps Mazarine fairy image that my friend Jane stamped for me before all this lockdown nonsense happened. We both attended one of Faye Wynn Jones Copic colouring classes way back in March 2019, Jane bought a few stamps as did I and we swapped a few stamped images of our purchases. I have been keeping them for the right occasion but decided I better use at least one of the cute Mazarine fairy images.

To start, I looked through my stash to find some turquoise and mustard DPs, one digi from NitWits I thought would do wasn't right but I did find this really ancient piece of mustard yellow self stripe. I think it's from Papermania and dates from my early days of crafting, back in the late noughties!
So I chose the Copics to match and coloured the fairy before adding some Crystal Stickles, to her wand and antennae. After fussy cutting, I put her to one side and concentrated on the card base. 

Using an MFT die I cut my top panel from white card, then using the left over cut another which I coloured using the darkest of my turquoise Copics. This is a great way to incorporate the same colour into your design without the hassle of finding matching card. On the white die cut panel I stamped the Uniko sentiment to one side, adding a few black, punched stars and hand doodled dots and slipped the coloured die cut under the bottom edge. I added some more of the Crystal Stickles to the stars and dots, it has a turquoise look on dark card that doesn't show up on lighter backgrounds. The mustard DP was added to my base card and the finished panel added on top, my fairy was then attached with foam pads.

So where will these colours take you? There's lots of inspiration over on the blog from the DT and our lovely GD for you to feast on.
Looking forward to seeing you in our gallery.

Joining in over at:-

Add some doodles

Uniko Introducing... Stencil Flower Power #6

Good morning again, a busy day here on my blog. I've another new stencil to introduce you to from Uniko. This time it's a floral one, Flower Power #6 stencil and masks. For my card I've only used three of the stencil parts to create an all over design.


To start I masked off the rest of the stencil except the small outline flower. I then inked through onto a panel of white card with a soft layer of Mustard Seed and Pink Flamingo DI, scattering the blooms across the panel. Next I masked off all but the small detail flower and repeated using more pressure this time. To get the  leaves in place I used the small flower mask and the small leaf stencil with some Mown Lawn DI.
My sentiment was one I had left over from an earlier make using the sentiments from Doodle Flower, double mounted on white and matching grey. I like to stamp a few sentiments at once when there are multiple stamps in them, it's just so easy in the MISTI when you have them set up!

That's all from me for today but why not check out what the rest of the Brand Ambassadors have been up to? I'll be back tomorrow with another stencil introduction.
 Anita

Jane

Julie - that's me


Recollection

Good morning.
The 1st of the month and a new challenge at Cardz4Guyz. This is the month of remembrance, with Armistice Day and Remembrance Sunday in a just over a week, so Caz has chosen the theme of -

REMEMBERANCE and/or POPPIES

Here is my take using Penny Black's Recollection die and a STAMPlorations sentiment.


I do love a poppy image and my friend Loll was kind enough to gift me this, along with a beautiful card she made with it, now sitting on my shelf as I type. It was such a kind gesture and I have been saving it up for just this challenge!
It doesn't have a leaf die to go with the flower, so I used an MFT leaf die that looked a bit like a poppy leaf. Each element was cut from MM paper and coloured with DI in a watercolour method, before inking over each part again with a brush blender. I also crinkled up the petals to give it a little bit of added dimension before sticking to a die cut panel, smooshed in Stormy Sky and Salty Ocean DI.
The sentiment was stamped in Memento Paris Dusk and the completed panel was added to an A6 top fold card with pads.

For more inspiration please check out the rest of the DT here. We'd love it if you joined in this week too.

Joining in over at:-