Tuesday 28 June 2022

Anyone For Cricket?

Good morning. I've heard from a blog friend that they have been unable to leave a comment on this blog. I'm not sure why as all the settings are as before but if you have tried like Sarah and been unable I do apologise and can only blame Blogger!!!

Anyway it's time for a new challenge over at Cardz4Guyz and this time our theme is:-

SUMMER

There are lots of things which suggest summer, tennis, it is the start of Wimbledon fortnight, sun, sea or sand but I went with the theme of cricket. Nothing says summer in the UK more than cricket. I've spent many a summer evening taking my son to cricket matches along with his mates. A car full of spotty teens with all their kit, driving off to some quiet village cricket ground, not sure why they piled into mine, perhaps it was my music choices! The sun wasn't always shining and sometimes we got there only to turn around and come straight home because of a heavy downpour. You could also find me on the sidelines with a score book, often huddled in many layers to keep out the chill!
He doesn't play these days but he tries to get to as many Headingly Test and other 1st class and one day matches as work and family allow.
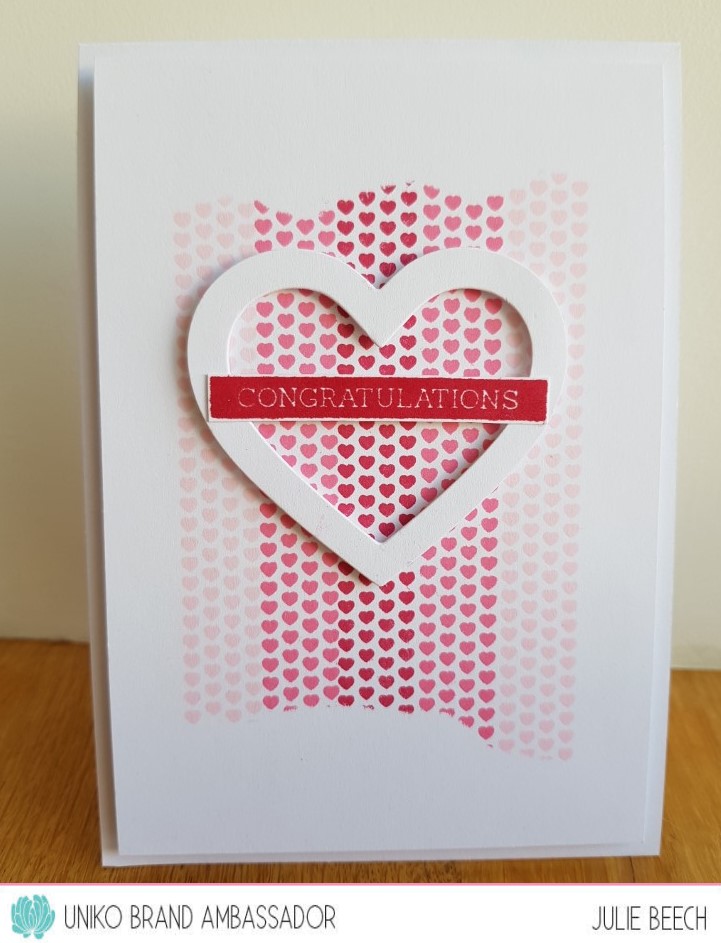
So here is my take using one of my earliest LOTV images.


After colouring with Copics and fussy cutting, he was arranged onto some punched grass and NitWits DP, framed with a simple frame matted on blue. I added a cricket ball made from a circle of dark red card with some white fine liner detail. The sentiment is from Magnolia, I think, it's from so long ago I can't remember!! Mounted on a die cut piece of yellow satin card, I added a smaller 'cricket ball' to cover the central flower.

So where will the summer theme take you? We'd love to see your takes in the gallery. There's more inspiration over at Cardz4Guyz.

Joining in over at:-


Masculine or Feminine
Has to be masculine. Although I love making girlie cards, I have far too many males in the family to make for and masculine cards also suit my CAS style. I agree with Squirrel that you can give a masculine card impact without embellishments!

Make it Masculine

Friday 24 June 2022

More Uniko BA Inspiration For The June Release

Morning all. 
Today I'm over on the Uniko blog with some more Brand Ambassador inspiration using some of the recent new release. I had so many ideas that I just had to share a few more of my makes. All the details can be found over on the Uniko blog.


See you over at Uniko!!

Monday 20 June 2022

Christmas Wreath

Good afternoon, just popping by with this cute Christmas card inspired by the team at CAS Christmas where their current theme is wreath, it's so good to have them back don't you think? The stamp was a freebie in a magazine a few years ago based on the Margaret Sherry images. 


After stamping and colouring these cheeky mice  with Copic markers, I fussy cut them and mounted the wreath on pads. The sentiment is from Uniko's Christmas Wishes. A quick card for my Christmas stash which isn't as large as it should be by now!
The sun is out today but not hitting the heights of last Thursday and Friday, it was impossible to do anything without breaking out in a complete lather! Even the dog couldn't cope and he always seeks out the sun, must be the Chihuahua in him.
Bye for now.

Joining in over at:-


L is for little

Thursday 16 June 2022

Color Hues #43

Good afternoon, are we really over halfway into June already? Well we must be because we've a brand new colour combo from Color Hues. It was my choice this time and I went with this.


This card uses another of the fab Lili of the Valley digi stamps called Teeing Off, perfect for the golfer in your family. I made this for my Son awhile ago, don't think he'll have been allowed to play too much recently though, as they have a new small person to look after in the form of our new Granddaughter!

After colouring with Copics and fussy cutting I put him to one side and created the background for him to stand in. The backing clouds is a DP from NitWits with some die cut grass in front. The cloud, cut from white using an MFT die created the ideal spot to place my die cut and stamped sentiment. All this was added to a 5" x 7" base card. My little golfer was then added and the tee slipped between the two layers of die cut grass. The digi doesn't have a golf ball, so I added one made by embossing a small circle of white card with a Swiss dot EF and shading with a Copic marker.

So where will the colours take you? I'd love to see what you do with them in the Color Hues gallery.
As always there's plenty of blue and green inspiration from the rest of the DT and our GD on the Color Hues blog.

Joining in over at:-

My little golfer is a digi as is the DP

Just has to be Copic Colouring and fussy cutting!

Masculine

Tuesday 14 June 2022

A 99 or Plain Vanilla?

Evening all.
Almost the middle of the month so its time for a new challenge over at Perfectly CAS.
For the latest cue, I thought I would use this cute Anita Jerram stamp from Colorado Craft, the mouse looks like he's enjoying his 99 cone.  When I was living at home, a 99 was the height of sophistication, normally it was just plain vanilla. Chris in his ice cream van would pull up on the street after Sunday lunch and off we'd go with a glass bowl to fill up with vanilla ice cream, come back, share out the spoils, then sit down with a dish of it to enjoy the Sunday afternoon film matinee, unless of course Dad had already seen it, which seemed to be quite often! I did wonder how he'd seen all those movies but apparently there wasn't a lot to do other than watch films on his time off from RAF Kidwelly in the late 40's! 
Anyway, here's my card.


To find out exactly how big a quarter of my card was, I cut an A6 panel of copy paper and folded it in 1/2 and 1/2 again, then cut out one of the sections. To make sure the image fit in my rectangle template, I placed it on the scrap then drew around the scrap on my A6 panel of Copic card with a pencil. I then stamped the image and rubbed out the pencil lines and proceeded to colour the scene with Copics.
The scene I created suggests a hot summer's day, hopefully we'll get some soon! Finally the sentiment was stamped in Memento Tuxedo Black.
I chose to fold my template into a rectangle but you could fold it along the length to create a 1/4 or along the width, it's all up to you, just make sure you only use 1/4! If you have other ideas about the cue card we'd love to see those too. More CAS inspiration can be found on the Perfectly CAS blog.

Joining in over at:-

Any stamped image

Father's Day

Good morning.
Have you made your Father's Day cards yet? Sadly mine is no longer with us but I usually make some for the older Grandkids to give their Dad.
The eldest is turning into a mumbling teen so my usual cute style wont cut it, so this year I've made a more adult looking card and it just so happens that it's the theme of this weeks Cardz4Guyz challenge:-

FATHER'S DAY

I chose his Dad's footy team colours as a starting point and was inspired by a Jennifer McGuire video here.


Instead of the hearts, I went with stars and stamped my red panel with a selection of sentiments with a red ink. As usual, I forgot that the ink sinks into the card and fades so although it looked right when I first did it, by the time I'd finished it was a tad too faded but if you look closely the sentiments can still be seen! 
My checker-plate EF folder for the top half of my panel was from Hobbycraft and the black and white strip was stamped using Uniko's BB Pinstripe a couple of times. My stars were punched using an absolutely ancient Fiskers punch and the sentiment embossed in white EP on red is from Mama Elephant using a die cut strip from MFT. The dry embossing didn't quite reach the edge of an A6 panel so I trimmed it down to leave a stripe of the grey base card showing. To complete I added die cut DAD cut using an Altenew alphabet set from black card.
So hope I've inspired you to join us for the next two weeks, but if you still need some inspiration there's plenty from the rest of the DT on the Cardz4Guyz blog.

I'd like to join in over at:-


Make it Masculine
(The b/w strip and large red panel are both stamped)
 

Friday 10 June 2022

Uniko June Release Full Reveal and Blog Hop

Good morning. Have we whetted your appetites with the latest Uniko release? Well just to show you how fab the sets are here are a few more ideas.

Here is one card using the large lemon stamp from Organically Zesty.


As with my orange in the introducing post here, I watercoloured this large stamp and fussy cut it out. On another panel of MM paper, I stamped the BB Grid a couple of times diagonally, with Versamark, not being too careful about full coverage. In fact after I added the EP but before heat setting it, I removed patches of the EP with a fine brush. Once heat embossed, I added a wash of Mermaid Lagoon DI and left it to dry. The panel was trimmed to leave a border when added to my base card and the the lemon was placed in the top right. On matching card, I cut a banner and stamped the sentiment.

My second card uses the Zesty stencil but instead of using the whole panel, I die cut the larger segments. I found that an old Spellbinders die (Standard Circles Large, next to smallest) embossed a line in exactly the right place on the slice to leave a gap that suggested pith and peel.

Once the slices were cut out, I inked the outside edge and blended out the colour to soften the whiteness left buy cutting them out. On some scrap card, I stamped the BB Diagonal Stripes twice in Altenew's Obsidian and stamped the sentiment on another strip of white card. The stripes were added to one side of the A6 base card and the sentiment strip added before layering on the die cut slices.

Next is a gift card featuring Background Builders - Hearts.


I initially intended to make a standard A6 card but after I'd done the stamping I thought it wasn't quite working so I tried it as a gift card and I think it works better.
The dotty hearts were stamped and embossed with silver EP and the central outline heart stamped in black and embossed in clear glossy EP. The congratulations from the Everyday Sentiments set was stamped and embossed with silver EP. The stamped panel was then cut to create the rectangle and matted onto silver card.

This next card card was a result of an experiment. I wondered what sort of rainbow the wrong side of the rainbow stamps would make. It worked pretty well until the last section which is solid, so I fussy cut a mask and stamped the final arc, then removed the mask, I quite like the look.


A few stamped and fussy cut clouds were added and the same cloud die was used to create the bottom panel as on this card, was stamped with the sentiment from Beautiful.

Finally I've combined the rainbow stamp with the raindrop stencil to create this slimline card.


I die cut a scalloped panel and inked it in Stormy Sky DI, fading it out towards the place where the rainbow was going. I then stamped the wrong side of the rainbow stamps as before but overlapping each layer a little bit for a more seamless blend. 
Using the stencil, I added some raindrops with the Stormy Sky for a tone on tone effect and three die cut and coloured rainbow brollies (Memory Box). Finally I added the sentiment with Versamark, white EP and heat embossed. The finished panel was then added to my base card.

So that's it, what do you think of the release? Something for everyone I think.
As always we are having the regular BA blog hop and giveaway.
Simply leave a comment on all of the stops along the hop for your chance to win a £20 eGift Code to spend in store.
All the details are on the Uniko blog but here are the links to the other BA's posts for this hop, so you can check out more ideas on how to use the new release. So don't forget to leave a comment before you hop along to the other BAs for your chance to win.
All Ts and Cs and further details can also be found on the Uniko blog.

Anita 
 Bev 
Hannelie
Julie -that's me

Joining in over at:-


Thursday 9 June 2022

Introducing Sunshine & Rainbows Stamp set and Raindrops Stencil

Morning! 
Back today with a couple of cards for the Uniko June release, this time featuring Sunshine and Rainbows stamp set and the Raindrops stencil.

First up is this card using the stamp set.


After stamping the rainbow from the set, I trimmed my A6 panel down and added a die cut cloud onto which I had previously stamped the sentiment from the same set. The largest of the clouds was stamped with pale grey ink, fussy cut and added to the rainbow, before the whole panel was added to the base card.

My second card features the Raindrop stencil and a sentiment from the stamp set.


To create the panel, I smooshed an A6 panel of MM paper into some watery Stormy Sky DI, until I got the coverage and depth of colour I wanted. When completely dry, I masked off a few of the smaller raindrops from the stencil and added some white texture paste through it. This time I combined the sentiment with the larger sunshine word stamp, which I fussy cut. I thought it needed a pop of sunshine, so cut a circle of shimmery yellow card stock and freehand cut a sun for my sunshine to sit on! The completed panel was trimmed to reveal a thin border when attached to an A6 card.

The stamp set and stencil are going to be another fab addition to the Uniko stable I'm sure. For more ideas and inspiration, check out the rest of the BAs.

Tomorrow is the big reveal so don't be late to the party. Grab a cuppa in good time and settle down for lots of zesty, rainbow and hearts action.
We'll also be having our traditional release day BA blog hop & giveaway going live at the same time.
See you tomorrow!

Wednesday 8 June 2022

Introducing Background Builders Hearts

Hi, I'm back with another brand new stamp set from Uniko. 
Adding to the already useful series of Background Builders, meet Background Builders Hearts.
As with others in the series, there are various stamp strips to build your own patterns alongside the patterned, larger hearts. For my example I've used the solid heart strip, which reminded me of some washi tape I had so that was the inspiration for my card.


On a panel of white card, I taped some torn paper to the top and bottom and then added the heart strips.
Altenew inks come in sets so it was easy to get an ombre look using the Red Cosmos set, though I didn't use the darkest colour. The sentiment from Sentiment Blocks was stamped in the same red as the central strip and added to the die cut heart, which was added to the panel once the masking paper was removed.
I'm sure you can think of many other ways to use these stamps and to help you Bev and the BAs have some great ideas of their own for you here or on the BAs own blogs. 

I'll be back tomorrow with the final introductions before the release on Friday.

Joining in over at:-

Tuesday 7 June 2022

Introducing Layering Stencil Zesty

Good morning folks, hope I find you well. 
It's day 2 of the Uniko June release and today we are focusing on a layering stencil called Zesty. 
Here's my take using some zingy citrus colours.


This is a 4 part stencil that allows you to build up the image of slices of citrus fruit. 
So to start, I used the outline stencil to ink the circles and semi-circles with a light inking of Altenew's Citrus Burst, Bamboo and Memento Canteloupe onto a panel of white card. Next, I used the segment layer and the same inks but with a heavier hand. The final layer for the segments, the detail one, was inked using Altenew's Fresh Lemon, Parrot and Memento Tangelo. The forth layer adds the small dots and juice spurts in between the slices, I used same as for the final detail layer.
The finished stenciled panel was the cut using a scalloped die, giving me two parts but more of the left over later. 
To complete the design, the bottom half of the base card was inked with a mix of Mowed Lawn, Squeezed Lemonade and Spiced Marmalade DOx and splattered with water and quickly dabbed off with some paper towel to remove the ink.
I wrapped some lime green bakers twine around the top half of the panel and added it to the base card with foam pads. The sentiment from Organically Zesty was stamped on a black panel and embossed with white EP, the Sweet was stamped in Memento Tangelo on white and fussy cut before adding to the card to complete.
Remember the off cut from the stenciled panel, well here is another card made. Its mainly from off cuts as the orange panel was a scrap in the bits box too.  I did add a couple of extra slices, the lime I cut in half, which I die cut from some stenciled scrap to complete along with the stamped and embossed sentiment.


What do you think of this new introduction? We'd love to know. There's lots more inspiration on its use from the BAs or over on the Uniko blog.
 
I'll be back tomorrow with another new addition to the Uniko stable.

Joining in over at:-

                                                                         #232  Fruit

Monday 6 June 2022

Introducing Organically Zesty

Well here is the first of the new stamp sets from the June release from Uniko, Organically Zesty.
It's a fab stamp set, with both a large lemon and orange outline stamp. They certainly pack a punch and if you like colouring they offer great scope. There are lots of pick and mix sentiments too.


My card uses the large orange with blossom stamp which I stamped on Mixed Media panel with Altenew Obsidian ink and embossed with clear EP as I wanted to watercolour the image. If you are unsure what colours to use, try googling a photo that you can use as a reference like I did.
For the orange, I used a mix of Ripe Persimmon, Spiced Marmalade and Dried Marigold DI which I swiped onto a MM mat and used as watercolour. The leaves were coloured in the same way with a mix of Twisted Citron, Mowed Lawn and Peeled Paint DI. The blossom flowers were coloured using a couple of Zig watercolour markers. When dry, I fussy cut the whole image and put to one side whilst I looked for a background. 
Initially, I was going to use a panel from a Gelli plate experiment but in the end decided I liked the look of the orange against the black but to add extra interest, I stencilled through the Scattered Polka Dot stencil with Unicorn White pigment ink. 
When this was dry, I stamped the sentiment from the same set on a strip of white card, added it to the background and then the coloured image, leaves hanging over the edge were trimmed ready to add to an A6 base card.

I really loved painting this fab image but what did the other BAs do with the new set? For more inspiration check out the rest of the team's fab ideas or over on the Uniko blog.

I'll be back tomorrow with another new Uniko introduction.

Joining in over at:-


Sunday 5 June 2022

Sneak Peeks Part 2

 What did you think of the two sneak peeks we shared yesterday? I hope you are as excited as we are to see them in full swing. You will have to wait until tomorrow though for that, as today we're back with 3 more sneak peeks.

First we have a new addition to the Background Builders collection. This product has been available since February, but didn't get a formal introduction, so we're giving it one this month. I am sure, like all of the geometric based background builders stamp sets, it will be a useful addition to your collection! 


The next peek is from the last clear stamp set for this June Release and Uniko's version of a popular theme.


The last peek for this release is of a fun stencil that can be paired with the stamp set above, I'm sure it will come in very handy!

That's all for sneak peeks for this release. It might be small but it packs a punch! I do hope you will join Bev and the rest of the Brand Ambassadors tomorrow for our first full introduction.