Tuesday 19 October 2021

Have a Moo-tiful Birthday

Good morning folks, the year is whizzing by and it's already time for another new challenge at Cardz4Guyz. This time our theme is to use a :-

REAL or CARTOON ANIMAL

in your masculine cards. Here's my take, inspired by a few of the current challenges out there.


I wanted to join in at the Cutie Pie challenge so got out my SSS Farm Animal set out. Living in the middle of farming country there are lots of farm animals around, we have sheep in our fields and our friend and neighbour has bullocks in one of his. Our sheep are all ladies about to be put to the tupp in the hope of lots of fluffy white lambs in the spring, not really masculine, so I decided to use the cow from the set.
To begin, I stamped the cow, coloured him with Copics and fussy cut him out. Putting him to one side, I cut a panel of white card with a MFT stitched rectangle die. To create the grass background, I tore a rough aperture from a Post It note and placed it where I wanted the cow to be. I then created a stencil for the grass with an old MS grass punch, adding it across the centre of the mask before inking with Mowed Lawn D moving it a couple of times to get a sense of depth with the shaded inking.
My cow was then popped up on pads over the stencilled grass and the panel added to a white A6 base card. No sentiment needed as he's holding his own!
So that's all from me but please check out the rest of the DT for more masculine inspiration.

Joining in over at:-


On the Farm

Monday 18 October 2021

Leaf Printing

 Morning. Yesterday I had a spare couple of hours after taking the pooch out for a walk and decided to try a little leaf printing. There isn't much in the way of autumn colour around here, the temps have been in double digits, so no frosts so far but the Japanese Maples by the house have started to turn from subtle golden red to a more vibrant colour. They are still hanging onto their leaves though as I had to give the leaves a fair old tug to get them off the branches.

My attempt at printing was influenced by the challenge at CAS Mix Up and as I haven't entered their challenge for awhile I thought I'd have a play. Less is More's challenge is OL Autumn so with that in mind also, I went ahead. Here is the result.

I started by creating a mask for the square on an A6 white card, then inked through with a selection of DIs, Mustard Seed, Carved Pumpkin, Candied Apple and Seedless Preserve. I chose those colours as they most closely represented the fiery maple leaf colours. When dry, I dusted it liberally with anti-static powder. 

Using one of the Japanese Maple leaves, I added Versamark to the reverse side and placed it carefully over the inked panel. I laid a piece of copy paper over and then trying not to move the leaf, brayered over the top. After carefully removing the paper and leaf, I heat embossed with gold EP. As I had used Versamark to stamp, the print wasn't visible until the EP was set, no second chances there! I rather like the way the leaf disintegrates towards the tips, totally not intentional! My sentiment from Uniko was stamped with Altenew's Grapevine to match the colour in the panel at that point, then heat embossed with clear EP.

I enjoyed the process and the challenge of a OLC hope you like it too.

Joining in over at:-


Using- Masking, Ink Blending and Heat Embossing

Autumn or Halloween, I choose autumn

Saturday 16 October 2021

Color Hues #28

Good afternoon. It's the middle of the month so time for a new colour combo at Color Hues.
Here's my take on the new colours.


Red and Kraft just shouts Scandie Christmas so I decided to include some gnomes alongside a Nordic stencil background and a punny sentiment.
The Gnomes are from Stamping Bella and the stencil used for the background and sentiment are Funky Fossil.
I love these cute gnomes, especially the grumpy one, and couldn't resist buying them awhile ago after a Copic colouring class. I've missed getting together and crafting in a group, hopefully it wont be too long before we can get together again, I only need level 4 to complete the basic programme.
Any road, after stamping the gnomes, I coloured them with Copics and fussy cut them and attached them to a die cut white panel, the middle one popped up on pads. The background, I already had left after the Uniko/Funky Fossil Instahop, so just used up a couple of bits to make my central panel, you can't see the join under the gnomes, but I did attach one the wrong way up to begin with!! The stencil was laid over a panel of kraft card and Ranger Texture Paste added. I still have a few bits left so they may make an appearance later!
So where will these colours take you, as always we'd love to see.
For more red and kraft inspiration, check out the rest of the team here.

Thursday 14 October 2021

Perfectly CAS and The Flower Challenge's 5th Birthday

Good evening, it's time for a brand new challenge over at Perfectly CAS.
Here is my take on this month's theme.


Sympathy cards are never the easiest of makes so I find it best to have a couple in my stash for those unwelcome moments.
I chose to use the Lilies from Uniko's Pure Floral set, the theme at the Flower Challenge and kept it very simple. I can't believe it the Flower Challenge's 5th birthday!
On a panel of white card, I stamped and masked my bunch of lilies and coloured them with Copic markers. I then die cut the bunch with a circle die and then again with a slightly smaller circle die to create a frame. The sentiment, also from Uniko was stamped on black and heat embossed with white EP.
To assemble, I die cut a piece of copy paper with the large die and set to one side. Using both circle dies, I cut a matching frame from fun foam and then attached it to the copy paper. The stamped and coloured panel pieces were then added to make a topper and the sentiment popped in the bottom right. The topper was then added to a 5 x 7 dark grey card.
By using a larger card, I was able to get away with a bigger panel and still keep the design to 1/3rd of the whole. Although it's tempting to add some detail to the background, I resisted and so kept it CAS. Remember white space doesn't doesn't need to be white!
So where will the theme take you? We'd love to see you in our gallery.
For more sympathy inspiration, check out the rest of the DT here.

I'm joining in over at:-

Tuesday 5 October 2021

Autumn Trees

Good morning, it's time for a brand new challenge over at Cardz4Guyz
This time our theme is -

A Birthday Card in Autumn Colours

As I need a card for the OH's birthday soon, I thought I would make one for that occasion. He is a bit of a tree nut, planting quite a few in our hedgerows since we moved here to complement the veteran trees that were already here. In fact an academic is coming on Thursday to inspect them as the venerable oaks are under threat from a nasty creepy crawly bug and he wants to check on their status!
Anyway here is my tree themed card in autumn colours.


I've used this stamp from Crafty Individuals a few times as you can get a really lovely autumnal effect using the marker and spritz technique.
To start, I took an A6 panel of rough watercolour paper and inked the stamp, which I'd stuck into my MISTI with a Pritt Stick, with some Mustard Seed DI and then spritzed with water before stamping. I then added a variety of autumnal colours with my Zig watercolour markers and stamped again before the first layer was dry, this allows the colour to blend together without leaving harsh edges. I left the panel to dry, then went in with Altenew's Sea Forest Ink all over the stamp. I hand painted the trunks with a dark ochre Zig marker when totally dry, adding more green marker and water to the base of the trees. When dry I added some dark shadows towards the bottom of the trees with the ochre marker on the stamp. 
The frame was cut from off white textured card using an MFT die and popped up over the panel with some fun foam, before being attached to a 5 x 7 matching off white base card. The sentiment from LOTV was stamped in Altenew's Mangrove Root ink.
So where will our autumnal colours take you? If you need more inspiration check out the rest of the DT here.

Joining in over at:-

Anything Autumn

Sunday 3 October 2021

September 2021 Reveal, Release, Brand Ambassador Blog Hop & GIVEAWAY

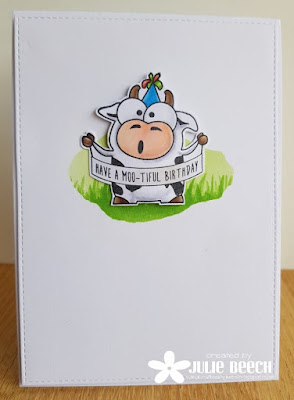
Well today's the day that you can get your hand's on the new Uniko release. What have you thought of it so far, fab isn't it. They are all available to purchase HERE on the website now.

So here are a few ideas combining the new release with some old favourites too. My first card features Background Builders Winter Wonderland.


Background Builders: Winter Wonderland £10.00
Copyright Uniko Ltd 2012 - To Date

For this card, I took my inspiration from the Northern Lights or Aurora Borealis. I've only ever seen them on TV but it must be quite a sight to witness them for real! There is something otherworldly about them I think. 
On a panel of white card I created my 'Aurora' using DI in Tumble Glass, Broken China, Evergreen Bough and Faded Jeans, not worrying too much about blending, I was looking at more of a streaky look. When dry, I added some stars with a white gel pen, stamped the text and silhouetted border over the top, then drew the outline of the hills onto black card using the stamp as a guide and cut it out. The hills were then glued in place and the finished panel trimmed down to leave a border on an A6 white base card. I was unsure whether to stamp a sentiment but in the end went with one of the small ones from the new Christmas Sentiment set.

This second card uses one of my sentiment panels I made using Christmas Sentiments and some of the older Christmas greeting stamps.


Christmas Sentiments £5.00
Copyright Uniko Ltd 2012 - To Date

The new sentiment set is a fabulous addition to anyone's Christmas stash and I decided to use them together with other Uniko Christmas greeting stamps to create some background panels. I used one earlier in the week, here, but for this card I used one of my strip backgrounds and white EP. The finished panel was cut down the middle and mounted onto a panel of white card with a stitched open scalloped border and simply popped it up on pads. A great design to mass produce as once you have the background panels made it's a pretty simple process to repeat the design!

My next card uses one part of the Pattern Building Christmas Tree, together with Background Builders:Vines, Winter Additions and the flower center from Kindness Blooms. It's a take on this card I made for a BA inspiration back in April. 


Pattern Building Christmas Tree £10.00
Copyright Uniko Ltd 2012 - To Date

The reindeer is made using the BB Vines-Winter Additions for the antlers, the nose is the flower center and the eyes are freehand. The mass of fairy lights are the string of lights from the set and two half strings added on either side!The lights were coloured with Zig water brush pens and then some glossy accents were added on top, as well as a touch to his red nose. The sentiment from Christmas Sentiments completes.

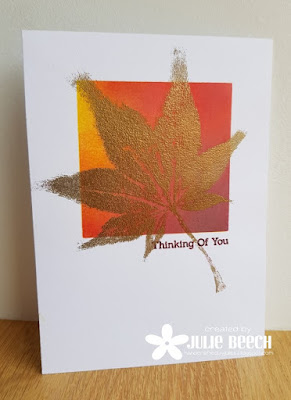
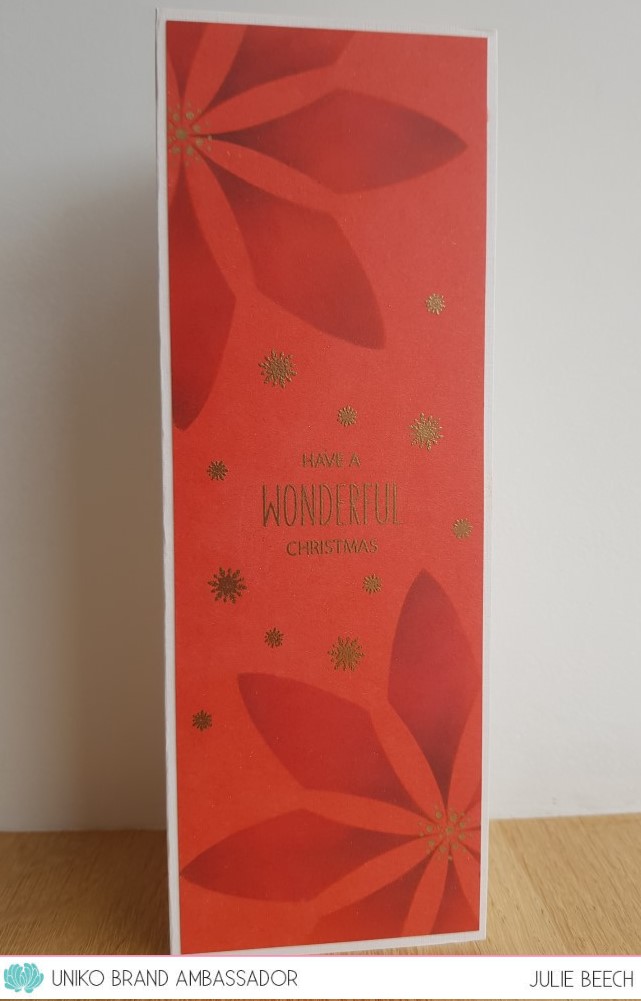
Finally, I've used the Flower Power #1 stencil to create a slimline Poinsettia card. 


Stencil - Flower Power #1 £3.50
Copyright Uniko Ltd 2012 - To Date
A panel of red card was stenciled in opposite corners using some Candied Apple DOx, followed by some shadows added with Vintage Photo DI. The poinsettia centers were added with a gold pen and the sentiment and stars added with Versamark and then heat embossed with gold EP. The star stamp is part of the new Background Builders set and the sentiment made up from Christmas Sentiments and Doodle Flower. The trimmed down panel was added to an off white base card. Simply an A5 piece of card folded lengthways.

Not enough inspiration? How about some more from the rest of the Brand Ambassadors. 
As usual we have our Brand Ambassador Blog Hop & GIVEAWAY! Simply hop along leaving comments along the way for your chance to win the ENTIRE* Release. You have until midnight BST Sunday 10th October 2021. A winner will be announced the following week.
*An alternative prize will be offered if you have already purchased any or all of the release.

So what are you waiting for, lets hop...

                  Julie - That's me

Saturday 2 October 2021

Autumn Colours

 Good evening folks. Max is back with us and his breath is SO much sweeter after his trip to the Vets yesterday! He had more than a few teeth out too so was feeling particularly sorry for himself last night. Anyway, this afternoon he was back barking at the hikers who were crossing the field and taking their time to get through the kissing gate! It would appear that normal service has been resumed!

Where did last month go? Well as it's now October it's time for a brand new challenge at HLS CAS. Here's my take on this month's theme.


To begin I took an A6 note card and masked off a square in the top centre with Post-It notes, before adding DI in a range of autumnal colours., including Spiced Marmalade, Mustard Seed, Barn Door and Seedless Preserve. Before removing the masking, I stamped the leaflets using a STAMPlorations stamp with Versafine and heat embossed with gold EP. After removing the masks, I stamped the Uniko greeting with Altenew's Mangrove Root ink.
The trees here are still in full green leaf, it must be the warm weather we've had recently but I can't wait for the colours of Autumn to erupt.
For more One Layer inspiration, check out the rest of the team here.

I'd like to join in over at:-

  
                                                 no option for me

Introducing... Pattern Building Christmas Tree

Good morning. Its time to reveal the last of the September release sets from Uniko. 
Today we are showcasing the Pattern Building Christmas Tree. Here's my take!


Whilst thinking of my design, I was rifling through my background box and came across a sentiment stamped background, this one is from a batch I made back in October 2019! I thought it showed off the strips rather well, I seem to be on a roll with stamped backgrounds.
To decide the size and shape of the tree, I laid out different elements in decreasing size order on an A6 scrap of paper. Choosing some scraps from the bit box, I cut some strips and laid those out too in a pleasing colour pattern, before stamping each element onto the strips of card and then reassembling onto the panel. To get a different look, all you need to do is change the order of the strips or the colours used or the background!

So that's it for the introductions, tomorrow we will be back with our BA Blog Hop and Giveaway, but if you want to check out more ideas for this set, check out the rest of the BAs first.

Friday 1 October 2021

Color Hues #27

 Good afternoon folks, its been a busy day on my blog, scroll down if you are looking for my earlier posts, as well as busy in the household! We also took Max, our little dog, to have his teeth cleaned at the Vet's this morning. He needed to be put under so that the Vet could get to the back one's without loosing a finger or two!! He will also get his jabs whilst he's there because the lovely lady vet couldn't get to do it last week. Typical small dog, especially the Chihuahua part, very protective and independent. Due to Covid restrictions, we couldn't go with him into the consulting rooms and although she picked him up and carried him in, he wasn't letting her anywhere near with the syringe! Hopefully he'll be back with us soon.

As it's the first of the month, its time for a new colour combo over at Color Hues. This time we've got a lovely autumnal combo to get your creative juices flowing. Here's my take.


I treated myself to some new stamps awhile back and one of them was this Fashion Monger Dahlia Build a Flower set from Altenew. I do love dahlias, mine were a bit of a disappointment this year, some tubers didn't sprout and some didn't flower and the retched slugs grazed the ones I left in last year as well as the ones that actually made it into the border!
Anyway, I thought they were the perfect choice for this challenge.
I used Memento Cantaloupe, Tangelo and Morocco ink for the petals and a new set of Altenew's to me Nature's Wonders for the centers. They are a greeny brown, quite an earthy set of colours, so they were within the rules! The leaves were a combination of Altenew's Bamboo, and Olive.
The background stripes are a stamp called Nautical Stripes, from Uniko, there are several in the series and are great for just this type of background. I stamped them in Altenew's Obsidian ink straight onto an A6 note card and then added the blooms and leaves. The sentiment looks as though it is part of the background stamp but is in fact a strip of black card, stamped and slipped under the blooms to mimic the stamp.
That's it from for today, but please check out the rest of the brilliant team over at Color Hues for more colourful ideas.

PS. Max is back with us and his breath is SO much sweeter! He had more than a few teeth out too so was feeling particularly sorry for himself. This afternoon he was back barking at the hikers who were crossing the field and taking their time to get through the kissing gate! It would appear that normal service has resumed!

We're Back!

Good morning, STAMPlorations are back with their challenges after a long summer holiday. 
So here I am with a card for our first challenge at Theme and Photo prompt.


What has more shine than mirror card, well if you've ever tried to photograph it you'll know all about it!
To start, I die cut a panel of white card using the middle die of the Crazy Double Running Stitch Rectangle Nesting Dies, then used the Christmas Icons Christmas Tree #2 die, to cut the shape. I flipped this panel over and added some double sided tape over the opening and flipped it back. Using the same tree die, I cut again using gold mirror card, but this time I was careful to keep all the cut out pieces as I wanted then to inlay into my first tree. The sticky side of the tape allowed me to insert the smallest pieces back into the openings!
To finish off, I stamped my greeting from Hello Christmas and embossed with gold EP. The finished panel was added to an A6 top fold note card.
So where will you go with the theme and photo? We'd love to see you in our gallery with your take.
If you need more inspiration please check out the rest of the DT here.

Joining in over at:-

Introducing... Stencil - Flower Power #1

This is a busy day on my blog but this is the post to showcase the latest stencil release from Uniko.
Here's how I used it.


Yesterday saw the launch of the new Christmas sentiments, so I made a whole batch of backgrounds using these and some of the older sentiment stamps. I made a whole batch whilst the stamps were in my MISTI, more of them later! This background was clear embossing over blue card, but you can use what ever you want to, some panels were embossed with white over stripes and others using clear and different festive coloured card. For more ideas on this theme check out this post.
I made the white snowflake pattern by laying the Flower Power stencil over the edge of the panel and inked through with Hero Arts Unicorn white ink. When dry, I left it overnight, I carefully rubbed away the excess ink away from the embossed text and trimmed it down before adding to an A6 white note card. With all the sentiments in the background, I felt another sentiment was superfluous!
So what do you think? For more fab inspiration check out the girls below.

Jane 
Julie -
that's me

See you tomorrow for the final introduction.

Uniko challenge, a reminder

Good morning, it's going to be a busy day here on my blog but first I'm just popping by to remind you that there's still time to join in the current Uniko challenge. Here's my card for your inspiration.


The cosmos are still flowering in my garden and will continue to do so until the first frosts, so I decided to use them to create this card, using Uniko's Pure Florals- Cosmos stamp set. I'd seen a card on Pinterest that used the same flowers and colours and I loved how it looked.
Using a pale ink, Altenew's Limestone, I stamped the images onto an A6 panel of white card and coloured them with Copics to give a no line effect. 
The sentiment, from Doodle Flower, was stamped with Versamark onto soft grey card and heat embossed with white EP before being die cut, then matted and layered to give more impact. A few homemade gel dots, Copic marker with added Glossy Accents on an acetate sheet, were added to fill in the gaps.
So that's it for the moment. What will inspire you, we'd love to see your take in our gallery. If you are in need of more inspiration why not check out the rest of the DT and our fab GD Nonni here.
The next post in our September release is up in an hour.

Joining in over at:-