Saturday 22 April 2023

Nature's Treasure II Dies Release Blog Hop and Giveaway

Morning all. 
It's release day for the new Nature's Treasure's dies at Uniko and as is tradition we are having a blog hop and give away. The release is timed to coincide with the Stamping Together festival at Port Sunlight, so if you're heading there you could be one of the first to get hold of the new goodies and say hi to Bev too!

Spring has truly sprung, the hedgerows are buzzing with life and I saw my first swallow of the year on Tuesday and one again on Thursday, well it could have been the same one of course! So green features heavily in these designs.
Here's my first offering, using one of the small stamps from Nature's Treasures II set and the large solid die from the new release.


On a panel of mixed media paper, I smooshed some DI, Peeled Paint, Mowed Lawn and Twisted Citron, onto a craft mat and dragged the paper through it until I had sufficient coverage. Once dry, I trimmed it down to size for my frame and randomly stamped the small leaf in a mix of inks, the DI's I used for the background and some Altenew ones, Bamboo and Parrot. 
The frame was made using a couple of rectangle dies behind which I attached 3 of the leaflets cut from the same card. A sentiment was stamped and attached before the whole lot was placed over the inky background with foam pads and added to an A6 white base card.

My next card is my take on a Jennifer McGuire card I'd seen on You Tube and wanted to have a go at, using the new dies and Nature's Treasure II stencil and masks.


My background was created using the masks from the stencil set and then I die cut a few of the solid leaves, a mix of large and small to create the garland from it. To pop up the leaves, I also cut matching pieces of white fun foam which I glued to the back of each die cut and then reassembled the panel onto a base card. A few of the tiny flowers from Originally Organic Additions dies were die cut, adding a coloured pearl for the centers. These are bog standard plain pearls coloured with a Copic marker! My sentiment is from the Sentiment Block series stamped in black on white.

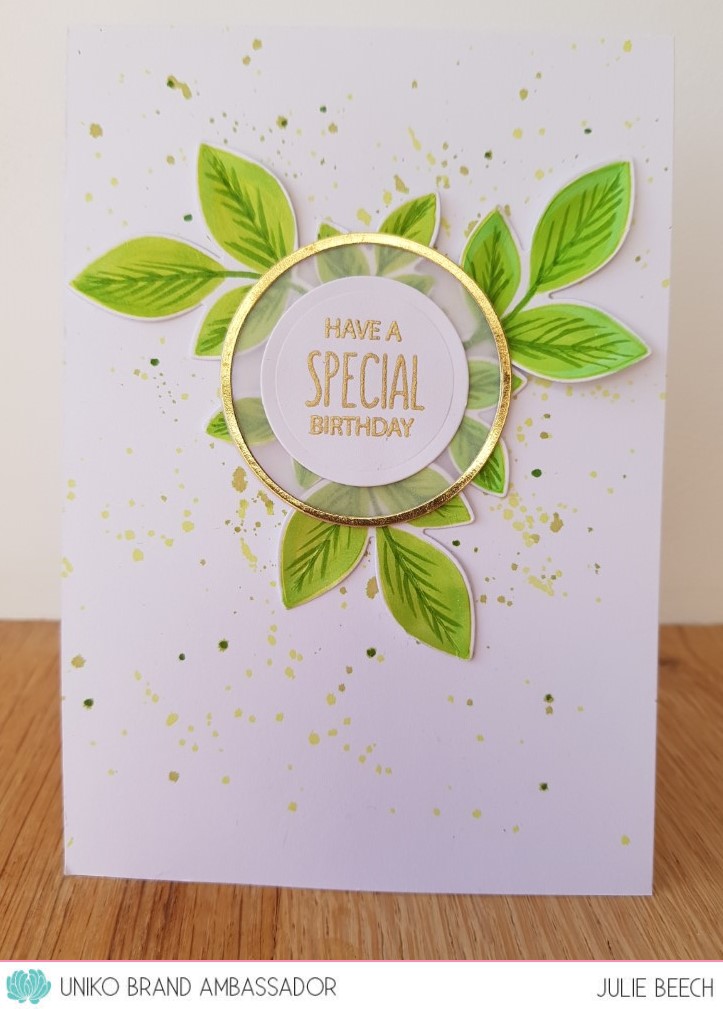
While I had my craft mat out for the first card, I smooshed some die cuts cut from MM paper in a mix of watery Mowed Lawn, Peacock Feathers and Twisted Citron DI. I then simply added them on pads to a white base card, trimmed off the overhangs and added another of my gold framed sentiments made from die cut circles and a Doodle Flower sentiment.


Here's the full set of dies, fab aren't they


OK, that's all from me but please check out the rest of the team for more ideas on how to use these fab new dies. 

Julie -that's me

One more thing before you go, make sure to leave a comment here and on all the stops for your chance to win a £15 eGift Certificate to spend in store. You have until midnight Sunday 30th April 2023 to comment. The lucky comment winner will be randomly selected and announced shortly after.

Thursday 20 April 2023

Introducing Nature's Treasures II Dies

Good morning. I'm here this morning to introduce some more inspiration using the soon to be released Nature's Treasure II dies from Uniko with my fellow BA Anita. I love these new dies and had lots of ideas of how to use them.

Spring is supposedly here, not that you would know it with the weather we've been having, but the leaves on the trees are finally bursting into life and the hedgerows are becoming green, so leaves are really on my mind! My first card uses the Nature's Treasures II stamp along with the matching die and a sentiment from Doodle Flowers. 


I used the large more solid stamp in the Nature's Treasures II stamp set to stamp 3 leaf sprigs with Altenew's Bamboo ink and used the matching solid die to cut them out. In my rush to play, the stamping on my first leaflet was a little patchy, so rather than waste it, I decided to colour the leaflets with a matching Copic marker and added some veins with a darker Copic to see what it looked like. I liked the look so did the same to the other two! You can still see a little bit of the original stamping showing through the Copic colouring, it has reacted with the Altenew ink to create additional detail which I quite like. I wanted a little bit more dimension, so simply scored along the center of each leaflet and carefully folded along the score line.

Using a selection of circular dies, I cut a gold frame, a vellum circle and a small white one, onto which I stamped and embossed my sentiment in gold EP.
On my base card, I flicked some of the Bamboo ink along with some darker Moss and added some random dots with the same dark Copic marker I used for the veins, YG 17 if you are interested. The three sprigs were glued behind the sentiment panel, glue added along the underside of the score line and added to the base card.

Just to prove I can stamp without messing up here's another idea using stamped and die cut leaves.


I stamped one of the leaf sprigs, in Altenew's Bamboo and one in Parrot, I also cut one from vellum, tying them together with a bit of silver thread from my embroidery box. 
Using the string of circles from Background Builders Circles, I stamped three rows across my card in Altenew's Silver Stone, the spray of leaves was then added and my sentiment from Everyday Sentiments stamped in Altenew Industrial Diamond.

Here's my final idea using just the dies to create a white on white background for my English Country Garden butterflies. The butterflies aren't around much at the mo, I have seen a few on sunny days but the cold wind will have given them a bit of a shock! Can't wait for them to be dancing amongst the blooms.

To make the background, I die cut a few of each of the dies, then glued then onto an A6 top fold note card. Two of the dies have cut away centers but for this, any that fell out were glued back in!

I die cut a few of the small butterflies and stamped them using the small detail stamp. I used Copic pens to colour over the stamping before arranging them onto the background. I only attached them at the body so that the wings could be given some dimension.

My sentiment is made up of a white embossed and fussy cut Fabulous from Yes You and Have a Birthday from Doodle Flowers stamped in black on strips of white card, a few sequins complete the design.

That's it for me for the moment but Steph and Izzy will be showcasing tomorrow and then it's release day on Saturday!

Joining in over at:-


Anything Goes with option of "Create your own background"

 Anything stamped option CAS

Spring                                                                                                                                 

In the Garden                                            

Tuesday 18 April 2023

Surprise April Release Sneak Peek

 Morning again. Today we have a little April surprise for you at Uniko, with a new product release coming this Saturday 22nd April at 9am BST.  

Bev will be demoing some new Designer Dies on the Uniko stand on Saturday at the Stamping Together show at Port Sunlight!
However, before that the Brand Ambassadors and Bev will be showcasing them on the Uniko blog this week. I had great fun playing with the new set which coordinates with a previously released stamp set but can be used on their own too.
Here is the official peek.

Hands up who knows the clear stamp set they coordinate with and gave a little squeal like we all did when we saw them?
As there are just these dies being launched, the introductions will be a little different this week, but super fun too. I hope you will pop back tomorrow to the Uniko blog for the first instalment of creative inspiration. 

Little Rebel on his Hobby Horse

Good morning, time for a brand new challenge over at Cardz4Guyz
This time we would like your take on:-

EMBOSSING (Wet or Dry)

So a card for a bloke with either dry embossing eg folders or embossing using wet ink such as heat embossing, simples!
Here's my take using an EF from Cuttlebug and an old, cute Little Rebels stamp from Nellie Snellen.


I found this little guy in my to colour box and the DP was in my scrap box too. No idea where it's from, probably a digi I ran off ages ago! No need for a sentiment, the EF says it all.

To start I cut a panel of white card, slightly smaller than A6 and die cut a circle from the top half, then embossed using my Cuttlebug Birthday EF. Don't do it the other way around or you'll ruin the embossing, guess how I know that!
The image was coloured with Copics that match the DP and fussy cut. The DP was glued to the A6 base card, the embossed panel popped up over with foam pads and the little guy added with foam pads and glue, simples.
If you need more inspiration please check out the rest of the team over at Cardz4Guyz, then why not join in?

Sunday 16 April 2023

Color Hues #62

Good afternoon. I can't believe that we are mid way through April already but we must be as there is a new colour pairing over at Color Hues. Here's my take on the new colours.


I was inspired by the current challenge at The Flower Challenge where their theme is to focus on the background, so chose to combine a BA post for Uniko for this card using Uniko's BB Modern Layered Floral set.
To start, I chose an A4 panel of thick card, as I was going to use a faux watercolour technique and it needed to hold up to the water I would be adding. Using the floral element of the set, I inked up with Altenew's Wisteria, spritzed with water before stamping. I then added some darker Hydrangea ink to the center and pushed it around the stamp with a wet brush to get rid of any harsh edges, before stamping again. This was repeated until the panel was covered. As the ink dries it separates a little to give the soft effect. The same technique was repeated with the leaf stamp using Altenew's Bamboo ink and a darker green Zig watercolour brush marker this time. When dry I added the dark centers to the flowers with the detail stamp and Altenew's Andromeda ink.
On a die cut panel of matching card, I stamped the sentiment from Doodle Flowers, attached it to some torn vellum and placed some silver thread behind before adding onto my stamped panel. A few silver sequins complete. My panel was trimmed to leave a narrow frame when added to anA6 note card.

So where will this color combination take you? We'd love to see your floral and other ideas in our gallery and if you need more inspiration there's plenty from the DT here.

Joining in over at:-


Tuesday 4 April 2023

Happy Birth-Yay

 Good morning, time for a brand new challenge at Cardz4Guyz. This time our theme is:-

A NUMBERED BIRTHDAY

Pretty simple then, so long as it's a birthday card with a number on it! It could be a special birthday such as a 21st or a major milestone birthday or just a plain old child's birthday like mine!


I used a couple of challenges to inspire this card. The theme at Paper Players is the animals came in 2 x 2 and over at AAA they would like a shaped CAS card.
I decided to use the rhinos from MFT's Birth-Yay set for a masculine take, initially I toyed with mirror stamping the single rhino but in the end just cut out the balloon holding rhino from his pals! The balloon also gives me somewhere to place my number, a black 6 cut using a freebie die from way back when! To keep it as CAS as I could, I used the sentiment banner for some grass for them to sit on and popped a circular frame die up on some foam, all popped onto a circular card base.

So where will you go with our latest challenge, as always we love seeing your takes in our gallery at Cardz4Guyz. The DT have some more ideas there, should you need them!

I'm joining in over at:-

no option for me

Sunday 2 April 2023

60th Birthday Wishes

Evening folks. A new month so a new challenge starts at HLS Birthday
Here's my inspiration for you.


Sorry about the quality of the photo but mirror card is a pig to photo!
This was made for my daughter's friend and features some lovely flower stamps from Altenew, Remember This, a die cut frame from The Works, freebie die cut numbers and a Uniko sentiment.
The blooms were stamped with Versamark onto some MM paper and heat embossed with white EP. The blooms were then coloured using some smooshed DI on a craft mat in a watercolour style. 
On a panel of textured lined card, I splattered some of the same colours as used for the flowers, Salty Ocean and Picked Raspberry and the die cut silver frame added. My blooms were arranged around the bottom right and my sentiment slipped in over the frame and under the blooms. The finished panel was then added to a matching linen effect A6 top fold note card.

So what will you make? The DT has lots of varied ideas to get those creative juices flowing, why not pop along and take a look before joining in?

Saturday 1 April 2023

Color Hues #61

First of the month, so time for a brand new colour combination from Color Hues
Here's my take.

I decided to go for something a little different for this challenge, away from my usual makes. 
I made a thankyou card for my eldest grandson's teacher awhile ago, so decided I would make one for the youngest's for when he needed one. I may have to change the banners if he doesn't approve the colour!

Did you know it's hard to find the right colour DP when you need it? Out of all the boxes of DP I have squirreled away, I could only come up with a couple, so I had to think laterally in order to make my peach banners! I cut a load of panels using an MFT die from one of their Blueprints sets, #13 I think and folded them in half to make my banners. To add a little extra interest to the similar looking banners, I added some tiny die cuts and some additional markings on some with a white gel pen. The last one I made from the wrong side of one die cut, adding marker lines freehand to make a plaid that matched.

The easel base, I made by first stamping SU's Hardwood in Memento Toffee Crunch onto a panel of kraft card and then mounting it onto a white card base. The blackboard is a die cut square onto which I stamped and heat embossed with white EP Uniko's Thank You and some extras with the white gel pen and added to my panel. The legs were cut using the same die I used for the blackboard. I added some chalk dust for a bit of realism, not that chalk boards are used these days!

To hang the banners, I cut a length of white linen cord and punched a couple of holes through the front panel and threaded it through, tying off inside the card. The die cut banners were then added and the ends glued together to keep them in place.
So what will inspire you? You never disappoint us with your entries into the gallery, making choosing our favourites especially difficult!
For more peach and kraft inspiration please check out the rest of the team here.