Tuesday 30 November 2021

Enjoy the Season

Good morning, time for a new challenge at Cardz4Guyz where our theme is:-

SHADES of BROWN

I went with a vintage feel for my take.


The LOTV image was stamped in Memento Rich Cocoa and then coloured with Copics using the E group. Snow was added with a white pencil crayon.
The finished image was trimmed and then added to a 4" x 4" cream base card. The greeting, from Altenew, was also stamped with Rich Cocoa.
A very simple, masculine card.
For more masculine inspiration check out the rest of the team here.

Joining in over at:-
Use a hand stamped or digital image


Friday 19 November 2021

Uniko Challenge

Morning all. It's time for a brand new challenge at Uniko.
Here's my card based on the twist this time.


Its a very simple card, just a couple of stamped holly leaves and berries from the Winter Foliage stamp set and the matching dies. the leaves were stamped on green card and although the veins showed up to begin with they had faded by the time I took the photo! The berries were stamped with red on red and then some Glossy Accents added on top.
From a panel of red card, I cut a curve using an Avery Elle set and knocked back the colour with some Rusty Hinge and Barn Door DI around the edges, before adding it to a white, A6 note card. The thread is 1/3rd of a strand of twine as it was too thick originally. I made a rough bow and glued it to another die cut set of berries. The leaves were added and then sandwiched by the glossy accented berries and glued along the edge of the join after I'd stamped the greeting from Christmas Sentiments.
So where will the theme take you? We'd love to see you in our gallery. For more inspiration please check out the rest of the team and our GD here

Joining in over at:-

Wednesday 17 November 2021

Stencil Monoprint Penguins

 Morning, I've another Christmas card to share with you today using a mono print from a stencil.
I was pleased to see that this month's CAS Mix Up was to use a stencil to make a mono print, I had loads of them after playing around with my Gelli plate for my bauble backgrounds here.
Here's what I came up with.


My monoprint was made as a bi product of the Gelli plate process. After inking up the plate with Picked Raspberry DI and laying down the stencil, Let it Snow from Uniko, and taking a print, the stencil has lots of ink on the surface and being from Yorkshire I had to use rather than waste all that juicy ink. So on some scrap white paper, I laid down the stencil and pressed all over with my hand and some kitchen roll to mop up any seepage!
I love the smooth effect you get doing it this way compared to direct inking to stencil which can get a little blotchy and the small details tend to get lost. It even picked up some marks from the Gelli plate left from a previous experiment which reminded me of falling snow.
Always on the look out for a challenge combo, I added these two cute penguins, found in my odds and ends box, coloured with Copics and fussy cut. I cut away the background as it wasn't needed and added back the snow drift with some scraps, all framed with a leftover from my bits box. The sentiment is from Woodware.

Joining in over at:-

Tuesday 16 November 2021

Color Hues #30

Good afternoon. We are half way through November already and no Christmas shopping done. The road into town has been closed since the beginning of October for sewage replacement and was due to open at the weekend but is still closed until the beginning of December. The diversion is awful, takes about 20 minutes extra and is single track with very few passing places. As a result my forays into town have been limited to the basics of supermarket and hairdressers! I suppose I have had plenty of time to make my Christmas cards and I've used the new colour combo at Color Hues to make another for the stash. I'll have to take my overseas cards to the PO when I go for my hair cut at the end of the month or they wont get there in time! Anyway, rant over here's my card.


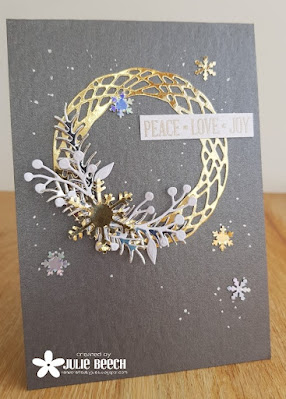
The starting off point was the wreath die from Joanna Sheen that I think I got free in a mag some time ago, but I may be wrong. I did win a few of her dies a couple of years ago so it could have been then!!
Anyway, its been in my die cut stash unloved so I decided to dust off the cobwebs, of which we have plenty I can tell you despite my daily spider patrol, and use it to make a wreath style card. I cut it from gold mirror card but instead of the little bits that come with the die, I added some bits I die cut from bits of silver and white card and the tiny snowflakes I punched from a scrap of holographic silver card.
To make the spray, I punched a small circle of gold card and added the foliage to it and to cover the joins, I added a punched snowflake in gold. 
My base card is made from a piece of hammered, dark, silver grey card that's been in my stash for years with a few dots of white gel pen to break up the starkness of the background. The gold die cut wreath was added then the spray. A few of the punched snowflakes were added too before the sentiment from Uniko was stamped and embossed in Platinum EP on a strip of white card and added.

So where will these latest colours take you, we'd love to see your takes in our gallery.
For more inspiration check out our GD and DT here.

Joining in over at:-
Christmas


Birthday Plaid

Good morning folks, time for a new challenge at Cardz4Guyz.
This time we would like to see your masculine cards that feature:-

GINGHAM, CHECKS or PLAID

Here's my card for your inspiration.


My starting point was the plaid DP from NitWits and the cute digi image from LOTV, Big Gift.
I was looking for an image for my Grandson's birthday and remembered this that I bought awhile ago. He comes in 3 different forms but I used the simple Big Gift Boy Alone. He reminds me of the comedian Harry Worth, if you are old enough to remember, who used to approach a glazed corner of a shop and raise one of his arms and legs. The effect was that he looked as if all four of his appendages were moving at once! Hands up if you've tried that when you were a kid, I know I did!!
This is a fairly simple design, I placed the digi to one side of a square on the computer and printed him off. I don't have the skills or programme to add details to the image so they are either die cut, freehand or stamped. Once coloured with Copics, I fussy cut part of the little boy and cut the square using my trimmer adding the lines and stars to match.
The NitWits DP was trimmed to size and added to a 7 x 7inch base card and the coloured, stamped panel was added on top with foam pads.

That's it from me but please check out the rest of the DT for more masculine inspiration and then why not join in?

Joining in over at:-

Monday 15 November 2021

Uniko BA Inspiration - Pastel Baubles

I'm over on the Uniko blog today with a little bit of festive BA inspiration with these two cards using the floating strip technique. 


You'll find all the details on the make there.

Sunday 14 November 2021

You Are So Sweet

Evening folks, time for a new challenge at Perfectly CAS!
Here's my CAS take on this month's theme.


When looking through my stash for a stamp to use for this challenge I found this fun pineapple stamp that came free with a mag quite a few years ago. I think pineapples are quite tropical so I went with it!
After colouring the pineapple body and foliage with Copics, I fussy cut them out as the die that came with the set gave too large a border around the edge. My sentiment is from an Avery Elle set which I stamped on a die cut panel in Altenew's Sea Forest ink, then added the fussy cut pineapple. The panel was then added on pads to a white, linen effect, A6 top fold card.
So where will the cue word take you? We'd love to see your take in our gallery but please keep it CAS!!
For more CAS tropical inspiration check out the rest of the DT here.

Wednesday 10 November 2021

Look what the postman brought!

 Morning folks. I've been playing with my newly acquired Altenew's Happy Together stamp set. I won it over at the Flower challenge together with a die cut thank you for their 5th Birthday celebrations with this card, thanks Viv. It dropped into the postbox on Friday so I've had some time to play and here is what I came up with.


I was influenced by the colours over at Altenew's November challenge and to start I made a background using the solid bloom stamp from the set and some DIs, blending out the stamping with a water brush. The finished panel reminded me of all the leaves in the cue picture but I wasn't satisfied so put the large panel to one side and had a play with the outline bloom spray.
Going for a no outline effect, I stamped with Altenew Limestone ink on MM paper and used a bright pink Zig marker to paint each petal which gives a more life like look. It's painstaking but so therapeutic, I get lost in the moment. I did the odd bit of Family History on the laptop whilst the petals dried, so I didn't smudge them! Some shadows were added with a purple Zig marker to give my bloom and bud some depth, before fussy cutting it out once dry. The rest of the panel of MM paper, I smooshed with a mix of Mustard Seed and Wild Honey DI and die cut a panel from it. The sentiment, I stamped on black and heat embossed with white EP and fussy cut.

I played around with both completed panel and rather liked the yellow panel over the fussy stamped background, so I die cut the panel to leave a border on an A6 note card, popped the smaller one up on pads and added the sentiment. It's not your typical autumnal thank you card but I was a bit orange and browned out!

Joining in over at:-


Wednesday 3 November 2021

Gnome for Christmas?

 Good morning. I was flicking through my bits n bobs box the other day and came across a coloured panel using Stamping Bella's grumpy gnomes. I think I originally wanted the gnomes that were stacked up on top of one another but went with the side by side ones as the other was out of stock. Still I had a play and tried my hand at making my own gnome tower. What do you think?


I decided to put them to good use by taking part in AAA's and The Male Room's latest challenges of a sketch with the option of gnomes and just gnomes.


I had a little bit of the stencil background from here, so trimmed it down to create the horizontal element from the sketch and popped the gnomes on top, the sentiment is Uniko.  A very quick card once the idea was sparked! 
Another Christmas card for the stash.

Joining in over at:-


Tuesday 2 November 2021

Cheeky Mouse and his Reindeer

As I said the other day, it's been a busy time in the craftroom. This time I'm here to announce the start of a new challenge at HLS CAS.

Here's my take on this month's theme.


I had to search through my stash to find a loveable pet stamp as I didn't want to break out my MFT Little Buddies set that I used not long ago! Anyway I decided to go with a Christmas image featuring a little Margaret Sherry image that came free with a mag a while a go. 
This cute little mouse is out in the snow with his toy reindeer, can't get more loveable than that! 
After stamping, colouring with Copics and fussy cutting I decided he needed a bit of a festive background. For that I used a leftover scrap from my bits box that I made for this card back in August. All the elements were then added to the bottom of a white linen effect white A6 base card.
To complete I added a trimmed down speech bubble sentiment. 
So where will the cue words take you? We'd love to see your take in the gallery but for more inspiration please check out the rest of the DT here.

Hope Your Day is a Pile of Fun

Morning all.
My posts are coming thick and fast this week, just like London buses, nothing for ages then they all come at once!
Well today sees the start of a new challenge at Cardz4Guyz. This time our theme appropriately is:-

LEAVES

As I had my MFT Pile of Fun set was still on my desk, I decided to use it for this card.


Like my card from yesterday, I took an A6 kraft base card and stamped the small leaves and clusters this time in Altenew's Sea Forest. On some white card I stamped the squirrel and two lots of the large leaf piles. After colouring with Copics I cut them out and put to one side. 
Using a couple of Avery Elle double pierced rectangles, I cut a frame from white card and stamped the greeting in Altenew's Mangrove Root. The two lots of leaves were added to the back of the frame and then a panel of card inked with DI added. Finally I added my fussy cut squirrel to the framed panel and then added that on pads over the base card.
So that's it from me but please check out the rest of the team here for more masculine inspired leaf fun.

 Joining in over at:-


Monday 1 November 2021

Color Hues #29

Good afternoon. Where has the year gone, just a couple of month's and we will be in 2022!
Anyway as it's the 1st of the month and time for a new colour combo at Color Hues. This month we are all autumnal with the colours and so here is my inspiration card for you.


I used the MFT set Piles of Fun for this little scene.
To begin, I took an A6 kraft base card and stamped the small outline leaves from the set in Memento Desert Sand all over. From a panel of white card I cut the frame using a couple of MFT arch dies and another large panel of white card using the largest die. Using some DIs I inked the large arched panel in orange and set to one side. On some more white Copic friendly card, I stamped the large pile of leaves and the cute hedgie. I thought it was a bird to start with until I began colouring! Using colours from the YR and E groups, to colour him and the leaves, I then fussy cut them out and attached the leaves to the bottom of the frame, trimming off the excess. I then added the frame with pads to the orange background along with the hedgie. My frame was just a tad too narrow to accommodate the sentiment so I added it on a strip of matching paper and then glued the whole to the base card.

So that's it from me but if you are in need of more colour inspiration please check out the rest of the team here.

I'd like to join in over at:-


Add a sentiment

STAMPlorations November Challenge

It's a new month so its time for the latest challenge at STAMPlorations Theme and Photo challenge.
Here's my card based on the theme and photo.


For my inspiration, I was influenced by the theme of fall and the maple leaf in the picture.
To start, I stamped three of the maple leaves from Leafy and stamped them onto MM paper with some Altenew Sea Forest Ink. I then added some colour with my Zig watercolour markers and added water to allow the colours to blend. I was surprised that the vein definition on the leaves stayed quite crisp, so although I left the stamp in my MISTI, I didn't need to re stamp once they were dry but I did fussy cut them, leaving a fine edge of the paper still visible. 
I am still trying to use up my stock of card, so found some textured card that has been in my stash since I made my daughter's wedding invites over 15 years ago to use for my background. Down one side, I added Dried Marigold and Carved Pumpkin DI, blending out the paler Dried Marigold towards the center of the panel. Some jute twine was wrapped around the panel over the inking and secured before I stamped the sentiment from Softly using Altenew's Mangrove Root ink. The leaves were attached along the twine border with foam pads and the completed panel added over a matching base card with pads too, this accommodated the twine wrap.
So that's it from me. Will you be inspired by the photo, the theme or like me both? We'd love to see what you make of the new challenge and look forward to seeing you in our gallery. For some extra inspiration why not check out the rest of the team here.

Joining in over at:-