Wednesday 24 February 2021

Sent with love

Hi, how are you? Are you pleased that there is going to be a lifting of lockdown restrictions or worried that its all come a little too soon. I must say I'm a little on the fence with this. I can see it from both sides, but I do think that there is at last a light at the end of the tunnel as vaccinations proceed at a pace.

Anyway as we are still in lockdown I have been getting crafty for crafty sake and made a card to enter in a few challenges and not just for a DT commitment.


I made this card for a number of challenges, Less is More is still celebrating 10yrs and want to see OL and flowers, whilst AAA would like us to follow their sketch and JUGS want rainbow colours.
So with a nod to all three this is what I came up with using a LOTV stamp from long ago.
Stamped in Altenew's Pure Graphite and heat embossed with clear EP, I coloured it with a selection of bright rainbow colours using my Zig watercolour brushmarkers. To add a bit of extra without loosing the OL, I embossed a scalloped frame and then added the heat embossed LOTV sentiment in the same way as the outlined vase of flowers. The vase reminds me of one I actually own and is currently say on my hall table with a few supermarket spray chrysanths.

Simples, if a little fiddly to paint!
Keep safe out there and keep crafting.

Joining in over at:-


Tuesday 23 February 2021

Brusho and Sympathy

Good morning.
Time for a new challenge over at Cardz4Guyz. This time we've chosen -

THINKING OF YOU

Sympathy cards spring to mind with this prompt but I'm sure there are other interpretations you'll come up with. Some people find masculine cards difficult and I think sympathy ones doubly so. For my take, I kept it CAS, my fall back state and used masculine colours.


I'm determined to use my odds and ends up so that I don't run out of card stock before I can get to the stationers, so I found this aperture panel in my bits box and cut the MB Fresh Foliage from some more matching white scrap. I had to go through quite a bit of white scrap, there are lots of whites out there, before I found a piece that matched! 
The background panel is a scrap of card coloured with Brusho crystals in Violet and Turquoise. I just love how the colour bursts from the dry powder when you add water. I think I added too much water and most of the colours blended together but they do blend beautifully too!
I popped the die cut sprig behind the aperture then added foam pads before adding to the coloured base. My sentiment from Uniko, was stamped with Altenew's Pure Graphite, heat embossed with clear gloss EP, then trimmed and added to my card.
A quick, simple design using scraps from my box of bits. Hopefully I wont need it in the near future but its there in the made cards if I should.
For more inspiration, please check out the rest of the team here.

Wednesday 17 February 2021

Have a Choccie-tastic Easter

 Evening all.

Well I've had the first of my Covid vaccinations so fingers crossed that I don't get any side effects. It was incredibly well organised, no waiting even though  I was a tad early. The only hold up was a bleeding needle site which took awhile to stop but all OK after that, even the sun was shining and the snowdrops on the verge were in bloom. We're both back sometime in May, all being well.

Anyway, over at Less is More it's their 10th birthday with Chocolate as their colour theme and as I haven't joined in for ages, I thought I would. Less is More was one of the sites that proved to me that I didn't need to slather the layers and embellishments on my cards to make a striking design, can't believe its been going 10 years, thanks for all the inspiration.

 I couldn't immediately think of what to do but after a root through the stash I came across a set of stamps I bought from a bargain bin in The Range ages ago, with cute Forever Friends bears and Easter Eggs. Well I didn't go with the egg part but the sentiment was perfect, so I teamed it with a homemade chocolate bar instead. Here it is -


The dark chocolate bar was made with some scraps of brown card die cut with a couple of small square dies and then edged with Hickory Smoke DI,  layered up on pads and glued to a panel of matching card. The finished 'bar' was wrapped in foil and the outer sleeve made by making a thin box from some pretty Spring like DP and stamping the sentiment on it with Memento Ground Espresso ink. I tore away most of the box and ripped the foil before peeling it back. The 'opened' bar was then stuck katy cornered on an off white base card. Hope there's enough chocolate on show!

Whether we see anyone at Easter this year is in the lap of Boris but perhaps it might find its way by post if not. I did find the chocolate bunnies and small eggs from last year at the back of the larder cupboard this aft, they may find their way into my tum, well I wouldn't want to give old chocolate to the kiddies, now would I.

I'm linking up at:-

http://simplylessismoore.blogspot.com/2021/02/challenge-436-colour-chocolate.html


Tuesday 16 February 2021

Color Hues #12

Good afternoon. 
I took the OH for his first Covid-19 jab this morning, the vaccination site was a few miles away but plenty of parking and lots of helpful stewards pointing the way. No hanging around around here with under the 65's, I got the call Monday afternoon and appointment booked for less than 48 hours later, so I'm off tomorrow. Hopefully there'll be no side effects and the second jab will come around sooner than we think. 
Anyway, as we are over halfway through February and rushing on towards March, it's time for another challenge at Color Hues.
Here is my take on the new colours.


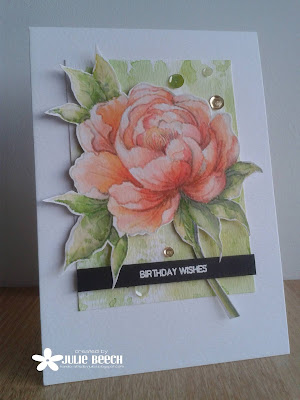
I must admit to having some difficulty deciding where peach stops and orange begins, so I hope I've hit the right mix of peachy tones in this no line watercoloured bloom. Peach to me is a mix of pinky oranges with a hint of yellow, just as in a real peach!
To start, I took a panel of MM paper and stamped this fab Uniko peony bloom in Altenew's Morning Frost, before using a combination of Dried Marigold, Spiced Marmalade and Abandoned Coral to paint each individual petal, adding some Chipped Sapphire as cast shadow. For the leaves I used the same Chipped Sapphire as well as Mowed Lawn and Crushed Olive.
I fussy cut the bloom and then created the background from the greens that were left on my palette, smooshing them onto a panel of card a few times, drying between each smoosh. 
The peony was popped up on pads over the trimmed down smooshed panel and a black sentiment strip added. My completed panel was then adhered to an A6 base card and a few green and gold PPP sequins added.
Where will you go with the colours? So far you've amazed us with your creativity and made life very difficult to choose our winners! There's more fab colour inspiration by the rest of the DT, over on the Color Hues blog just in case you do need some inspiration.

Sunday 14 February 2021

I splashed out on your birthday

Evening peeps, happy Valentines day! 
There's a lot of love floating around blogland at the mo but in the brand new challenge over at Perfectly CAS we've side stepped the love theme and gone for something completely different. 
Here is my inspiration -


- on the theme of


A very QCAS card, using a freebie die and sentiment that both came with a mag!
White embossed stamped sentiment and white die cut splash on turquoise, what else is there to say really. 
I kept the design CAS by keeping the design to the corner of my card base, placing the sentiment close to the main element and a plain and simple background.
How will you play it? We'd love to see. If you need a little bit more inspiration please check out the rest of the DT here.

I'd like to join in over at:-

Tuesday 9 February 2021

Skating Fun

Morning all.
It's time for a brand new challenge over at Cardz4Guyz and the theme chosen by Helen is right up my street -

CAS

You all know I'm a clean and simple girl and the CAS style is perfect for making masculine cards!
Here is another one for the Christmas stash with my take on the theme.


My starting points were the challenges at CAS Christmas, Dogs and or Cats, still trying to keep the flow of Christmas cards coming, and CAS Mix Up, stencil heat embossing. 
Max would never forgive me for going down the cat route, so I hunted out the doggy images from my Christmas stash, finally settling on this LOTV image of Patch the dog, skating with his rabbit friend, who I trimmed off for the purposes of this card. After colouring with my Copics, I fussy cut him out added some Wink of Stella to the "ice" and set him to one side to dry.
The back panel of falling snow was made by using embossing paste over a freebie falling snow stencil on a panel of white card, which I then heat embossed with a holographic EP to get just a little twinkle, well it is for a bloke when all said and done! I was unsure as to my layout to start with, so after a quick whizz through my old designs I decided to stick with one of my tried and tested layouts. I chose kraft as the base, its more masculine I think, and popped the panels and Patch on pads over the embossed background. (White space on a CAS card doesn't mean you can't use coloured backgrounds.) A white heat embossed sentiment from Altenew completes. I trimmed the completed panel to leave a small border when it was attached to an A6 kraft base card.
If you are new to the CAS style then here are a few pointers
 
Keep the image to 1/3rd of your card front
Keep embellishments and layers to a minimum
Ensure there is lots of "white" space to your design
Remember LESS is MORE
Finally make sure its MASCULINE!

Hope that helps, but why not check out what the rest of the team have come up with here, then dip your toes into CAS!

I'm joining in over at:-


Tuesday 2 February 2021

With all my Heart

Evening all. 
It's time for new challenge from HLS CAS and this month "Love is in The Air".
Here is my take using an IO die, Heart of Hearts.


I'm playing with those strips of scrap again, with a selection of pinks and reds stuck to a panel of copy paper to create a rough ombre pattern, then added to my base card under my die cut heart.
After cutting the heart from textured linen card, I cut it again from red fun foam and glued the two together, adding the sentiment from Uniko along the edge of the heart. The trimmed down panel was then glued over the base card so that the gradient of strips showed through.


So what will you come up with, we'd love to see your interpretation but please keep it CAS!
If you need some more inspiration, you can check out the rest of the team here.

I'm joining in over at :-


Happy 9th Birthday Uniko

Good morning, it's party time!
Uniko is celebrating its 9th Birthday today. I take my hat off to Bev for managing to keep the brand fresh all by herself, as well as being mom to two very active boys, especially over the last year! I haven't been on the team for all that time but I have been an admirer from the moment I found the designs.


A birthday wouldn't be a birthday without a party, now would it? Over the years its become a bit of a tradition to hold a linky party to celebrate.

To join in all you have to do is simply create a birthday card, any theme, any style and using any product you like and link it up via the linky on the Uniko site. You don't have to have a blog to enter, you can link your card from your Instagram, Facebook, Pinterest or like with all challenges, you can email Bev your entry.

You don't have to use Uniko products, but we'd love to see you using your Uniko stash (including Uniko Digital Freebies via the link on the blog or ones from Magazine Features), there's an extra opportunity to win a prize if you do.

So here is my birthday card to get the party started.


To start my design, I took a panel of MM paper and heat embossed in white, a row of 9 candles from the Big n Bold Wish stamp set.
Each candle was then coloured in rainbow colour order, using Zig markers. The flames were coloured  and a warm glow added with a wash of yellows. The rest of the panel was finished with a wash of Salty Ocean DI and dark blue Zig pen towards the bottom.
The sentiment, from Birthday Sentiments, stamped with Altenew's Pure Graphite ink, was then embossed with clear gloss EP. Using an MFT stitched rectangle, I die cut the painted panel and mounted it flat on to an A6 side fold note card from my stash.

There are some more fab birthday cards by the Brand Ambassadors over on the Uniko blog. Why not check them out and leave some love along the way for the chance to win a prize!

Need a little more incentive to join in on the fun? How about some prizes.

  • Main winner chosen by the DT - £25 eGift Certificate
  • Random Uniko stamps winner - In stock clear stamp set of winners choosing (any value)
  • Top 5 chosen by DT - In Stock £5 clear stamp set of winners choosing
  • Two randomly selected comments from the Design Team Hop - In stock £5 clear stamp set of winners choosing

That's a total of NINE chances to win! 
Winners will be announced Sunday 7th March 2021 along with all the other 9th Birthday Celebration Winners.

Why not take advantage of this fabulous discount code too! The code celebrate9 is valid for the whole month of February 2021 and can be used on any order placed, even if you place multiple orders during the month!

So what's stopping you? 

Don't forget to leave a comment before you leave, you might miss out on a prize!

Happy Hopping!

I'm joining in over at:-

die-cut/ embossing/ blue


Monday 1 February 2021

Color Hues#11- Always and Forever

Afternoon, is it February already? Well as it's the first of the month it's time for a new colour combo at Color Hues. We've gone for a romantic colourway this month of Valentine's Day. Here is my take.


I've made quite a few cards using strips of card as backgrounds but for this card I made them the star of the show! I'd seen this card by Norine Borys and thought the black outline together with the striped
die cut was very striking so decided to make my take on it using the challenge colours.

I used Altenew's Hibiscus stamp set, it is a big bold outline stamp set, perfect for the background. After stamping and masking the different elements to create my spray, I went to work on my scrap box. As I've had a lot of time on my hands recently, I decided to have a clear out and tidy my bits and bobs. I also wanted to use some of them up and the striped backgrounds are a perfect way. You can buy dies to do the job but I just eyeballed it. The 1/4" strips were glued to a scrap of copy paper before lining up the Tall Alphabet Dies from Altenew onto my panel. I tried my best to line them up so that the lines of the strips followed the horizontal. When cut out, I placed them above a sentiment strip stamped with Always and Forever from Uniko's Always and Forever set. The result, I feel, is quite romantic without being too mushy!

So for more red and pink inspiration please check out the rest of the girls over at the Color Hues blog, then why not join in?

I'm joining in over at :-

Used fussy cut masks to create the spray