Tuesday 24 January 2023

Cute Puppies

Good morning. Time for a new challenge at Cardz4Guyz. This week our focus is:-

PETS

So any project that features a pet for a bloke, young or old! For my take I went with a cute puppy image from LOTV.


LOTV had a January sale on and I just couldn't resist this cute chap. He comes with a friend but I chose to use just the sitting pup not his chasing buddy!

I printed him out 3 times, but reversed one of the images. After colouring him with Copic markers, I fussy cut them out and arranged them behind a panel of kraft card that I had die cut some circles from. I found some bright blue card in my stash, cut a strip and edged it with a stitched scalloped die on the long edges. This was glued onto an A6 note card and the pups added on pads. A simple LOTV stamped sentiment completes. I suppose it will be another card to add to my Grandson's party pile, he's already used the last one I made!

So where will you go with this theme? The DT have come up with lots of ideas for you so why not check them out on the Cardz4Guyz blog, then join in.

Joining in over at:-

For a Child

Sunday 22 January 2023

BA Inspiration @Uniko, Don't forget the small elements!

 Good morning. I'm over on the Uniko blog with some more inspiration using the new stencil, MOD Background Builders Circle stencil. Here are a couple of ideas using just the large semi circle.


All the details can be found over on the Uniko blog.

Monday 16 January 2023

Color Hues #56

Well we're half way through January already, so that means a new colour combination at Color Hues. With Valentines Day only a month away we've gone with a romantic combination for you. Here's my take.


I've used a panel of smooshed ink under a die cut Sizzix Scattered Hearts die cut panel and an MFT sentiment.
On a MM mat, I added DI Kitsch Flamingo and Candied Apple, spritzed them with water and dragged a panel of MM paper through. Allowed that to dry then went in again to add some more texture and repeated again until I was satisfied with the depth of colour.
From a panel of linen textured card, I cut the Scattered hearts and glued the white remainder onto the inked panel. The hearts outline was added back along with the extra cut outs to leave the panel showing through the heart shapes. A simple sentiment was added on a strip of matching card, along with a couple of die cut hearts in gold. Finally I glued the completed panel onto a white linen textured base card.
So where will these colours take you? We'd love to see your takes in the Color Hues gallery. For more inspiration please check out the rest of the team and our GD here and then why not join in?

Joining in over at:-

Friday 13 January 2023

Release Day, Blog Hop and Giveaway

Good morning. It's release day at Uniko and we are giving you the chance to win the whole release in our blog hop. Just leave a comment as you hop along to win, simples!! The stamps and stencil are also available to purchase here.

My first card using the new release, combines Mid Century Modern Frames and Purrfect for this 50's inspired card.


The largest of the frames was stamped followed by the cat outline. I didn't need to mask it off as I was going to colour it with black Copic. I also stamped a few of the small atomic elements in black. The sentiment is from the frames set too.

Keeping with the cat set, I created this fun card.


I used a Sizzix plate die for the circular openings as well as a couple more made using a punch. The solid cat was stamped in various directions with Memento Tuxedo Black onto the largest 7 circles, adding the features with clear EP and white gel pen. The smaller circles were placed back into the panel and secured at the back with tape, the stamped ones placed in and similarly secured before adding to a white base card. A sentiment combining the Mid Century modern Frames and Purrfect sets completes.

My next card is very simple and uses the BB Mid Century Linear Lines stamp.


I simply stamped and embossed the lines a few times in my MISTI to build up the dimension then added the sentiment, So Much, with Jewelled Gold EP and fussy cut. The finished panel was added to a matching base card on pads.

Now do you remember my stencil panel card from yesterday? Well here is the other half in another masculine birthday card.


I simply trimmed the leftover panel down, cut it into two and popped both pieces up on pads onto an A6 base card with the sentiment from Floral Vines stamped in black in the gap. It was a bit of a faff to get all the different colours inked onto the panel so I'm pleased I managed to make two cards from the one panel!

So what do you think? I know I've had fun playing with the new release and I know the rest of the girls have had a fun time playing too. For the chance to win the full release hop along to leave some love as Bev will be drawing one lucky commenter from blogs and social media to win.

Julie - that's me

So don't forget to leave a comment here before you hop along, Bev will draw the winners on Saturday 21st January.
Happy hopping!

Thursday 12 January 2023

Introducing ... Mid Century Modern Purrfect Day and MOD Background Builder Circles

Morning and welcome to day 3 of the latest release from Uniko. Today sees us focusing on a cute new stamp set, Mid Century Modern Purrfect Day. Here's my take using the cute puss cats.


When I first saw the set I wanted to use the cats to create a heart shape with their tails, but as they weren't a mirror image of each other I had to sit and have a think.
I ended up using the mirror stamping technique for one of the cats, stamping the outline one onto the back of a larger stamp, any Background Block stamp is perfect for this, before stamping it off onto the paper. I coloured the cats with Copic marker and fussy cut, by fussy cutting them I was able to make a more heart shaped shape with their linked tails! After I'd done all this, I realised that if I had just cut the second outline out and coloured the wrong side of the cat, it would have worked just as well! 

A panel of white card was inked with Chipped Sapphire DI, keeping it light where I was going to place my die cut moon. The moon is simply a die cut circle with a light inking of Weathered Wood DI. the moon was added to the inked panel and the two cats added, I did cut off the very bottom of each cat that over hung the panel before adding it on pads to the A6 base card to which I'd already stamped the word Purrfect. A few tiny silver gems to one of the cats completes.

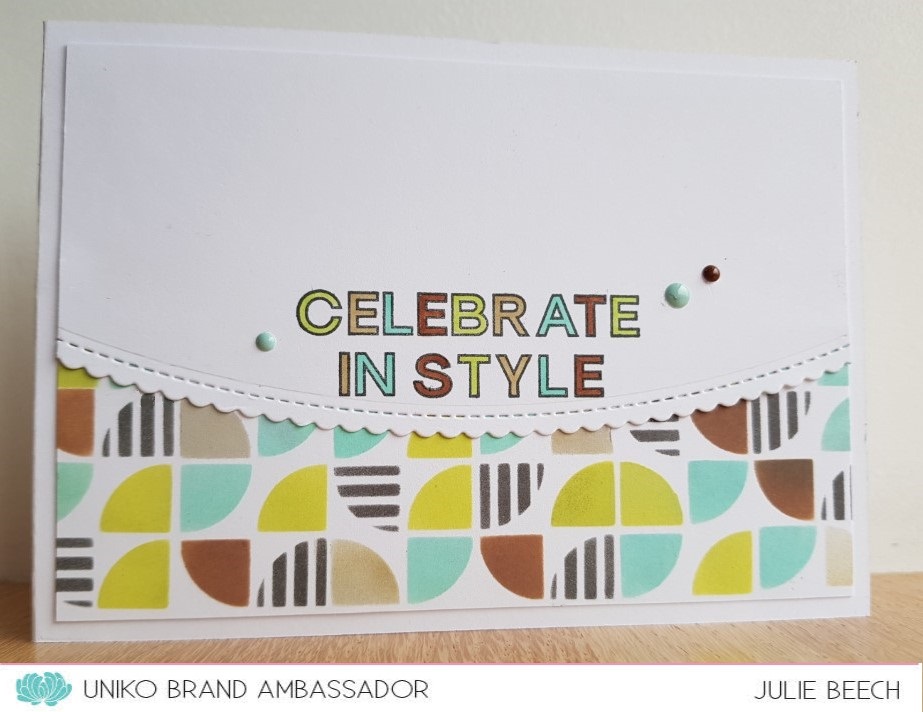
Now to the stencil, MOD Background Builder Circles. Still keeping with the retro theme this can be used to create a whole panel of pattern or just a small area, it's all down to you! Here's what I made with half an A6 panel I created.


I chose the colours after seeing them as wall art on Pinterest. I would never have thought to use them but I really like how they go together. I used a mix of DOx and Altenew inks, masking off as I went. Each shape was given it's own colour to make my life easier but can you spot where I got it wrong?
The finished panel was added to a base card and the scalloped edged panel, stamped with the sentiment from Sentiments Outlined. The sentiment was coloured with matching Copic markers and a few Create a Smile enamel dots added to finish.

For more inspiration why not check out the rest of the Uniko team over on their blogs?
Tomorrow is launch day and you'll be able to buy the whole release as well as the usual chance to win it by taking part in our blog hop!

Wednesday 11 January 2023

Introducing ... Mid Century Modern Frames

Morning all, it's day 2 of the Uniko release and today we are previewing Mid Century Frames. A set of 3 frames and some text for you to use in lots of different ways. Here's my take using just one of them.


On a panel of white card, I stamped an arrangement of the simplest frame in black. On a Post-It note I stamped the same frame and cut away the center to create a mask. Using the that, I inked the centers with a rainbow of colours. When dry, an assortment of sentiments from Everyday Sentiments and Floral Sentiments were stamped in Versamark and heat embossed with white EP.
The panel was trimmed and added to an A6 base card to complete.

Here's another card using another frame from the set.


A simple retro themed card using the text and atomic stamp as well. The black pole was added using a black fine liner and the Mid Century Modern stencil
The frames were stamped and coloured with Copic markers, sentiments added for a quick graphic card.

That's it for today but I'll be back for the final release introduction. Check out the rest of the team for some fab inspiration as well.

Tuesday 10 January 2023

Introducing ..Background Blocks Mid Century Modern Linear

Good morning, I'm back with day 1 of the Uniko January release. Today we are focusing on another fab addition to the Background Blocks stable- Mid Century Linear. As with the other Background Blocks, it's extremely versatile, use it on it's own or in the background like I have in my first card.


On a panel of midnight blue card, I stamped the BB three times down the center of the panel with Versamark and then embossed with a mix of WOW Oceanic EP and WOW Changers Glisten.
On a separate piece of Copic friendly card, I stamped the large spray from Hello Lovely and coloured it with Copics. After fussy cutting it out, I laid it across the top 2/3rds of the blue panel on pads. The sentiment from Birthday wishes was stamped on a white panel and added flat. The completed panel was then glued flat onto a DL card base.

This second card was the result of an experiment, but I turned it into a masculine card with the simple addition of a fussy cut sentiment.


I started by stamping three of the stamp in a row on white card with Versamark, then embossed with Primary red EP, then added another set of the stamp just slightly off to one side and embossed with clear EP. Finally I inked over the top with Black Soot DOx.  The result was a bit patchy, I really needed to add more clear EP but that wasn't possible as the patchiness only showed up after the ink was added! 
I found a frame in my stash and moved it over the stamped panel until I found the best look and mounted the panel behind it and trimmed off the overhang. A simple red embossed sentiment from Birthday Sentiments, fussy cut and added on pads completes. 
The result a masculine card, perfect for a Man U or Sheff U fan!

The rest of the team have been playing with the new stamps too, why not check them out for some more fab inspiration. I'll be back again tomorrow with another new release.

Up the Blues!

Good morning and Happy New Year. It's time for a new challenge at Cardz4Guyz. This time we've got a really easy one for the first theme of 2023:-

A CHILD'S BIRTHDAY

With a young grandson, there's always call for some birthday cards for his mates, that boy has such a hectic social life! Here's another for the stash.


I looked through my stamped and printed off box of images and found this little footballer from LOTV. He's had lots of use over the years, well worth the cost. I was wondering what colours to use when I saw that the girls at JUGS have a colour challenge and so do The Cutie Pies, so decided to go for that theme and a layout I used a few years ago.
In my bits tray, I found some blue corrugated card for my background and some white that I cut some circular openings in. I stamped the goalie image using another LOTV stamp and coloured both with Copics before fussy cutting them out. 

The corrugated panel was added to an A6 white base card and I doodled a couple of lines around each of the openings on my white panel before gluing it flat over the top. A small piece of white was slipped behind the bottom circle to ground my footballer before adding the number, goalie and footballer images. An LOTV sentiment was stamped on a strip and added to complete.
So what will you decide to make? Need more inspiration, then please check out the rest of the DT here.

Joining in over at:-

 
January Blues


Monday 9 January 2023

Uniko January Release Sneak Peeks

 Morning all. It's time for a sneaky peek at the latest Uniko release.

Over the next few days we'll be revealing them one by one in all their glory, but for today you'll have to be satisfied with just the sneak peeks


Three brand new stamp sets and a one stencil. What do you think? Pop by tomorrow for the first of the reveals, see you then.

Sunday 1 January 2023

Color Hues #55

Happy New Year! 
Hope you had a great holiday period and you are all well. We're straight back in with a brand new colour combo at Color Hues, as well as three new team members, here's my take.


I've got a couple of January birthdays coming up so decided to make one of those, starting with a stencil from Uniko and some embossing paste with EP on top, it gives a lovely dimensional effect.
On a 5x7 panel of white card, I inked through the stencil with some white embossing paste, quickly removed the stencil to some water to clean later and sprinkled some Stampendous Jewelled Gold EP over, then left it over night to dry before heat setting. If you rush before the paste is fully dry it makes nasty bubbles in the pattern. 
Using my Altenew Garden Picks dies and white card and Memory Box's Fresh Foliage die and a couple of different pieces of gold card, I cut out some flowers and foliage. The flower layers I coloured with Altenew's Frosty Pink and Coral Berry inks, trying to keep the effect soft, before assembling them. 
The stencilled panel was trimmed down and a panel of embossed white added, the joint masked using a strip of linen effect gold card. The gold foliage was arranged over the join and the white leaves and flowers added over the top. A sentiment strip, HLS, was stamped and slipped under the posy arrangement. The completed panel was then added to a 5 x 7 base card.
So that's it, what will you do with the colours? We'd love to see your takes in the Color Hues gallery this time. For more fab inspiration from the rest of the Color Hues team, check out the blog.

Joining in over at:-