Wednesday 26 December 2018

Congratulations Mr and Mrs

Well hello, hope you had a fab Christmas with friends and family.
All is now quiet chez Beech after a hectic but lovely couple of days with the kids and grandkids.
I've now got time to share a card I made for the wedding of the best friend of my son.


I didn't know what the brides colour scheme was so went down a traditional red and soft pink route.
I must admit to having been inspired by this fab card by Therese Calvird. I loved the bold die cut Mr and Mrs against the grey background. Her's was an A6 card but mine was a 5 x 7 so I needed to make the layout a little different. 
I decided to use those same die cut letters from the Altenew bold alphabet set and include a larger bouquet of roses, in fact I added a small one in the bottom left to balance the design. 
Despite having tons of coloured card in my stash, I have found it really difficult to find the right colours for these layering dies, so used my Copic markers to colour white die cuts before building up the layers. 
I liked Therese's idea of popping the letters up on red fun foam which matched the colour of the flowers, giving them a little more room to spread out on the larger format. A few Pretty Pink Posh clear sequins and a congratulations banner completed the design. I'm so glad that I bought these dies as they are so easy to use and create such great effects.

As it's review of the year time over at Altenew I thought I could share it there as the colours match the February colour swatch.


Simom Says Stamp Wednesday Challenge
wed-newchallenge-header
Anything Goes

Tuesday 18 December 2018

Tartan Happy New Year

Good morning, back to share a card I made for the new challenge over at Cardz4Guyz
The theme this time is :-

NEW YEAR - NEW BEGINNINGS

So,  I thought about making a tartan inspired card. Scotland seems to celebrate the New Year or Hogmanay more than we do here.


The background to this card was made using the stamp strips from Uniko's Background Builders Christmas 2018 set. I was inspired by fellow Uniko DT member Sarah P to create the background after I saw this fab card
I used a panel of red card, a gold liner pen and three of the strips, the 3 stripes, diagonal lines and the wrong side of the Ho ho ho!
The diagonal line strip was laid across the panel and inked in Versamark before heat embossing with white EP, repeating to get the required pattern.
The 3 line stamp was inked in Altenew's Hunter Green and stamped in a tartan pattern followed by the Ho Ho Ho stamp which I reversed to get a plain image in Altenew's Ruby Red. When dry I added some gold lines with a fine gold marker and a straight edge.
The panel was then trimmed down to size and added to a white base card. 
From some gold glitter paper, I cut the 2019 and added it to the same cut from red fun foam.
On a banner of black card, I stamped the sentiment from Simply Said Christmas and heat embossed with white EP and then popped it up on a strip of foam.

For more masculine themed cards pop over to the Cardz4Guyz blog.
Hope we can prove to you that making cards for the blokes in your life is easier than you think.

Monday 17 December 2018

A little bit extra

Just stopping by to remind you that there is still time to enter ALL the STAMPlorations challenges.
Here is my inspiration for you.


I've used the CUTplorations Peace, Love and Joy phrase die as well as some older stamps from Christmas Medley, Frames and Flowers and Trendy Spring Blooms.
I used the CUTplorations inspiration photo, focusing on the poinsettias and foliage.


The phrase die was cut from black card and placed centrally on a white base card, then using my MISTI, I stamped the sprays of foliage in shades of green. On some scraps of white, I stamped two of the poinsettias from Christmas Medley and embossed with gold EP. I used some Zig markers to colour and then fussy cut them. The centers of the flowers were made with tiny dots of white PVA, coloured with a yellow Copic. Before adding them I decided to add some red Nuvo drops to the foliage and some Wink of Stella to the Phrase die for some shimmer, which sadly does not show up in the photo.

OK, that's all for me but if you are short of the odd Christmas card, why don't you link up your creations to the STAMPlorations blog. The CUTplorations challenge can be found here.

I'm joining in over at:-

For your blog
Make a Christmas card #2

Sunday 16 December 2018

Another one layer Christmas card

Afternoon peeps. Just taken the dog out before it got too dark, still not long now before the days start to lengthen!
Here is another Christmas card to share with you involving lots of masking.


I love a one layer card but they do require some planning!
I started by masking off a rectangle with Post-its on a white base card and added a torn piece at the bottom to make a snowdrift. It was then inked up with DI before stamping some trees in the same. colours. The main tree was stamped in black and I added some of the same DI over the branches. The snowdrift looked too bright so I knocked it back with a touch of  Vintage Photo. Some white chunky EP was scattered over the scene and heated carefully so it didn't blow everywhere!
Finally I added a simple sentiment.
I'm still in the process of decorating the main tree in the lounge, it got too dark to see what I was doing, but the one in the snug is finished. It was one that we grew from a seedling planted nearly 10 years ago and it was sad that it had to be cut down but it had to be done though as the others were being crowded out. This is the third cull from the plot and there is something very satisfying in decorating your own grown tree. The last two came with roots but this was too large a root ball to get out without disturbing the others. My Grandson and OH cut it down last week but the weather was so vile that we left it soaking in a bucket until Thursday. 

Joining in over at:-

Grab our logo
Christmas Trees                                 

Thursday 13 December 2018

Another bauble scene

Morning all.
Just stopping by to share another Christmas card featuring a bauble scene.


I was given this eastern die cut by my bloggie friend Sarah (Sazzle Dazzle) at last years HLS retreat, thanks. I didn't get the chance to use it last year but thought I should use it this.

My stating point was the pic over at CASual Friday of the scene in a bauble.
I simply inked a starry sky with DI and added the black silhouette die cut to the panel then cut a circle out with a die from the stash. I cut the star with an IO snowflake die from gold card, adding a glitter paper gold star to the middle. A few extras were added with a white gel pen. to complete I added a gold mirror card hanger and some glittery ribbon. My sentiment is from STAMPlorations Christmas Bauble set and is embossed in gold EP.
I think I've made all my cards now but you never know! There are still quite a few still to share though. 

Joining in over at-


Tuesday 11 December 2018

Bubble chicks to naughty robins

Good evening.
Back again today with a card to share for the start of this week's ATSM challenge.


It's time to -----


So cards where you make a mark, colouring, stiching, fussy cutting etc.

At the end of October I attended a Copic colouring class run by the lovely Faye Wynn-Jones. We had a great time and one of the sessions involved changing some chicks doing aerobics from Stamping Bella into penguins and robins. I did buy that stamp set but I also had another chick stamp where they were blowing bubbles which I used here. I decided to try the Faye transformation on these chicks and turned bubbles into baubles and chicks into robins. What do you think?
The Christmas foliage was stamped at the top of a white base card using a foliage stamp from the STAMPlorations Christmas Bell Medley set, stamped repeatedly in Mowed Lawn and Pine Needles DI, adding some water with a brush to soften in places. Chicks and bubbles were stamped then coloured using Copics before being fussy cut. Strings and holders were added using a black fine liner and a ruler.

For more inspiration check out the rest of the DT here and join us in our last challenge before the Christmas break.

Joining in over at:-

Take It, Make It Challenge

Uniko December Release

Good morning and welcome.
If you've been following the Uniko blog, you'll know that it's release day over there!
Three fab stamp sets AND two gorgeous stencils too.

Here are a few ideas for the new sets, so get a cuppa and settle in for a show.


This birthday card uses the latest addition to the Pure Florals range at Uniko. This time its a peony with additional script 'sending' and addition small sentiments.

Pure Florals: Peony £15 Clear Stamp Set

I started by stamping the large bloom and then a couple of the buds with Altenew Industrial Diamond ink, before colouring with Copics and fussy cutting. I wanted some texture for my base card so stamped some wood grain with a stamp from the stash and heat embossed with white EP. From some gold mirror card, I die cut a frame and arranged the blooms on the base card adding a gold embossed vellum sentiment strip.

My next two cards are made with the gorgeous Let it Snow stencil.


I used a selection of DI and DOxs to ink through it onto a panel of white card which I then used to form the main panel of the first card, then cut the letters for the second from the leftovers.
I chose a matching pink base card and added two thin strips of silver under the edges of the stenciled panel and added a die cut joy with a banner stamped using Simply Said Christmas on black and heat embossed with white EP. The die cut joy, from the Works, was cut from silver glitter paper and also from fun foam before being added to the base card. 
I used the bold alphabet die set from Altenew to cut the noel after I saw a card on You Tube by Therese Calvird. I love the contrast between the dark shimmery grey card base and the pink and white letters. A couple od die cut snowflakes that were sitting on my desk were added for accents.

Let It Snow Stencil £3.50

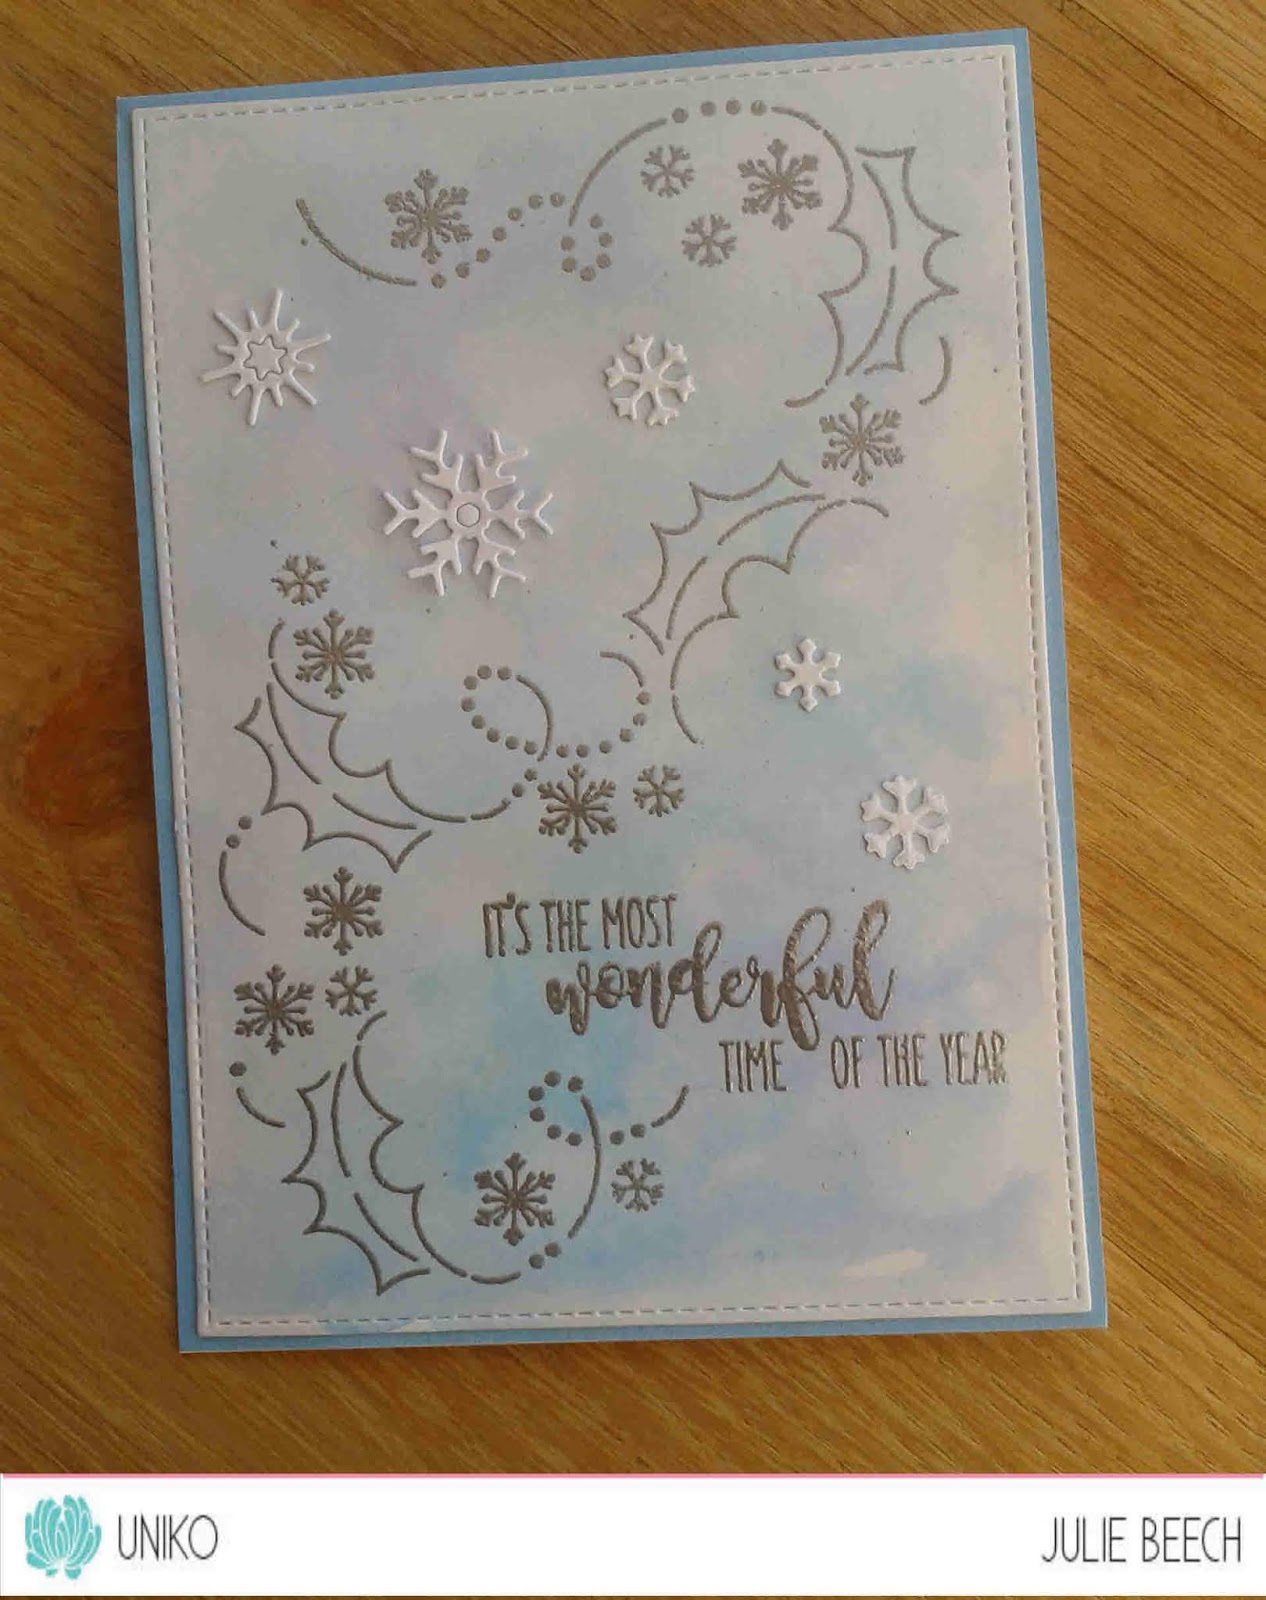
This fourth card uses the same stencil as well as the stunning Snowflake Serenade stamp set.


You can't really see the very subtle pattern of the stencil which I placed over a panel of dilute DI ink and left to dry, think I removed it too soon, but it worked with the delicate swirl of the holly leaves and snowflakes of the stamp which I simply embossed in silver over the top. Using a stitched rectangle die, I cut the panel down to size and mounted it on a pale blue card base. I added a few more of the die cut snowflakes from the stash and stamped and embossed the sentiment from the same set in matching silver EP.

Snowflake Serenade £9 Clear Stamp Set


Back to stencils for these next two cards, this time using the In the Forest stencil.


Again I inked a panel of white card through the stencil with an assortment of three green DOxs, Forest Moss, Twisted Citron and Mown Lawn but treated each half slightly differently.
The first half had the stencil replaced over it and Versamark inked over and then embossed with clear EP. Make sure you get a good coverage as when you add the blue DOx over the top, it will colour the green underneath! I found a previously die cut panel and placed the inked panel underneath, adding a white die cut Rudolph on foam with a red diamonte for his nose. The silver twinkle embossed sentiment  is from the Snowflake Sentiment set.
The second just adds a couple of die cut snowdrifts beneath the simply inked panel and a simple sentiment from Festive Sentiments.

In The Forest Stencil £3.50

My final card uses the Wonderful day stamp set, but only some of the tiny stamps!


I was still in need of a few more Christmas cards so decided to turn what is essentially a birthday stamp set into a Christmas one by using the berry style sprigs and laurel sprays.
I used the colours at The Paper Players and the layout at CAS(E) this sketch for my inspiration as after all these cards I was sorely in need!
I used some Altenew inks to stamp the foliage on a strip of white card and stamped and embossed with gold EP the Merry Christmas from the Festive Sentiments on a panel of red card.

                                                    
Wonderful Day £9 Clear Stamp Set

So that's it from me but there's tons more inspiration for you over on the rest of the DT's blogs.
Hop over and check them out, leave a comment and have the chance to win some Uniko goodies. 
All the details are on the Uniko blog.

Julie -that'll be me

Joining in over at:-


                                             free for all


                                              Greens


                                              Die cuts are my choice

Tuesday 4 December 2018

Wishing you all the joys of Christmas

Morning all.
Have you got your tree up, finished all your shopping and posted all your Christmas cards, no me neither!
Anyway, if your are in need of some more cards for your stash you may like to know that the latest challenge at Cardz4Guyz is -

SNOWMEN

So, I had a trawl through the stash and ended up with this old favourite. They didn't get a look in last year so I decided to show them some love with this card.


I always seem to make A6 cards so I decided to break with tradition and use this layout, one I've used before but using my Stacked Scalloped and plain circle dies that my lovely daughter bought me.

I cut three largish scalloped ones from white card, a middling one from white using the plaine die set and the next size up in black. The layout is one I learned at class a couple of years ago but the background uses a technique I learnt at my Copic class in October. 
I covered a circle of white card with B39 Copic then using a microfibre cloth dipped in Copic colourless blender, no sponge was available, I dabbed over the whole panel before adding the snow using white PVA and a white gel pen. 
I stamped the LOTV Snow family on one of the scalloped circles and coloured them with Copics before fussy cutting the family out. I did extend the snow line to the edge of the circle with a black fineliner before cutting out and adding the sentiment from Uniko.
The black circle and snowy one were added to the from panel and then after scoring a hinge on the last scalloped circle attached it to the front one at the top to make the base card. 
For added sparkle I painted some clear Wink of Stella around the black frame and on to the snow family and surrounding snow. I wish it showed up better in the picture but it does sparkle in real life, not too much as it is for a chap! The snow family was lined up with the base and secured with some sticky foam pads.
Not the quickest to make but a little different for me. 
For more Snowmen inspiration, check out the rest of the team here, then why not join us in the gallery?

I'm joining in over at:-

    
                                            Festive free for all

Stamping Sensations

Winter Sparkle

Monday 3 December 2018

Christmas Baubles

Good evening and welcome.
It's the start of a brand new challenge over at STAMPlorations, our  CUTplorations challenge.
Here is my inspiration for you.


I based it on this month's pic below.

image source: 30smagazine

My starting point was that it was obviously Christmas decorations so I made some Christmas baubles, or Wesley Bobbs as my friend calls them. I'd never heard of that name for them before, it must be a West Yorkshire thing, 'cos I hadn't come across the term until I moved further north from Sheffield which is also in Yorkshire England!

In a previous post I made a single bauble, here, so for this card I made a trio of graduated ones. I was going to use Christmas Baubles #1 dies but as I wanted graduation, I had to come up with another method.
I cut 2 of 3 different sized circles using circle dies from the stash and set one set to one side while I inked the rest with Salty Ocean and Chipped Sapphire DI, keeping the centers lighter to create the illusion of dimension. From the other set I cut a landscape from the bottom half using the Stitched Winter Landscape Die., which I glued to the matching inked circle. Some white gel pen dots suggest snow falling or a starry sky. To get a random effect I used the tip I picked up on a recent colouring class - add some random dots then come back later and add some more! It works. A hit of Wink of Stella was added to the snow drift for a subtle hint of sparkle.
Then using the hanger section of the Christmas Baubles #1 Layering DiesI cut 3 from silver card. I replaced the centers of two using double sided tape on the reverse but left it out of the third. These were then attached behind the three baubles. Some silver Christmas twine was threaded through each bauble and glued down using double sided tape
On a panel of white card, I planned where I wanted the baubles then stamped the sentiment from the Christmas Baubles stamp set in black. The ornaments were then glued to my panel and the excess twine secured with more tape on the reverse. Some foam tape popped the completed panel up over a 5 x 7 base card.
So what will inspire you, there are more ideas from the rest of the team here but we'd love to see what ideas you come up with and you get the chance to win some STAMPlorations goodies if you enter! All Ts and Cs are on the STAMPlorations blog page.

Joining in over at:-

    For your blog
        Make a Christmas card


Sunday 2 December 2018

Onelayer poinsettia

Evening peeps.
Just dragging myself away from the Strictly Results show to share this card for the start of this month's CAS challenge at Happy Little Stampers.


Our theme this time is -


There are lot's of ways to incorporate this technique, heat or dry, into your projects, I used both in this example.

On a A6 top fold white card, I stamped the gorgeous large Poinsettia from Uniko in Altenew Evening Gray and heat embossed it with WOW Clear semi dull EP. It know it looks grey in the photo but you actually get a subtle tarnished gold effect close up, just what I was after. I then decided to emboss a rectangle to frame the design but keep it one layer. My sentiments, also from Uniko were stamped and embossed with WOW Pale gold EP and that's that! A CAS one layer card.

Just in case you're not sure what CAS means here are a few pointers to help you.


If you enter, the winner for this challenge will receive a $20 coupon to spend at the shop! Check out all the details HERE.

IF YOU USE STAMPS BY HAPPY LITTLE STAMPERS AND YOU ARE OUR RANDOM WINNER, YOUR PRIZE WILL BE DOUBLED!

So come along and join in!

Joining in over at:-