Tuesday 19 April 2022

Let's Celebrate You

 Good morning, hope you had a good Bank Holiday weekend and you weren't too inconvenienced by all the airport holdups, road and rail works that were going on. Easter weekend is not the time to go on the roads, in my opinion, especially this year as it's the first holiday since Covid restrictions were fully lifted, we Brits are like lemmings heading for the coast at the first opportunity!

Anyway the good weather allowed me some time in the garden but I also had time to make a card for the new Cardz4Guyz challenge. Here's what I came up with using the new theme of :-

TAG IT

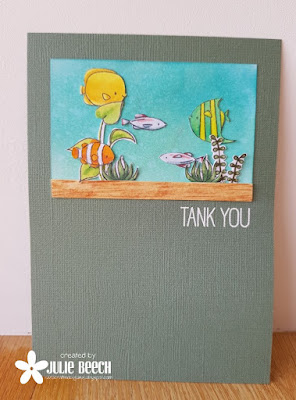
I used the current challenge at The Male Room as my starting off point and included a tag cut from an embossed panel and these cute critters from MFT.

I took a panel of white card, trimmed to give me a border when added to an A6 card. The tag was cut from it using a Poppystamps die, then embossed with a Cuttlebug EF that I've had since I started making cards many years ago. Behind the tag opening, I added a snippet of DP and I then glued the panel onto an A6 white base card. On some Copic friendly card, I stamped the 3 critters from MFT's Birth-Yay set, coloured them with Copics and fussy cut them out. Using another ancient MS grass punch I cut two strips of green card and added them to my tag. A hole was punched in the tag and a bit of jute twine was added before gluing the tag at a jaunty angle. The animals were added along with the stamped sentiment strip to complete.

So where will the theme take you? If you need more inspiration why not check out the rest of the team here.

Joining in over at:-


Cute or Flowers
I went cute, well I usually do, especially as flowers aren't exactly masculine! Cute cards are always needed when you have 2 socially active Grandsons as well.

Saturday 16 April 2022

Color Hues #39

Good afternoon, we're halfway through the month so it's time for a brand new colour combination at Color Hues. Here's my take.


Over at the Flower Challenge they want you to add a heart to your design, so I decided to make an engagement card with a stenciled heart background and some bold purple blooms from Altenew.
To start, I took a slightly smaller than A6 panel of white card and stenciled through a heart stencil with Nuvo Moonstone Glimmer paste and set to one side to dry. I've not used the paste for awhile and although the original paper cap is on and lid was tightly shut, the paste has dried out a lot. Anyone else had the same problem? 
On a panel of Copic friendly card, I stamped the Altenew Poppy Garden flowers and leaves in Memento Tuxedo Black, colouring the petals with a mix of V12, V15, V17 and V09 Copic marker. The leaves were coloured using YG21, YG25,YG17 and YG67. The flower centers posed a slight problem as I was limited to the colours in the challenge and neutrals, but I got over this by using a selection of Copics from the green section, YG00, YG95, YG97 and G99.
The greeting is an old Cuttlebug plate die cut from silver mirror card, mounted on fun foam and a stamped sentiment strip from HLS. The completed panel was then added to an A6 white base card.

So where will the colours take you? The DT have come up with some fabulous ideas to get your creative juices flowing, check them out here.

Joining in over at:-

Thursday 14 April 2022

Pirate Treasure

 Good evening. As we head to the middle of the month, I have good news, the swallows are back! Well actually I only spotted one when I hung out the washing this morning but it's a start, I also spotted a wheatear earlier this week so spring is definately here. It's also time for a new challenge at Perfectly CAS.

This month we have a theme that could take you in lots of different directions but here's what I came up with!


This fun pirate with his stash of gold doubloons is from the Party like a Pirate set from MFT.
I stamped the treasure chest, pirate and gold on to Copic friendly card, coloured with Copics and then fussy cut the elements out.
On an A6 white base card, I inked in a soft background using an MFT cloud stencil and part of the waste from a die cut circle for the island. The elements were then arranged on top and my LOTV sentiment stamped below completes.
My stash of masculine birthday cards was depleted by my daughter's recent visit, so it will go towards a new pile!
So where will the cue card take you? It could include gold coloured elements or themed ones but which ever way you go don't forget to keep it CAS!
For more inspiration, please check out the rest of the DT here.

Joining in over at:-

Does pirate qualify as an occupation, I hope it does!

Masculine

Tuesday 12 April 2022

Spring Bunny with Daffs

Hi, just popping by to share a card made for a few challenges out there.


I needed another Easter card to go with the one I made a couple of weeks ago but this time I was influenced by a couple of challenges so went with this LOTV image Spring Bunny with Daffodils. In the original image he isn't jumping quite so high but to make a better arrangement on my background I decided to cut him from the flowers and added him separately.
On an oval white die cut, I inked the background using the MFT cloud stencil, added some green at the bottom, then added the Copic coloured fussy cut daffs.
After colouring with Copics and fussy cutting the rabbit, I added him to the top half of the oval.
The finished panel was then added to a plain white A6 base card on which I'd stamped the sentiment in black.
That's about it, thanks for stopping by. 

Joining in over at:-

             Stencil            


Bunnies and Blooms

Hoppy Easter/ Animals

Monday 11 April 2022

Playing on a Sunday Afternoon

Good morning all. 

After a busy day in the garden yesterday, I decided to have a chill session playing in the craft room before tea. One of my DT commitments was proving tricky so I gave up and got my alcohol inks out and had a play. The ladies at JUGS want foil on alcohol inked backgrounds so, I looked at my few inks and decided to go with a wintry sky look. I'm still running behind in my efforts to make Christmas cards all through the year, I know, nothing for ages then like London buses two in a row! Here's what I finally ended up with.


I used Sailboat Blue and Turquoise on a thin scrap of Yupo paper, messing around with blender solution, foil and blending tool, I came up with this. Well part of the strip, there's another half left that I can use for another card. 
The foil adheres to the sticky edges of the pooled ink so you have to be quick applying it, I chose silver to go with the blue, then trimmed my panel down and added the little wintry scene using that Marianne tree scape die and a die cut tiny IO deer. The sentiment was stamped onto a white A6 base card and embossed in silver EP, then the finished panel was added on foam pads.
That's one more for the Christmas stash!

Joining in over at:-


#13

Sunday 10 April 2022

Dreaming of a White Christmas?

 Good morning folks, hope you're having a fab weekend. 

The sun might be shining now but there has been quite a nip in the air first thing in the morning these last couple of days, in fact when we took the dog out yesterday there was a little bit of icy snow left from a night time shower, in the shadier parts of the field! It just goes to show that even as we approach the Easter weekend, there can still be a sting in nature's tail! In fact I do remember a few years back we awoke to a complete white out on Easter Sunday, the snow was quite thick but it had gone by lunchtime.

That's my type of snow, doesn't hang around for too long, and it reminded me that over at Christmas with the Cuties their theme is I'm Dreaming of a White Christmas, not that I am. Snow is fine when you haven't got people visiting or places to go!

Anyway, I thought this card perfectly summed up the theme.


Over at As You like it, their theme is Recycle or Buy new, well I'm always trying to use up all my bits and bobs leftover from other projects, must be the Yorkshire gal coming out! This card uses bits from the leftover box for the snowflake frame, pale wintry sky DP as well as the die cut landscape, however I did have to print off the darker falling snow DP as I didn't have enough of it leftover. The trick to using different pieces of white together, is to either use DP between them or emboss it. The slight differences in the white is then not quite so obvious, such as here where the frame is different from the base card and background die cut landscape.
The couple wrapped up in their winter clothes is a digi from LOTV which I coloured with Copics and fussy cut. The snowflake frame was cut and then embossed with a small freebie snowflake EF and the landscape of fir trees, is cut using a Marianne die in two layers.
The sentiment from Uniko completes.

Here's a pic of that snowy Easter Sunday 2008 I found.


Joining in over at:-

I'm Dreaming of a White Christmas

Recycle or Buy New

Tuesday 5 April 2022

Computer Fun

Good morning, time for a brand new challenge at Cardz4Guyz
This time our theme is:-

ADD TEXTURE

There are lots of ways that you can add texture to a card but my favourite way is to use an embossing folder. It's a great way to lift a large area of blank space without overpowering the design. Here's my take.


I used one of my favourite layouts for this design and LOTV's Computer Fun as the focus. The DP is from a paper pad that LOTV sold quite awhile ago, I'm eking it out but I think you can get something similar to download from NitWits.
To begin, I took a 5 x 7 white base card and added the red and small circle DP, then took a panel of matching white card, cut out a circle before embossing with a Darice diagonal stripe EF, the girls at Seize the Birthday are asking us to Stripe it up! It had to be done in two stages as it was too big for the EF, but the die cut circular frame hides any errors!
The die cut frame was made using 2 circle dies and some of the same white card, then I cut a panel of text DP from the set using the same die as I used for the opening in the white panel.
To assemble, I laid my embossed panel over the base card in my MISTI. Using the magnets to secure the panel, I drew a faint pencil line around the inside edge of the circle, removed the embossed layer and glued the text DP in place inside the pencil line. 
The frame was added to the embossed panel and then the whole panel was added on foam pads over the base card.
My little computer fan was stamped, coloured with Copics and fussy cut before placing him over the opening and gluing him down with a mix of foam pads and glue.
The greeting is an LOTV stamped sentiment on a die cut banner and the name is made up of letters cut from scrap white card with Altenew's slim alphabet dies, coloured with red Copic marker to match the red side panels.

So that's my take, but where will the theme take you?
We'd love to see your take in the gallery.
For more masculine ideas, check out the rest of the team here.

Joining in over at:-

Saturday 2 April 2022

Tank You

Good evening. 
It's time for a brand new challenge at HLS CAS and here's what I came up with using this month's cue card.


I came up with a tank of tropical fish, using MFT's Gill Friends again. Just like London buses, not used for month's then twice in a month!!
I stamped a few of the different smaller images along with some of the sea weed ones, coloured with Copics and fussy cut them out.
The aquarium was made from a die cut panel of white card which I inked with a mix of Peacock Feathers and Cracked Pistachio DI and spritzed it with a fine mist of water, mopping up the water to remove a subtle amount of ink. This effect gives a mottled effect that appealed. My tank base was a strip of pale cream card which I coloured with Copics and attached to the base of the tank rectangle before adding my fussy cut foliage. 
The small fish were then glued in place and the completed panel added to an A6 drab green card base.
White space doesn't need to be white, just empty!
Using Versamark and white EP, I stamped and heat embossed the sentiment.

So where will the cue card take you? We'd love to see you in the gallery this month BUT please keep your entries CAS!
There's more fab tropical inspiration from the rest of the DT here if you need it.

Friday 1 April 2022

Uniko BA Inspiration meets Color Hues #38

Good afternoon. As it's the 1st of the month there's a new challenge over at Color Hues. This time around we have a lovely spring like combination and here is my inspiration card.


I used a no line effect with Copic colouring for this card, framing my sentiment with a thin frame so that the central tulip is still visible.
All details about the colouring can be found on the Uniko blog, where I've also shared these watercolour interpretations using the same stamp set.


So how will this colour combination inspire you?
As usual we'd love to see your takes in the gallery but if you need a little more inspiration check out the rest of the team and our GDs here.

Joining in over at:-


STAMPlorations Theme and Photo Prompt Challenge

Good morning, although it is April 1st, there really is a new challenge starting at STAMPlorations!
Here's my card based on this month's Theme and Photo prompt.


When I saw the theme, I immediately thought of a technique I saw on Jennifer McGuire's You Tube channel awhile ago, where she used a range of different sentiment stamps to create a background. I've done it with Christmas ones but never with birthday ones, so off I went to rifle through my STAMPlorations stamp sets, looking for appropriate sentiment stamps. 
I've used quite a few to create my background including, Hello YouSweet CravingsFond Expressions 2Party TimeThe Birds and The BloomsCarved FlowersSparklyBalloons and BannersA Snarky Birthday to You. All the stamps were arranged on my MISTI ready for stamping.

This is what my MISTI looked like with all the stamps arranged, some are rather discoloured because of age and lots of use! They still work though.


I chose a range of coloured card and stamped a few backgrounds, embossing with white and clear EP.
It takes time to arrange the stamps so I took the opportunity to make a batch for further use, here are some of the ones I didn't use.


I die cut the Flutter Zen 1 layering die from white card, colouring the solid element to match the background card. The filigree top was then glued to it and added to my panel, from which I had die cut a circle opening.
On a strip of black card I stamped Happy Birthday from A Snarky Birthday to You and heat embossed with white EP, then glued flat onto my finished panel. 
The die cut circle from the background was flipped, inked with Picked Raspberry DI and attached behind the opening before adding to a base card with pads.
So where will this month's cue card take you, we'd love to see your interpretations over on the STAMPlorations blog, where you'll also find the rest of the teams take and all the Ts and Cs.