Showing posts with label Sentiment Blocks. Show all posts

Saturday, 20 April 2024

Flippin' Release Day at Uniko, BA Blog hop, Giveaway and Port Sunlight!

I hope you've all enjoyed You're Going to Flip Week here at Uniko and you're as excited about this new stencil as we all are. It's now available on the Uniko website to purchase and if you're coming to Stamping Together in Port Sunlight today, Bev will have stock with her and will be also doing a LIVE demo on the How To Craft Network using this stencil. The live is recorded and will be shared once it is available in case you miss it. 

So down to business. My first card uses the same technique that I've been using throughout the week of Magic Reveal. This time I used the background foliage stamp from Bev's collaboration with Craft Stash and Versamark ink.


After my earlier failure, I tried harder to ensure there was lots of ink on the white panel but as you can see it is still quite pale but at least it is visible!!
After yesterday's card colours, I rang the changes and went for a more realistic look, using Twisted Citron DI for the background and Vintage Photo and Spiced Marmalade DIs for the butterfly. A freehand pair of antennae complete. I chose the sentiment from English Country Garden for a change, stamped in more Vintage Photo on a white panel.

Now for my second take.
This time I used the same resist technique but white pigment ink and the BB Scattered Dots stamp.


After stamping the dots with white ink on white card, I let it dry completely before adding the colour. I used what I thought was Altenew's Deep Iris but what turned out to be Lavender Fields! Think I must have dropped the pack of cubes on the floor at some stage and the tops came off and were put back incorrectly!! I love how the dots look dark against the softly inked sections and paler on the heavier inking, it's just an optical illusion as they are in fact the same colour!
Once dry I cut out the butterfly and carefully folded it along the edge of the body and then added glue just to the body so that the wings were held away from the hammered silver base card


A Simply Said Block sentiment in matching ink and white gel pen antennae complete.


So what's your opinion?
The rest of the BA's have been exploring what's possible with this new stencil, so why not go check them out too.
Be sure to comment along the way for your chance to win a Flippin' Good Prize! Commenting to win will close midnight BST Sunday 28th April 2024 and Bev will announce the winner on the blog 29th April. 

  Anita


Julie -that's me


Hopefully I will be on my way to Port Sunlight as you read this post and perhaps if you are going too you'll see me on the Uniko stand, so please say hello. 

Wednesday, 14 February 2024

Happy Valentine's Day - Introducing... Ink & Flip Geometric Heart Layering Stencil

We start off the introductions for the Uniko birthday release with another of Bev's Ink and Flip stencils.
This time as it's Valentine's Day she's designed a heart shaped one. Here's my take.


It is a two part stencil, one to create a background and one to create this fractured heart pattern.
To begin I inked up the first side of the stencil with Abandoned Coral DOx then wiped it clean, flipped it over and repeated this time using Worn Lipstick DOx. The fracture pattern gives the heart a sense of dimension, so I went one further and decided to use some very old embossing tools and a mat to give the heart a padded look. I started by placing the other part of the stencil over the inked heart and using a fine ball tool, drew around the heart, then flipping over to repeat the process. Once I had the outline, I flipped the inked panel over and using a couple of large ball tools and the mat, raised up the heart shape. A smaller heart shape cut from white fun foam was glued behind the heart before the panel was added to an A6 base card.


You can see the end result a little better here.
A simple Sentiment Blocks sentiment stamped with Abandoned Coral on white and trimmed down complete.
That's all from me for today but pop back tomorrow for another release intro.
In the mean time why not check out the rest of the girls ideas here.


Joining in over at:-


Wednesday, 31 May 2023

Introducing Bauhaus Blocks Stamp set

Morning, it's day 2 of the intros for the May release from Uniko. 

Today I've gone all Piet Mondrian using the new Bauhaus Blocks stamp set for my first card.


There are 5 blocks and 4 sentiments in the set but I only used one of the blocks for this as well as the square stamp from Background Builders Squared. I played around with the one stamp, rotating and stamping in black on white before adding the squares in primary colours. To get a rectangle or smaller square, I just masked off an area with tape before stamping. The sentiment was already in my sentiment jar and fit the space perfectly.
Each square was cut out and mounted onto a panel of black card to create a thin border, then the whole was added to a base card on pads.

This is a quick make using another of the square blocks.


This time, I stamped the block onto some card with Versamark and heat embossed with white EP, then
using 3 Zig watercolour markers, I filled in the shapes. When dry the finished panel was die cut, attached to an A6 textured off white base card and the sentiment from Simply Said stamped with Altenew's Ultra Violet, then heat embossed with clear EP.

Bev and the rest of the BAs have more fab ideas over on the blog here if you've missed them.
See you back here tomorrow for the final introduction.

Saturday, 22 April 2023

Nature's Treasure II Dies Release Blog Hop and Giveaway

Morning all. 
It's release day for the new Nature's Treasure's dies at Uniko and as is tradition we are having a blog hop and give away. The release is timed to coincide with the Stamping Together festival at Port Sunlight, so if you're heading there you could be one of the first to get hold of the new goodies and say hi to Bev too!

Spring has truly sprung, the hedgerows are buzzing with life and I saw my first swallow of the year on Tuesday and one again on Thursday, well it could have been the same one of course! So green features heavily in these designs.
Here's my first offering, using one of the small stamps from Nature's Treasures II set and the large solid die from the new release.


On a panel of mixed media paper, I smooshed some DI, Peeled Paint, Mowed Lawn and Twisted Citron, onto a craft mat and dragged the paper through it until I had sufficient coverage. Once dry, I trimmed it down to size for my frame and randomly stamped the small leaf in a mix of inks, the DI's I used for the background and some Altenew ones, Bamboo and Parrot. 
The frame was made using a couple of rectangle dies behind which I attached 3 of the leaflets cut from the same card. A sentiment was stamped and attached before the whole lot was placed over the inky background with foam pads and added to an A6 white base card.

My next card is my take on a Jennifer McGuire card I'd seen on You Tube and wanted to have a go at, using the new dies and Nature's Treasure II stencil and masks.


My background was created using the masks from the stencil set and then I die cut a few of the solid leaves, a mix of large and small to create the garland from it. To pop up the leaves, I also cut matching pieces of white fun foam which I glued to the back of each die cut and then reassembled the panel onto a base card. A few of the tiny flowers from Originally Organic Additions dies were die cut, adding a coloured pearl for the centers. These are bog standard plain pearls coloured with a Copic marker! My sentiment is from the Sentiment Block series stamped in black on white.

While I had my craft mat out for the first card, I smooshed some die cuts cut from MM paper in a mix of watery Mowed Lawn, Peacock Feathers and Twisted Citron DI. I then simply added them on pads to a white base card, trimmed off the overhangs and added another of my gold framed sentiments made from die cut circles and a Doodle Flower sentiment.


Here's the full set of dies, fab aren't they


OK, that's all from me but please check out the rest of the team for more ideas on how to use these fab new dies. 

Julie -that's me

One more thing before you go, make sure to leave a comment here and on all the stops for your chance to win a £15 eGift Certificate to spend in store. You have until midnight Sunday 30th April 2023 to comment. The lucky comment winner will be randomly selected and announced shortly after.

Wednesday, 8 June 2022

Introducing Background Builders Hearts

Hi, I'm back with another brand new stamp set from Uniko. 
Adding to the already useful series of Background Builders, meet Background Builders Hearts.
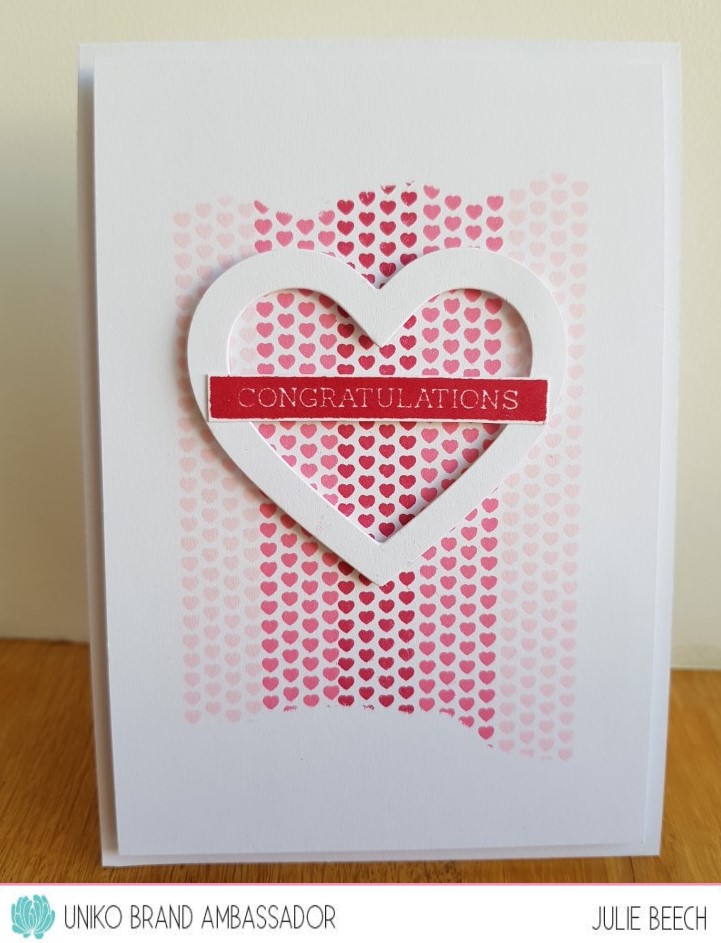
As with others in the series, there are various stamp strips to build your own patterns alongside the patterned, larger hearts. For my example I've used the solid heart strip, which reminded me of some washi tape I had so that was the inspiration for my card.


On a panel of white card, I taped some torn paper to the top and bottom and then added the heart strips.
Altenew inks come in sets so it was easy to get an ombre look using the Red Cosmos set, though I didn't use the darkest colour. The sentiment from Sentiment Blocks was stamped in the same red as the central strip and added to the die cut heart, which was added to the panel once the masking paper was removed.
I'm sure you can think of many other ways to use these stamps and to help you Bev and the BAs have some great ideas of their own for you here or on the BAs own blogs. 

I'll be back tomorrow with the final introductions before the release on Friday.

Joining in over at:-

Tuesday, 1 March 2022

Color Hues #36

Good afternoon. 
A new month sees the start of a new challenge at Color Hues.
However, because of the unfolding situation in Ukraine, Nancy has had the wonderful idea that we offer you the chance to flood the internet with a show of solidarity and a mass of blue and yellow themed cards. The original idea was first voiced on the Share Handmade Kindness FB group on Saturday by a card maker by the name of Linda Eterno.
Nancy then contacted the CH team as well as the ladies over at Seize the Birthday to ask if we would join in. So for this challenge we are doing something slightly different. 
Here is my card, hoping to bring a little sunshine to this troubled world.


When Nancy first voiced the idea of a blue and yellow theme, the flag colours of Ukraine, I thought of a card I saw last year and combined with this card by fellow CH and Uniko team member Hannelie being fresh in my mind, I came up with this take.
I made my pocket freehand from a really ancient piece of denim DP, it says 2002 on the back, scoring to create the pocket and as the DP was quite thin, I strengthened it with a panel of white card, which I slipped inside. A few freehand dashes with a blue fine liner create the faux stitching.
I had a couple of these yellow daisy style flowers left over in my bits box from last summer, so just stamped a few more using Uniko's Doodle Flowers and BB Doodle Flowers, colouring with Copics and fussy cutting them out. The tag sentiment is also Uniko, stamped with Unicorn White and Faded Jeans DOx over yellow card. Although the white and DOx are opaque it still lets some of the yellow show through the blue, casting a greenish hue, but I didn't know how else to do it.
On an A6 off white note card, I embossed the stitched detail and then added my pocket.

So now, back to what I came up with using the original colour combo!


To start this card, I took a panel of MM card added some water followed by a mix of Brusho Emerald Green and water across the top half. Whilst still wet, I added some of the dry crystals and left it to work it's magic! To be honest I was expecting more of a mix of colours as is usually the case with Brusho powder, but as it was only a background I went with it.
When dry, I die cut the Tim Holtz wreath and then added back one cut from gold mirror card. A few punched and shaped flowers from the same gold card were added, followed by an Altenew sentiment stamped and heat embossed with mirror gold EP.
The completed panel was trimmed and added to an A6 cream base card.

So you, lovely crafters, now have a choice. You can make a card to show love and support for the Ukrainian people or you can make a card using Lindsey's colours of Green and Gold, OR BOTH!

We are going to have TWO overall winners for this challenge, one for each colour pairing but please, if you do decide to make two cards, would you post them in separate posts, so that way no entry gets missed by mistake.

For more inspiration, please check out the rest of the team and our GD Jules here.

Thursday, 20 February 2020

Introducing Designer Dies - Kindness Blooms

Good morning folks.
It's day 3 of the new release from Uniko. and today we introduce another set of dies to go with a previously released set. This time Bev has chosen Kindness Blooms to be the next die set release.
In my card I've used the dies to create my own letterpress elements, just to show you how you can get more from your dies.


I took the large looped outline from the set and cut 3 from card and one from vellum. I did the same for the leaf die but cut another two sets. Each element was then glued together, 3 card then one vellum to create your type-press block. The vellum needs to be the top layer as this is how you add the ink! 
I prepared my BigShot for embossing, adding my tan mat over my base cutting plate. After deciding on the layout I carefully added the stacked die cuts to a panel of white card which I had previously laid onto the tan mat and placed the top plate over, trying very hard not to disturb the die cuts.
After running the sandwich through, I again moved carefully to remove the letterpress elements from the machine to reveal the design.
To complete I stamped the sentiment in matching ink and added some sequins and a large gem to the bloom center. I decided to trim the panel down a little and added it to a matching pink base card.

For more inspiration using these new dies, check out the rest of the team below.

Bev
Carol 
Hannelie 
Jane 
Julie - That's me
Linda
Sarah P
Wiebke 

I'm joining in over at:-

Grab our logo
Dies and/or Punches
I used die cuts to make my letterpress images