Showing posts with label Everyday Sentiments. Show all posts

Saturday, 27 June 2026

Release Day @ Uniko

Morning all, it's release day at Uniko!!
Here are just a few more ideas using the new June release.

Have you ever thought about the off cuts that are leftover when you trim a stencilled panel down to the size you want for a project? Well I thought exactly that when I had lots of little strips left over from this month's projects. This first card uses the BB Scramble ThankYou and some inky strips from The Chevron Duo stencil.


Background Blocks Thank You Scramble £7.00
Copyright Uniko Ltd 2012 - To Date

Stencil - Ink & Flip Chevron Duo £5
Copyright Uniko Ltd 2012 - To Date
In my earlier post I used DI in Salty Ocean and Peacock Feathers to create some stencilled panels but I needed some contrast for some of the letters so on some plain scrap card, I used some Picked Raspberry DI to create a mini panel which I over stamped the Thank You image. For the turquoisey stencilling, I used a different method and cut up the thin strips and stamped them by inking the stamp and pressing the card over the letter I wanted. All the letters were then fussy cut. On another scrap of white, I stamped the Scramble Thank You in black, coloured the flower with Copics and placed the fussy cut letters on top. Still not quite happy, I added Peacock Feathers to a couple of the blue letters and more Picked Raspberry to the two pink letters before glueing them down.
My panel was trimmed and added to a leftover piece of the holographic card from earlier and mounted the whole lot onto an A6 white note card.

This second card uses the scraps from Ink n Flip Triangulate woven to give an abstract pattern.


Stencil - Ink & Flip Triangulate £5
Copyright Uniko Ltd 2012 - To Date

I did cut some of the leftovers into smaller strips to ensure I had enough to fill the apperture, finally weaving them together to get this effect. The woven panel was laid over the opening and glued into place before flipping it over and adding the Bauhaus Blocks sentiment and a few die cut black dots. The finished panel was then added to the base card on foam pads.

Finally I have this card which uses the left over panel from the Modern Floral layered stencil.


Stencil - Layering Modern Blooms £13.75
Copyright Uniko Ltd 2012 - To Date

I followed an old Jennifer McGuire tutorial over on You Tube for the layout.
Sentiment is from Pure Florals Peony, embossed and fussy cut and the text strip is Everyday Sentiments stamped in Picked Raspberry.

So what do you think of the release. I'm sure you will love the versatility, really important when our purses are stretched and purchases are considered!
For more inspiration why not check out the rest of the BAs below leaving some love as you go for a chance to win a £20 eGift Certificate to spend in store. Bev will draw a lucky winner from all comments left on BA blogs and/or socials and announce the winner on July 6th.

Denise


Julie -that's me


Thanks for visiting!

Joining in over at:-


Tuesday, 31 March 2026

Uniko Product Revisit

Morning, there's no March release from Uniko, so Bev and the other Uniko Brand Ambassadors are revisiting the two releases from earlier in the year.
I've chosen the fabulous Bauhaus Blocks Spring Layering Stencil for my focus, here are couple of ideas.

I started by covering an A6 panel of white card with the various elements of the stencils, using Cracked Pistachio, Picked Raspberry and Squeezed Lemonade Distress Oxides. When I had covered the white  panel, I realised that I had made an error in one of the flowers, so it stood out like a sore thumb, so not wanting to waste the panel I cut it up and made two cards!

This first card uses a part of the panel.


Another error was that my A6 panel wasn't, about 5mm too narrow! I had to make a decision and decided to use it, trimming it down so that it fit an A6 topfold note card, with a white border showing. To emphasise the gap, I added a panel of paper inked on my Gelli plate. I used the Squeezed Lemonade and Cracked Pistachio to give a kind of speckled effect. The Oxide inks blend so well like this, I prefer it to straight inking. The combination of yellow and the soft green gives a lovely spring feel to the card. A stamped and embossed sentiment completes.

Remember that error on my original panel, well here is what I made with that.


The error was front and central, so I just covered it with the sentiment! More of my Gelli plate paper and some Greetery dies complete.

I wonder what the rest of the team have been inspired to create? Why not pop along and check their blogs and Instagram accounts out to find out?
Don't forget to comment as you go for a chance to win some Uniko goodies.

  Anita

Bev

Izzy

Julie - that's me


 Hope you left some comment love along the way, Bev will randomly select a comment to win the £20 eGift certificate to spend in store.  The winner will be announced on Monday 13th April 2026. 


Happy crafting!

Wednesday, 1 January 2025

Uniko January 2025 Release - Introducing - Ink & Flip Layering Geometric Gem and Sparkle Sentiments Clear Stamp Set

Morning and Happy New Year!!
So it's also day 2 of introductions for Uniko's New Year release. Today we are featuring another of Bev's ingenious Ink n Flip stencils and a sentiment set that will hopefully add some extra sparkle to your designs!
Firstly here's my take on the stencil.


After my initial play with the stencil, I was quite pleased with the result of using a WOW embossing pen in the spaces of the gem instead of inking with a dauber and Versamark. I added sparkly silver  WOW EP to the first stencilled area and heat set before wiping the stencil and flipping. This time I used silver glitter EP, I love the effect using the different powders gives. The central panel was then cut from my stencilled panel and a die cut semi circle arc from a scrap of gold mirror card using 2 stacked circle dies, creates the suggestion of a gold ring. A simple sentiment in black Memento completes the panel. The panel was then popped up on pads to leave a border over an A6 note card.

My second card uses the Sparkle Sentiments stamp set. As you can see it would link really well with the stencilled diamond but for this card I've used the two different sizes of text and a stamped diamond which I've stamped and embossed with white EP and a few sparkle hi lights in silver sparkle.


Once I'd embossed the text onto a panel of MM paper, I added some Sea Grass Brusho and spritzed with water and let it stand until dry. The excess ink on the embossing was removed with a damp paintbrush and some kitchen towel before the silver sparkles were added. Panel trimmed it was added to an off white base card. 
I'm sure there are lots of wordy sentiments you could come up with using this set and a simple treatment like this will show them off, no artistic input required.

So that's all for today but be sure to check out the rest of the team below.

Bev

Julie -that's me


I'll be back tomorrow with plenty more inspiration.

Joining in over at:-

No option for me this time!

Saturday, 22 April 2023

Nature's Treasure II Dies Release Blog Hop and Giveaway

Morning all. 
It's release day for the new Nature's Treasure's dies at Uniko and as is tradition we are having a blog hop and give away. The release is timed to coincide with the Stamping Together festival at Port Sunlight, so if you're heading there you could be one of the first to get hold of the new goodies and say hi to Bev too!

Spring has truly sprung, the hedgerows are buzzing with life and I saw my first swallow of the year on Tuesday and one again on Thursday, well it could have been the same one of course! So green features heavily in these designs.
Here's my first offering, using one of the small stamps from Nature's Treasures II set and the large solid die from the new release.


On a panel of mixed media paper, I smooshed some DI, Peeled Paint, Mowed Lawn and Twisted Citron, onto a craft mat and dragged the paper through it until I had sufficient coverage. Once dry, I trimmed it down to size for my frame and randomly stamped the small leaf in a mix of inks, the DI's I used for the background and some Altenew ones, Bamboo and Parrot. 
The frame was made using a couple of rectangle dies behind which I attached 3 of the leaflets cut from the same card. A sentiment was stamped and attached before the whole lot was placed over the inky background with foam pads and added to an A6 white base card.

My next card is my take on a Jennifer McGuire card I'd seen on You Tube and wanted to have a go at, using the new dies and Nature's Treasure II stencil and masks.


My background was created using the masks from the stencil set and then I die cut a few of the solid leaves, a mix of large and small to create the garland from it. To pop up the leaves, I also cut matching pieces of white fun foam which I glued to the back of each die cut and then reassembled the panel onto a base card. A few of the tiny flowers from Originally Organic Additions dies were die cut, adding a coloured pearl for the centers. These are bog standard plain pearls coloured with a Copic marker! My sentiment is from the Sentiment Block series stamped in black on white.

While I had my craft mat out for the first card, I smooshed some die cuts cut from MM paper in a mix of watery Mowed Lawn, Peacock Feathers and Twisted Citron DI. I then simply added them on pads to a white base card, trimmed off the overhangs and added another of my gold framed sentiments made from die cut circles and a Doodle Flower sentiment.


Here's the full set of dies, fab aren't they


OK, that's all from me but please check out the rest of the team for more ideas on how to use these fab new dies. 

Julie -that's me

One more thing before you go, make sure to leave a comment here and on all the stops for your chance to win a £15 eGift Certificate to spend in store. You have until midnight Sunday 30th April 2023 to comment. The lucky comment winner will be randomly selected and announced shortly after.

Thursday, 20 April 2023

Introducing Nature's Treasures II Dies

Good morning. I'm here this morning to introduce some more inspiration using the soon to be released Nature's Treasure II dies from Uniko with my fellow BA Anita. I love these new dies and had lots of ideas of how to use them.

Spring is supposedly here, not that you would know it with the weather we've been having, but the leaves on the trees are finally bursting into life and the hedgerows are becoming green, so leaves are really on my mind! My first card uses the Nature's Treasures II stamp along with the matching die and a sentiment from Doodle Flowers. 


I used the large more solid stamp in the Nature's Treasures II stamp set to stamp 3 leaf sprigs with Altenew's Bamboo ink and used the matching solid die to cut them out. In my rush to play, the stamping on my first leaflet was a little patchy, so rather than waste it, I decided to colour the leaflets with a matching Copic marker and added some veins with a darker Copic to see what it looked like. I liked the look so did the same to the other two! You can still see a little bit of the original stamping showing through the Copic colouring, it has reacted with the Altenew ink to create additional detail which I quite like. I wanted a little bit more dimension, so simply scored along the center of each leaflet and carefully folded along the score line.

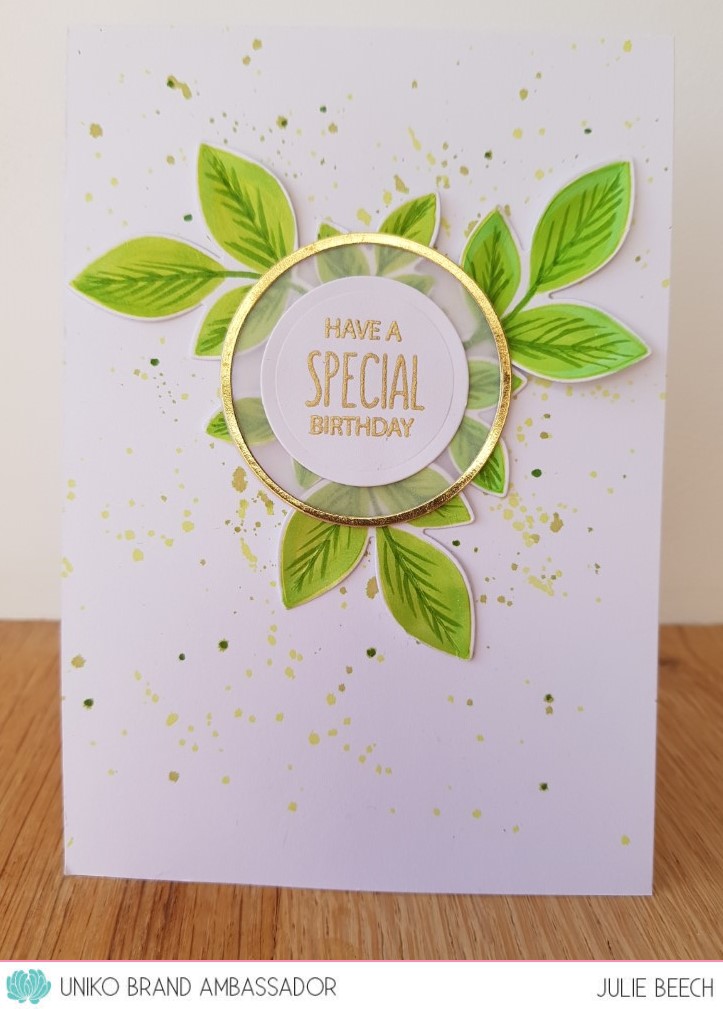
Using a selection of circular dies, I cut a gold frame, a vellum circle and a small white one, onto which I stamped and embossed my sentiment in gold EP.
On my base card, I flicked some of the Bamboo ink along with some darker Moss and added some random dots with the same dark Copic marker I used for the veins, YG 17 if you are interested. The three sprigs were glued behind the sentiment panel, glue added along the underside of the score line and added to the base card.

Just to prove I can stamp without messing up here's another idea using stamped and die cut leaves.


I stamped one of the leaf sprigs, in Altenew's Bamboo and one in Parrot, I also cut one from vellum, tying them together with a bit of silver thread from my embroidery box. 
Using the string of circles from Background Builders Circles, I stamped three rows across my card in Altenew's Silver Stone, the spray of leaves was then added and my sentiment from Everyday Sentiments stamped in Altenew Industrial Diamond.

Here's my final idea using just the dies to create a white on white background for my English Country Garden butterflies. The butterflies aren't around much at the mo, I have seen a few on sunny days but the cold wind will have given them a bit of a shock! Can't wait for them to be dancing amongst the blooms.

To make the background, I die cut a few of each of the dies, then glued then onto an A6 top fold note card. Two of the dies have cut away centers but for this, any that fell out were glued back in!

I die cut a few of the small butterflies and stamped them using the small detail stamp. I used Copic pens to colour over the stamping before arranging them onto the background. I only attached them at the body so that the wings could be given some dimension.

My sentiment is made up of a white embossed and fussy cut Fabulous from Yes You and Have a Birthday from Doodle Flowers stamped in black on strips of white card, a few sequins complete the design.

That's it for me for the moment but Steph and Izzy will be showcasing tomorrow and then it's release day on Saturday!

Joining in over at:-


Anything Goes with option of "Create your own background"

 Anything stamped option CAS

Spring                                                                                                                                 

In the Garden                                            

Wednesday, 11 January 2023

Introducing ... Mid Century Modern Frames

Morning all, it's day 2 of the Uniko release and today we are previewing Mid Century Frames. A set of 3 frames and some text for you to use in lots of different ways. Here's my take using just one of them.


On a panel of white card, I stamped an arrangement of the simplest frame in black. On a Post-It note I stamped the same frame and cut away the center to create a mask. Using the that, I inked the centers with a rainbow of colours. When dry, an assortment of sentiments from Everyday Sentiments and Floral Sentiments were stamped in Versamark and heat embossed with white EP.
The panel was trimmed and added to an A6 base card to complete.

Here's another card using another frame from the set.


A simple retro themed card using the text and atomic stamp as well. The black pole was added using a black fine liner and the Mid Century Modern stencil
The frames were stamped and coloured with Copic markers, sentiments added for a quick graphic card.

That's it for today but I'll be back for the final release introduction. Check out the rest of the team for some fab inspiration as well.

Friday, 10 June 2022

Uniko June Release Full Reveal and Blog Hop

Good morning. Have we whetted your appetites with the latest Uniko release? Well just to show you how fab the sets are here are a few more ideas.

Here is one card using the large lemon stamp from Organically Zesty.


As with my orange in the introducing post here, I watercoloured this large stamp and fussy cut it out. On another panel of MM paper, I stamped the BB Grid a couple of times diagonally, with Versamark, not being too careful about full coverage. In fact after I added the EP but before heat setting it, I removed patches of the EP with a fine brush. Once heat embossed, I added a wash of Mermaid Lagoon DI and left it to dry. The panel was trimmed to leave a border when added to my base card and the the lemon was placed in the top right. On matching card, I cut a banner and stamped the sentiment.

My second card uses the Zesty stencil but instead of using the whole panel, I die cut the larger segments. I found that an old Spellbinders die (Standard Circles Large, next to smallest) embossed a line in exactly the right place on the slice to leave a gap that suggested pith and peel.

Once the slices were cut out, I inked the outside edge and blended out the colour to soften the whiteness left buy cutting them out. On some scrap card, I stamped the BB Diagonal Stripes twice in Altenew's Obsidian and stamped the sentiment on another strip of white card. The stripes were added to one side of the A6 base card and the sentiment strip added before layering on the die cut slices.

Next is a gift card featuring Background Builders - Hearts.


I initially intended to make a standard A6 card but after I'd done the stamping I thought it wasn't quite working so I tried it as a gift card and I think it works better.
The dotty hearts were stamped and embossed with silver EP and the central outline heart stamped in black and embossed in clear glossy EP. The congratulations from the Everyday Sentiments set was stamped and embossed with silver EP. The stamped panel was then cut to create the rectangle and matted onto silver card.

This next card card was a result of an experiment. I wondered what sort of rainbow the wrong side of the rainbow stamps would make. It worked pretty well until the last section which is solid, so I fussy cut a mask and stamped the final arc, then removed the mask, I quite like the look.


A few stamped and fussy cut clouds were added and the same cloud die was used to create the bottom panel as on this card, was stamped with the sentiment from Beautiful.

Finally I've combined the rainbow stamp with the raindrop stencil to create this slimline card.


I die cut a scalloped panel and inked it in Stormy Sky DI, fading it out towards the place where the rainbow was going. I then stamped the wrong side of the rainbow stamps as before but overlapping each layer a little bit for a more seamless blend. 
Using the stencil, I added some raindrops with the Stormy Sky for a tone on tone effect and three die cut and coloured rainbow brollies (Memory Box). Finally I added the sentiment with Versamark, white EP and heat embossed. The finished panel was then added to my base card.

So that's it, what do you think of the release? Something for everyone I think.
As always we are having the regular BA blog hop and giveaway.
Simply leave a comment on all of the stops along the hop for your chance to win a £20 eGift Code to spend in store.
All the details are on the Uniko blog but here are the links to the other BA's posts for this hop, so you can check out more ideas on how to use the new release. So don't forget to leave a comment before you hop along to the other BAs for your chance to win.
All Ts and Cs and further details can also be found on the Uniko blog.

Anita 
 Bev 
Hannelie
Julie -that's me

Joining in over at:-