Be sure to comment along the way for your chance to win a £20 eGift Certificate to spend in store. Winner will be announced Wednesday 26th August 2026.
Showing posts with label Festive Sentiments. Show all posts
Saturday, 8 August 2026
Uniko's Christmas in July Release and Blog Hop
It's release day at last and is always the case we are having a blog hop and giveaway!
But first here are a few more ideas using the latest release to tempt and inspire.
First off is the Christmas Star stencil. For this I've combined it with Christmas Scramble and the rays from Sparkle Sentiments.
Second is a card made using Rustic Snowflake and a couple of other snowflakes stamps from older sets in a OLC! I love it when new sets coordinate with stash you already have.
Thirdly using probably my favourite of this release, Modern Poinsettia layering stencil. With a stencil this good you don't really need much to make a fab card.
And finally we have a card using another of the Winter Garlands, holly this time.
So that wraps up this little Christmas *almost* in July 2026 release. I hope you love the products as much as we do. As always the Bev and the other Brand Ambassadors are here to inspire you a little bit more.
Julie -that's me
Happy hopping!
Friday, 7 August 2026
Introducing Winter Garlands
Good morning.
It's day 4 and the final of Uniko's Christmas in July introductions.
Today we introduce Winter Garlands. It comprises of 3 beautiful foliage garland stamps, perfect for Christmas and other occasions too. Here's one idea I came up with using the Fir tree garland.
On some MM paper, I stamped the garland with pigment ink repeatedly down the panel, leaving space for my sentiment. I used MM paper and pigment ink because I wanted to colour using a watercolour technique.
Once the ink was dry, I coloured the berries and foliage with some Altenew ink smooshed onto an acrylic mat. I used Evergreen and Heartbeat, the paler green was just more diluted ink.
My sentiment, Christmas Wishes, was stamped and heat embossed with WOW primary red EP. I also heat embossed the berries in clear EP, having first used my WOW embossing pen over the top of the red ink wash.
The panel was then trimmed and added to an A6 base card.
For more inspiration why not check out the rest of the team over on the Uniko blog, I'm suer they have had some great ideas on how to use this new stamp set.
Tomorrow is release day with the usual blog hop and giveaway so I'll see you same place same time tomorrow!
Thursday, 6 August 2026
Introducing Layering Modern Poinsettias Stencil
Welcomem we are onto our 3rd introduction for Uniko's Christmas in July release. Today we focus on a brand new layering stencil based on a previously released stamp set.
Here's a simple idea using Layering Modern Poinsettias and Festive Sentiments.
There are 5 layers to this, building up the layers as you go. I chose to use the Pink Cosmos set from Altenew for my inks to colour the main image as they come in graded colours, perfect for layering, along with their Olive ink for the green sepals. Mustard Seed DI was used for the centers and dots. I tried to get some additional dimension by concentrating the ink towards the center of the large poinsettias.
Once I'd inked my panel, it was trimmed down and my simple sentiment added in black. It's such a fab stencil I didn't think it needed more!
So what do you think? For more intros, why not check out the rest of the team over on the Uniko blog.
See you back same time tomorrow for our final introduction.
Tuesday, 4 August 2026
Introducing Ink & Flip Christmas Star
Morning all.
It's day 1 of Uniko's Christmas in July release introductions.
Today Bev and the BAs are focusing on an brand new Ink n Flip design, Christmas Star. Here's what I did.
I've kept it very simple as the stencil speaks for itself, a simple gold star using Mustard Seed DI and some jewelled gold EP powder for the center and sentiment on a white base card.
Why not pop over to the Uniko blog to see what the rest of the team have come up with and I'll see you back here same time tomorrow for another introduction.
Joining in over at:-
Saturday, 2 October 2021
Introducing... Pattern Building Christmas Tree
Good morning. Its time to reveal the last of the September release sets from Uniko.
Today we are showcasing the Pattern Building Christmas Tree. Here's my take!
Whilst thinking of my design, I was rifling through my background box and came across a sentiment stamped background, this one is from a batch I made back in October 2019! I thought it showed off the strips rather well, I seem to be on a roll with stamped backgrounds.
To decide the size and shape of the tree, I laid out different elements in decreasing size order on an A6 scrap of paper. Choosing some scraps from the bit box, I cut some strips and laid those out too in a pleasing colour pattern, before stamping each element onto the strips of card and then reassembling onto the panel. To get a different look, all you need to do is change the order of the strips or the colours used or the background!
So that's it for the introductions, tomorrow we will be back with our BA Blog Hop and Giveaway, but if you want to check out more ideas for this set, check out the rest of the BAs first.
Friday, 12 March 2021
Kraft, Red and White - Uniko Brand Ambassador Inspiration
Morning all. I'm over at Uniko with another Festive Friday post.
This month I've been inspired by the colours over at CAS Christmas, where they are also celebrating their 3rd birthday, can you believe it? Why don't you grab yourself a cuppa, then head over to the Uniko blog for some festive kraft and red inspiration and details on the makes.
This card uses the Christmas Pop trees as well as BB Falling Snow and a freebie snow stencil from a magazine. A trio of red gems and a scrap of matching NitWits DP complete.
I've used Background Builders Christmas 2018 before to make a plaid pattern, here I've used a panel of kraft card, red ink, a white gel pen and a black fine liner to make a panel to cut my letters from.
You can't get much simpler than this card, Festive Sentiments Outlined and Framed - Holly stamped and embossed in white EP and 3 tiny red crystals for the red berries on an A6 kraft base card.
I'd like to join in over at:-
Thursday, 27 February 2020
Uniko Brand Ambassador Inspiration
Morning all.
As you may know, we're celebrating Uniko's 8th Birthday. We've had the Birthday Linky Party .....
Today I have a couple of birthday cards over at Uniko to share, one feminine and one more unisex.
Here's my first card using the recently released Hello Lovely and a sentiment made up from elements from both Birthday Sentiments and Festive Sentiments stamp sets. Yes I said Festive, Happy is not just for Christmas!
My second card is interactive and I was inspired to make it after watching this video on You Tube.
For all the instructions on how I made them pop over to the Uniko blog.
I'm off later this morning for a little crafty fun with a friend I made at the Altenew class I attended in November. Its our second get together after the first had to be postponed from early December to last month due to the 'flu.
Looking forward to some crafty chat with a fellow Julie!
Thursday, 28 November 2019
BA @ Uniko
Hi, I'm up over at Uniko with a little bit of Christmas card inspiration.
For details on how I made these cards check out the Uniko blog here.
Tuesday, 11 December 2018
Uniko December Release
Good morning and welcome.
If you've been following the Uniko blog, you'll know that it's release day over there!
Three fab stamp sets AND two gorgeous stencils too.
Here are a few ideas for the new sets, so get a cuppa and settle in for a show.
This birthday card uses the latest addition to the Pure Florals range at Uniko. This time its a peony with additional script 'sending' and addition small sentiments.
Pure Florals: Peony £15 Clear Stamp Set
I started by stamping the large bloom and then a couple of the buds with Altenew Industrial Diamond ink, before colouring with Copics and fussy cutting. I wanted some texture for my base card so stamped some wood grain with a stamp from the stash and heat embossed with white EP. From some gold mirror card, I die cut a frame and arranged the blooms on the base card adding a gold embossed vellum sentiment strip.
My next two cards are made with the gorgeous Let it Snow stencil.
I used a selection of DI and DOxs to ink through it onto a panel of white card which I then used to form the main panel of the first card, then cut the letters for the second from the leftovers.
I chose a matching pink base card and added two thin strips of silver under the edges of the stenciled panel and added a die cut joy with a banner stamped using Simply Said Christmas on black and heat embossed with white EP. The die cut joy, from the Works, was cut from silver glitter paper and also from fun foam before being added to the base card.
I used the bold alphabet die set from Altenew to cut the noel after I saw a card on You Tube by Therese Calvird. I love the contrast between the dark shimmery grey card base and the pink and white letters. A couple od die cut snowflakes that were sitting on my desk were added for accents.
Let It Snow Stencil £3.50
This fourth card uses the same stencil as well as the stunning Snowflake Serenade stamp set.
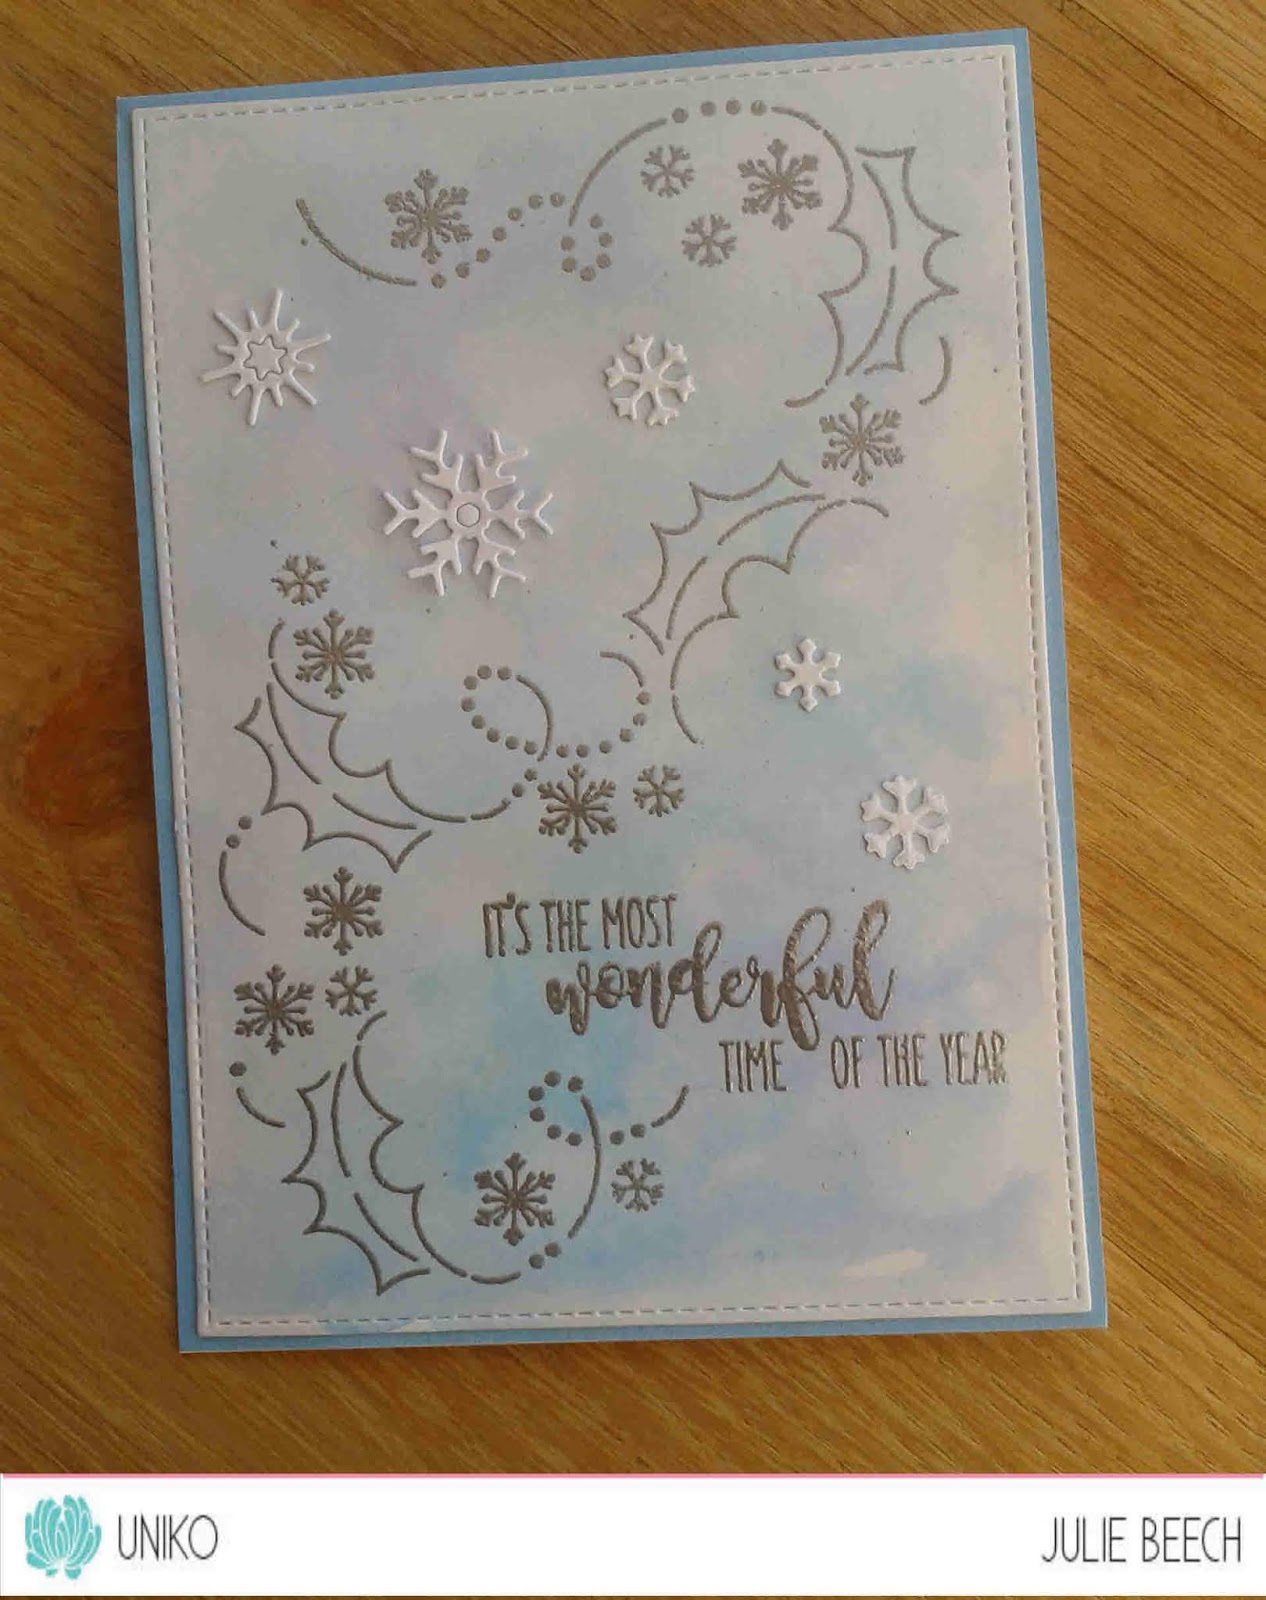
You can't really see the very subtle pattern of the stencil which I placed over a panel of dilute DI ink and left to dry, think I removed it too soon, but it worked with the delicate swirl of the holly leaves and snowflakes of the stamp which I simply embossed in silver over the top. Using a stitched rectangle die, I cut the panel down to size and mounted it on a pale blue card base. I added a few more of the die cut snowflakes from the stash and stamped and embossed the sentiment from the same set in matching silver EP.
Snowflake Serenade £9 Clear Stamp Set
Again I inked a panel of white card through the stencil with an assortment of three green DOxs, Forest Moss, Twisted Citron and Mown Lawn but treated each half slightly differently.
The first half had the stencil replaced over it and Versamark inked over and then embossed with clear EP. Make sure you get a good coverage as when you add the blue DOx over the top, it will colour the green underneath! I found a previously die cut panel and placed the inked panel underneath, adding a white die cut Rudolph on foam with a red diamonte for his nose. The silver twinkle embossed sentiment is from the Snowflake Sentiment set.
The second just adds a couple of die cut snowdrifts beneath the simply inked panel and a simple sentiment from Festive Sentiments.
In The Forest Stencil £3.50
I was still in need of a few more Christmas cards so decided to turn what is essentially a birthday stamp set into a Christmas one by using the berry style sprigs and laurel sprays.
I used the colours at The Paper Players and the layout at CAS(E) this sketch for my inspiration as after all these cards I was sorely in need!
I used some Altenew inks to stamp the foliage on a strip of white card and stamped and embossed with gold EP the Merry Christmas from the Festive Sentiments on a panel of red card.
Wonderful Day £9 Clear Stamp Set
So that's it from me but there's tons more inspiration for you over on the rest of the DT's blogs.
Hop over and check them out, leave a comment and have the chance to win some Uniko goodies.
All the details are on the Uniko blog.
Julie -that'll be me


free for all


Greens


Die cuts are my choice
Thursday, 8 November 2018
25 Days of Christmas Tags
Hi and welcome to a post to share a few tags for Tracey McNeely's 25 days of Christmas Tags as part of Uniko's sponsorship of the event.
Always in need of tags for family and friends I decided to make a batch!
These are a take on this Christmas jumper using the recently released Background Builders Christmas 2018.
I always struggle to make a neat tie for a tag that doesn't interfere with the tag design, so I decided to make a feature of the attachment!
I started by cutting some tags in bright colours using a Sizzix tag die and then stamped the strips and embossed with white EP. I added the Merry Christmas using two of the words from the Festive Sentiments set.
The top of the tags were made by adding a white paper die cut circle over the edge of the tag and trimming the excess away and the collars were cut freehand.
For the masculine tags, I used a black bow to attach the matching baker's twine and for the feminine ones a matching button.
Here's a couple of close ups.
For more information and to join in click here.
There are lots of ways that you can win so don't hang around!
I'm joining in over at:-
Using stamping, heat embossing, die cutting
Subscribe to:
Posts (Atom)