Tuesday, 24 August 2021

The last ever Twofer Challenge

Good morning folks.
It's time for a brand new challenge at Cardz4Guyz. This time the theme is:-

THINGS WITH TAILS

Lots to get your teeth into with this, lots of animals, birds or even airplanes would fit the bill but for my card I chose puppy dogs. Do you remember the little rhyme, What are little boys made of? Slugs and snails and puppy dog tails!
I also chose it as the very last Twofer Challenge is to feature a Dog or Cat.
Here's my first card using the MFT set Little Buddies.


I steered away from a simple birthday card and went for a more get well or just a cheer up sort of vibe. If you are a dog person I think the sentiment says it all. 
The puppy on the left was stamped using the mirror technique where you stamp an image onto the back of a larger stamp, then stamp that onto your card. It takes a bit of practise but it's worth the effort. Any missing edges were added back with a black fine liner. 
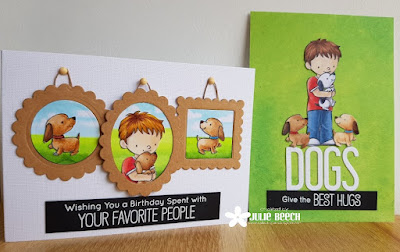
So after stamping, colouring with Copics and fussy cutting, I arranged the elements onto an A4 panel of DP that I found in my stash. The DOGS part was cut from a scrap of white card using an Altenew alphabet die set and the sentiment below is part of one which came with the set but the You part was masked off before stamping with Versamark and embossing with white EP on black.

As its for the Twofer challenge, I needed another card using the same stamp but in a different design and for a different occasion.
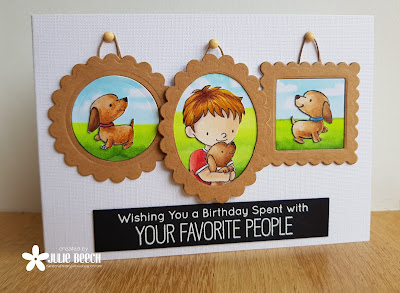

This card uses the same stamped elements but put into some frames and a sentiment from another MFT set, Birth-Yay.
The frames were made by die cutting kraft card using some really old scalloped dies, which I cut away the center of with dies for the small ones and fussy cut the middle oval because my matching oval die was too small! The backgrounds were coloured with Copic markers and the little fussy cut puppies added, the larger image was done in much the same way, trimming away the excess. 
All the elements were added to a white linen effect base card, including 3 brads from
 which the pictures hang. The central oval frame was popped up over pads but the others were glued flat.

Here are both my designs together. It's sad that Darnell has felt the need to stop this fun challenge but I was determined to enter the last one, even if I am a little near to the wire!!
For more TAIL inspired cards from the Cardz4Guyz DT check out the blog here.

 I'd like to join in over at:-

Tuesday, 17 August 2021

You're on the Nice List, Guesting at ATSM

 Hi and welcome to a post for a GD spot at ATSM. I was asked to GD after winning their Any Occasion challenge a few weeks ago with this card

Here's my card for your inspiration.


Christmas with the Cuties wanted a CAS design this month so I inked up the reindeer, tree and Santa from MFT's Jingle all the way set. The snowflakes, embossed in white in the background are from Uniko. A soft layer of blue ink was added over those before the Copic coloured, fussy cut elements were added over. The white embossed sentiment was added on a black die cut banner.

All in all a very simple card.
Check out the rest of the ATSM team for more fab Christmas inspiration.

Joining in over at:-

Clean and Simple

Monday, 16 August 2021

Color Hues #24

Welcome to a new colour combo at Color Hues. This time it was my turn to choose, not as easy as it would appear, but eventually I thought of tropical islands and settled on this summery combination.


As I've said before, when it comes to colour groups, the small cube ink sets from Altenew make it easy to get colours that work together. For this card I used Coral Bliss and Pink Pearl from the Tea Party set and Coral Berry from Red Cosmos. The Turquoise panel uses all four of the Sweet Dreams set.
Using a Background Block Bold Stripes from Uniko, I stamped an ombre panel then stamped the flowers from Adore you on white card and the leaves onto vellum with Versamark and heat embossed with white EP. The leaves were left without colour but I added washes of the coral colours to the flowers before fussy cutting and arranging them into a pleasing group. A small, silver die cut Congrats was layered over a black one, then added to the card. A little bit of the black layer was left showing around the silver so it stood out better against the background. A few clear sequins complete.

So where will theses colours take you, you've certainly made it difficult to choose our winners in the challenges so far. For more colour combo inspiration check out our DT and GD here.

At Color Hues, we are also joining in with Altenew's Ultimate Blog Hop, so I may just have to link up there!

Saturday, 14 August 2021

CAS Wesley Bobs

Good evening folks, we are heading towards the halfway point in August already but it also means a new challenge at Perfectly CAS. Here's my card based on this month's theme.


As you can see I went with just the stripes for my take, well I suppose there are a few dots on the Wesley Bobs. 'Wesley Bobs?', I hear you cry, well my friend and work colleague Jenny calls Christmas baubles that. She's from an area in the Heavy Woollen district of West Yorkshire, known to the locals as Cleckheckmondsedge or Cleckliverwike and Methodism was quite strong there, so perhaps the Wesley part is a nod to Wesleyanism. Not sure what the bobs bit is, perhaps because they bob around on the tree? Any road up, I quite like the term and it's certainly stuck in my mind, even after I left work 15 years ago!
Over at As You Like It, they want you to use your favourite primary colour in a card. Well anyone of my kids will tell you that my fave colour has to be red and white, the colours of my football team, Sheff Utd. So for this Christmas design it was a no brainer, red it was.
 The background to my baubles was stamped using a couple of solid Background Builders stripe stamps from Uniko in the 4 reds in Altenew's Tea Party set onto a panel of white card from which I cut my small panel. Using 3 of the baubles from STAMPlorations  Christmas Baubles set, I stamped them in Versamark and then heat embossed with white EP. I continued the string behind the top right bauble by masking off the bauble and stamping the string again in line with the first. Rather than leave the striped pattern showing, I added some more red with a finger dauber, coloured the hanger with a white pastel pencil and then stamped the greeting and white heat embossed it too.
So where will the prompt take you, we'd love to see you in our gallery. If you need more inspiration please check out the rest of the team here.

I'm joining in over at:-


Your favourite primary colour 

Uniko's July release in review

Today the Uniko Brand Ambassadors are revisiting the July release to share a few more ideas using some of those stamps and stencils, as well as showing how to incorporate other Uniko sets. There's also a chance to win by commenting along the way.

So this is my first card to inspire you.


For this card I've used Block Party Summer as a background combined with elements from the Paradise stamp set and a sentiment from Simply Said Blocks III.
I played around with a new technique when I first got hold of the stamp that I saw Jennifer McGuire using. I stamped the background with Versamark and heat embossed with white EP on MM paper.
Using some DI inks in Peacock Feathers, Salty Ocean and Mermaid Lagoon, I added colour straight from the pad randomly over the embossing. I then spritzed it with water containing some perfect pearls and set it aside to dry. Once it was really dry, I sandwiched it between a couple of pieces of typing paper and ironed over a towel to remove the embossing. Only use the paper once or you may transfer embossing where you don't want!
The end result left a soft, shimmery panel that is completely flat. I didn't use this panel for the release day as I wasn't sure how to use it but I then picked up on the tropical bloom in the background stamp and used the toucan and foliage from the Paradise set and the tropical flower from Block Party Summer to create the design. These elements I coloured with Copics, fussy cut them and added to a die cut aperture in my now trimmed down panel. A sentiment was stamped in black, trimmed and added to complete the coloured elements. The finished panel was added to a white linen effect base card on pads.

My second card focuses on the BB Grid stamp which I used to create a subtle background for the peonies from Hello Lovely.


To start, I stamped the large spray from Hello Lovely onto a panel of white card and them made a mask for it which I fussy cut. After placing the mask over the stamped image, I stamped the grid over the panel with Versamark ink. I wasn't too bothered about completely covering the stamp with ink as I was aiming for a shabby chic look on the finished panel. I then added white EP, removing where not required with a soft paint brush, and heat embossed. I got slightly carried away with this section and forgot to remove the grid pattern from around where I was going to stamp the greeting!
I then removed the mask and coloured the flowers using coral coloured Zig Markers. Using the plain acetate backing of the BB Grid stamp, I added some Zig marker and added some clean water, then used the acetate to stamp colour over the panel, adding more when required and also to deepen the colour in  certain areas. When satisfied with the coverage I added some splatter in the green and coral over the whole panel. Finally I stamped the greeting, from Wonderful Day.
I used an ancient peach coloured base card which I trimmed to size and added Abandoned Coral DI around the edge before adding my trimmed down panel, leaving a border all around.

My final card features BB Layered Floral and a sentiment from Simply Said III.


Instead of stamping a solid image, I tried a faux layered effect by adding a partial inked flower over the original stamped image and blended it out with a damp paint brush. I rather like the subtle effect this gives you.
I used the reds from Altenew's Red Cosmos and the greens were from Tropical Forest.
Over at The Flower Challenge they want us to use dies along with flowers, so as we don't have a matching die cut, I used a stacked pierced rectangle set from Avery Elle to die cut my finished panel.
I also cut some pink fun foam and mounted two of the layers before adding them back onto a white note card. A sentiment strip stamped in a matching coral pink completes.

To see the full July release, check out the Uniko blog
To see what the other Brand Ambassadors have come up with check out the links below.

Don't forget to leave a comment on all the stops along the hop. Bev will be randomly selecting one lucky comment winner to win a £20 eGift Certificate. Commenting to be able to win will close at Midnight BST my Sunday 22nd August 2021. The winner will be announced on the blog before the end of August.

I'd like to join in over at:-