Showing posts with label Brand Ambassador blog hop. Show all posts

Sunday, 27 April 2025

Uniko April Release Day Blog Hop and Giveaway

Good morning, hope your weekend is going well.
Today marks the full release day for Uniko's April release and as per usual we having a Blog Hop and GIVEAWAY!!
Simply leave some love along the way for a chance to win!

So buckle up, grab a cuppa and join me for some more release inspiration, then hop along to visit Bev and the rest of the BAs.

First off I've used the 2 small solid butterflies from Butterfly Serenade to create this.


Butterfly Serenade Clear Stamp Set £11.50
Copyright Uniko Ltd 2012 - To Date
I chose some of my favourite colours and CASed a card of mine from way back. 
To create my opening for the sentiment, I cut a large butterfly mask using English Country Garden dies, then stamped the coloured butterflies around it. Removing the mask I stamped a sentiment. I had planned on using the larger sentiment from the set but couldn't fit it into the opening made by the mask, so used one from Originally Organic, stamped a couple of times in the darkest plum from the butterflies. The finished panel was going to be kept as is but after stamping I put it to one side which happened to be over the envelope from my daughter's Mother's Day card which I'd saved. It looked so pretty I decided to cut the panel down to reveal the thin pink edge!

Next up is a card using the Ink n Flip Delightful Diamonds and the spray using Flower Fusion stencil, which I fussy cut out.


Stencil - Ink & Flip Delightful Diamonds £4.50
Copyright Uniko Ltd 2012 - To Date

Stencil - Layering Flower Fusion £13.75
Copyright Uniko Ltd 2012 - To Date
I found a card mask in my bits box which had rounded corners but was the correct size to create my central panel on the base card. Using the Delightful Diamonds stencil, I inked through the stencil onto a white A6 base card with Salty Ocean DI. 
The large daisy in the stencil reminded me of a very old daisy punch I had and I wondered if it would fit, so had a play. The punched daisy was coloured using the stencil which left the white collar in the center which I really liked and no fussy cutting involved!! The punch is a yellow Woodware one, 11/2" diameter, if you're interested. Unfortunately the rest of the spray had to be cut freehand. Each element was shaped using a ball tool before adding to my base card which I'd stamped the sentiment from Organic Flower garden.

Speaking of which, here is the second panel I mentioned on Wednesday using Originally Organic Flower Garden.


Originally Organic Flower Garden Clear Stamp Set £11.50
Copyright Uniko Ltd 2012 - To Date
This panel was created the same way, using masking fluid but I spritzed water over the MM stamped panel before sprinkling some Brusho over and adding salt. This technique really does require good masking as Brusho powder gets everywhere!! 
Once the panel was dry I brushed off any loose powder before removing the masking fluid and watercoloured the blooms. A simple frame stamped with a sentiment from the set was added on pads over the trimmed down panel on a linen effect base card.

And finally I have this card using Spring Blossom layering stencil and the outline stamps from Organic Flower Garden.


Stencil - Layering Spring Blossom £10.75
Copyright Uniko Ltd 2012 - To Date

The background was created using the stencil and a grey palette and the central panel was created using colours. A bit of fiddling around using a mask to identify the correct area to be used, before cutting it out. I softened the coloured panel by running the blending brushes used over each element and stamped the made up sentiment as before. The panel looked a bit bare so I stamped the blooms in a no line ink and used Copic to colour the large one and the stencil and DI for the smaller. All were fussy cut along with a few stencilled leaf clusters.

So that's all but for some more fab inspiration please check out the rest of the team below, leave some love and you'll be in the running for a £25 e gift card, the winner of which Bev will draw randomly from all comments on Monday 5th May 2025.

  Anita

Happy hopping!!

Joining in over at:-


Spring


Saturday, 5 October 2024

Uniko Release Day Blog Hop and Giveaway

Good morning, it's time for our Uniko release day blog hop and giveaway!
So here are a few more ideas using this fun stencil release.

First off is this Christmas card I made using the Geometric Christmas Tree stencil set.


On some white card, I inked the tree with Mowed Lawn DI but on the second pass I wiped the stencil clean then replaced it and added some Cosmic Shimmer Aurora Sparkle embossing paste over the top to give my tree a little extra oomph. When dry, I cut up the tree and glued the pieces over a strip of gold mirror card, adding a freehand cut pot and a punched glitter star. The finished tree was then popped up on pads over a white base card to which I had added a stamped sentiment panel from my stash. I make loads at the same time as it takes ages to set them out even in a MISTI!

 Stencil - Ink & Flip Layering Geometric Christmas Tree £8
Copyright Uniko Ltd 2012 - To Date

Next is another piece of my Cobweb panel made using the Cobweb stencil set.


This time I simply added it to an A6 white, side fold card after adding some glitter EP to the back lines in the web.
On some scrap white card, I stamped HAPPY using Alphabet Outlined and filled in with a web effect pattern, fussy cut them out and glued underneath the panel. I stamped birthday in black then drew the spider dropping down from the Y freehand.

Finally another cobweb based card using the same LOTV image as Thursday's card.


For this card my starting point was the panel I made when first trying out the stencil pair. I used some Hickory Smoke DI to ink the background before adding the two cobweb layers to complete the panel.
I had the top panel in my stash from another project, so slipped the cobweb background underneath then added the sentiment by masking off WISHING so that I could write WITCHING and added Happy Birthday. I had this little girl on my desk as I was initially going to use her for my DT post at Color Hues. I simply added her to the front and drew in a few lines to ground her to replace the ones I cut off.

 Stencil - Ink & Flip Layering Cobweb £8
Copyright Uniko Ltd 2012 - To Date
That's it from me but please check out the rest of the team to find out how they've used their new stash!
Don't forget to leave a comment for a chance to win a prize!


Julie -
me


Make sure you've commented along the hop as Bev will be giving away 3 Ink & Flip Stencils of the winners choice. Comments will close for the chance to win at midnight Sunday 13th October 2024 with the winner announced on Monday 14th October 2024. Any comments left after this time will not be included.

Joining in over at:-

Saturday, 20 April 2024

Flippin' Release Day at Uniko, BA Blog hop, Giveaway and Port Sunlight!

I hope you've all enjoyed You're Going to Flip Week here at Uniko and you're as excited about this new stencil as we all are. It's now available on the Uniko website to purchase and if you're coming to Stamping Together in Port Sunlight today, Bev will have stock with her and will be also doing a LIVE demo on the How To Craft Network using this stencil. The live is recorded and will be shared once it is available in case you miss it. 

So down to business. My first card uses the same technique that I've been using throughout the week of Magic Reveal. This time I used the background foliage stamp from Bev's collaboration with Craft Stash and Versamark ink.


After my earlier failure, I tried harder to ensure there was lots of ink on the white panel but as you can see it is still quite pale but at least it is visible!!
After yesterday's card colours, I rang the changes and went for a more realistic look, using Twisted Citron DI for the background and Vintage Photo and Spiced Marmalade DIs for the butterfly. A freehand pair of antennae complete. I chose the sentiment from English Country Garden for a change, stamped in more Vintage Photo on a white panel.

Now for my second take.
This time I used the same resist technique but white pigment ink and the BB Scattered Dots stamp.


After stamping the dots with white ink on white card, I let it dry completely before adding the colour. I used what I thought was Altenew's Deep Iris but what turned out to be Lavender Fields! Think I must have dropped the pack of cubes on the floor at some stage and the tops came off and were put back incorrectly!! I love how the dots look dark against the softly inked sections and paler on the heavier inking, it's just an optical illusion as they are in fact the same colour!
Once dry I cut out the butterfly and carefully folded it along the edge of the body and then added glue just to the body so that the wings were held away from the hammered silver base card


A Simply Said Block sentiment in matching ink and white gel pen antennae complete.


So what's your opinion?
The rest of the BA's have been exploring what's possible with this new stencil, so why not go check them out too.
Be sure to comment along the way for your chance to win a Flippin' Good Prize! Commenting to win will close midnight BST Sunday 28th April 2024 and Bev will announce the winner on the blog 29th April. 

  Anita


Julie -that's me


Hopefully I will be on my way to Port Sunlight as you read this post and perhaps if you are going too you'll see me on the Uniko stand, so please say hello. 

Saturday, 7 October 2023

Uniko Release Day Giveaway and BA Blog Hop

Good morning.
It's release day for Uniko's October release and of course as is traditional we are having our bog hop and giveaway. Comment on all the blogs for a chance to win the WHOLE release! All the stamps will be available from 9pm tonight, if you can't wait and if you are lucky enough to win and you already have the release, then Bev will happily provide an alternative!
.
We are doing things a little differently for this release with Bev having done the intros and the BAs joining in for today as it's World Card Making Day too!

First off we have another addition to the Big and Bold series, Thank/s/ful.


BIG & BOLD thank/s/ful  £11
Copyright Uniko Ltd 2012 - To Date

Here I've stamped an array of leaves from assorted Uniko sets including Autumn Serenade and Nature's Treasures I, in shades of autumn onto a panel of white card to which I had first stamped the thanks in a pale matching colour, Altenew's Misty Moor. This showed me where to stamp my leaves and where to stick my fussy cut sentiment. This I stamped on some matching card with Memento Rich Cocoa and embossed with clear EP.  The leaves were inked randomly with a mix of Memento, Canteloupe, Tangelo, Peanut Brittle, Potter's Clay and Rich Cocoa. The SENDING, also stamped with Rich Cocoa, is from the Picked Posies set.

Next up is this card using the new Autumn Serenade. It follows the similar designs of the other Serenade sets, Love and Snowflakes, plus a few extra leaves.


Autumn Serenade £11
Copyright Uniko Ltd 2012 - To Date

I tried to get my stamping to bleed into my paper but was only marginally successful. So I decided to ink the stamped panel with some Scattered Straw DI and stamped one of the sentiments with more Rich Cocoa. The other colours are the same as for the previous card.

Next is my favourite of the release, Remembrance. It contains a couple of poppy stems and accompanying sentiments. Here I've used watercolour and masking fluid to create my central panel.


I'm afraid that I had intended for the stems to be part of the design but my masking was a bit hit and miss, and the watercolour had bled through, so went with a close crop and a square die cut frame. No sentiment as I wanted the image to shine!

Remembrance £11
Copyright Uniko Ltd 2012 - To Date
I love this stamp so much I couldn't wait to colour up another, this time using Copic markers.


You never know when you'll need a sympathy card and they are always hard to make at short notice, so I like to have a couple ready in my stash.

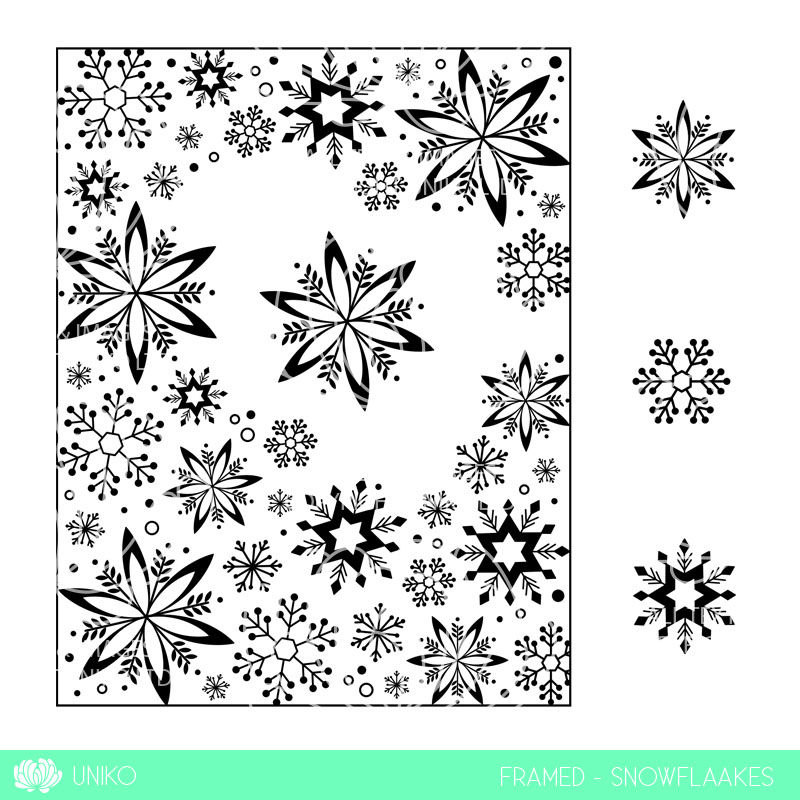
Finally here is another in the Framed series, this time snowflakes with 4 additional snowflakes to play with.


Framed - Snowflakes £11
Copyright Uniko Ltd 2012 - To Date

I started by embossing the frame with white EP onto white card, then added some DOx colour with a blending brush, splashing on some water and then lifting it with a paper towel to get even more dimension. On some scrap card, I stamped and embossed in white some of the other snowflakes, inked as before, fussy cut them and placed them on my design with pads after stamping and embossing the sentiment from Christmas Wishes. The whole panel was trimmed to leave a small inky border and mounted on a white base card.

Now the formal introductions are done, let's give you some more inspiration for using them. Be sure to leave some comment love either on the BA blogs or social media. You have until midnight Saturday 14th October 2023 to comment and then Bev will randomly select a winner to win the entire release, or equivilant.

 Anita

Bev

Izzy


Hope you have enjoyed this release and happy hopping!

I'd like to join in over at:-


                                                               Option of Autumn

 
                                               Autumn or Halloween


Friday, 2 June 2023

Release Day and Blog Hop @ Uniko

It's release day at Uniko and as per tradition we are having a blog hop and giveaway!
So for your chance to win, don't forget to leave a comment as you hop along to see what the BAs have come up with for this release.
Here's my first card using the Bauhaus Blocks stamp set.


I used 3 of the 5 grid stamps to create a Piet Mondrian style card, perfect for the males in your life. This is a square card but I could have used all 5 stamps and created a rectangular panel. The 3 panels were stamped in black then coloured with Copic markers before being trimmed and added to a panel of black card leaving a small amount of the backing showing. The sentiment is from my favourite Doodle Flowers, I tend to create a batch of them on neutral panels once I've got the stamps set out, use one and save the others for later! This time white EP on black, then mounted on white to match the coloured sections.

I said earlier in the week that I love the new layering stencil and this card is another example, using DOx in Picked Raspberry, Squeezed Lemonade and Wilted Violet. This is cut from a larger panel and attached to a die cut white panel and onto a 41/4"square base card.


The sentiment this time is from Yes You, the wonderful stamped and heat embossed with white EP on black and fussy cut, the you are, yes you added on strips.

OK, I know this is overload but here is another of the stencil panels, this time in a palette of blues, Altenew's Lapis Lazuli set, and another of my Doodle Flower sentiment panels.

This is a great masculine colourway, use as a whole or as a part of the panel.

Finally I have this card made using the Flower Power #4 stencil and the sentiment from Pure Florals -Peony.


To start, I took a panel of white card and attached the stencil whilst I inked through with Picked Raspberry DOx. I then removed the stencil and repositioned it so that the petals were in between the first set and inked again with the DOx. I used a firmer hand over the center and edge of the flower to create a sense of shape and dimension. The stencil was then removed and I inked lightly over the whole panel without the stencil to get rid of as much white as possible.

Using a couple of the stamps from Flower Power #4, I stamped in Seedless Preserve DOx to create a center, then added a sequin for a bit of bling! 
The sentiment, Sending, was stamped, heat embossed and fussy cut and the many thanks added on a white strip. A few sequins and gems complete.

So that's all from me for today. For the chance to win don't forget to leave a comment here before you hop along for the chance to win the whole release!.

Sunday, 20 June 2021

Uniko Stencil Release Day and Blog Hop

So it's time for the full release at Uniko
Hope you've enjoyed the new stencil release so far so why not grab a cuppa and join in our 9th Birthday Blog Hop. Here are a few more cards I made with the brand new stencils.

The first one is made using the fab Rose stencil. 


I was trying to find different ways to use this fab large rose and came across a card by the talented TaeEun Yoo on Pinterest. Her gorgeous card uses a different stencil but I used the same technique, I think. 
On a panel of dark pink card, I inked through with some white pigment ink, removed the stencil then left it to dry. When fully dry, I went in with my Polychromo pencil crayons to give definition to the petals. I don't use them quite as often as I should so I hope the effect looks OK.  I am ashamed to say that after colouring the flower I was left staring at it for a couple of days trying to decide how to make a card. In the end I gave in and CASEd TaeEun's card layout. 
I trimmed down the panel, added it at a jaunty angle and trimmed off the excess before adding a sentiment strip that I had in my stash, made by putting a couple of small sentiments from Pure Florals-Peony together. When I do something like that I make quite a few using different colours and EP and save them for later use as getting the elements lined up is time consuming. To lift the strip I added a bit of gold glitter paper from the stash, a few PPP gold sequins complete.

My second card took inspiration from the rainbow wall in the latest Time Out challenge.


After inking my rainbow through the mini Mix Geometrics stencil with DI, I die cut the large English Country Garden butterfly die and popped it up with a second one cut from fun foam. The sentiment strip from Pure Florals - Cosmos was stamped on a die cut banner and embossed with white EP, before adding it across the middle of the butterfly. With all the hot weather we had last week there have been lots of butterflies fluttering around the garden, so I thought it would work well.

Finally, this card also features a butterfly but this time it's the stencil variety. The colours chosen being the latest ones over at JUGS.


To begin, I placed the open butterfly stencil over a piece of white card and inked through with Dried Marigold DI. Removing the stencil revealed a soft, solid, orange image. Carefully laying the detailed stencil over this, I added Picked Raspberry to the outer edges and Candied Apple DI to the center.  Before removing the stencil, I added some Black Soot DI to the body and antennae ends. I love the way the soft orange shows in the fine lines of the butterfly's wings and the way the wings appear to almost shimmer. The body didn't look dark enough, so I added some Zig watercolour pen detail in black as well as the antennae ends.
I decided to have my butterfly flying out of the panel, so I laid my rectangle die over the image and marked where it crossed the wings, then fussy cut towards the center of the image, just enough to allow the die to slip under, then secured with tape and die cut as normal. Once cut, I removed the die and fussy cut the rest of the wings. The sentiment, from Birthday Wishes was stamped in black then embossed with clear EP.
I thought a thin frame of gold glitter paper hi-lighted the orange shimmer of the wings so added it under my butterfly panel, before finally adding it to a black 5 x 7 card base with pads. I was going to add some sequins but in the end left them off.

So for a chance to win some Uniko goodies, leave a comment here then hop along following the links below. If you loose your way just head back to the Uniko blog where you'll also find all the links and the Ts and Cs.
Don't forget to comment along the way, as there will be one lucky winner from those comments left, selected to win ALL the stencils released today. You have until 10pm BST Sunday 27th June 2021 to leave a comment. Winner will be announced on the blog on or around the 28th June 2021.

Jane 
Julie -that's me

Happy hopping


I'd like to join in over at:-