Showing posts with label Sentiments Outlined. Show all posts

Friday, 26 June 2026

Introducing Ink n Flip Chevron Duo Stencil

It's the final day of the intros for Uniko's June release. Today we showcase a stencil duo that I've found to be so versatile in creating backgrounds. Here is one idea I came up with.


One of the stencils gives you the solid element of the chevron and the second the pattern. This panel was made using a combination of the two and some DI in Salty Ocean and Peacock Feathers. 
I started with the solid stencil, inking first with Peacock Feathers before flipping and repeating with Salty Ocean. Next I replaced the stencil with the patterned one and used Peacock Feathers then flipping and using Salty Ocean, to create this overall pattern.

I'd seen a card a few years ago that influenced this card I think but as per usual I can't find it, it must have stuck in my mind though! I cut the inked panel with an MFT rectangle die and added the sentiment panel, a mix of Happy from MCM Christmas and half of the Happy Birthday from  Anniversaire Arts Décoratifs. 

This second card uses the same stencil but inked in a slightly different way. 


Mounted down the middle of an A6 white note card, the strip was edged with a slither of holographic card along each edge, saves on card, and the sentiment panel added on foam pads. I've used Sentiments Outlined embossed in white on some matching blue card, filling in the open area of wonderful with an embossing pen before heat embossing again. The panel was mounted onto a scalloped die cut rectangle and a few punched stars complete.

I wonder what the rest of the team have come up with? Why not check out their ideas below.

Denise


Julie -that's me


I'll be back same time tomorrow with the full reveal, see you then!
 

Thursday, 7 August 2025

Introducing Background Blocks MOD Circle Builder

 Good morning and welcome to day 3 of the intros for Uniko's August release.

Today it's another Background Block and it may be familiar to some as it is based on a previously released stencil. Here are a couple of ideas I came up with to use the stamp.

Firstly is this simple design using a half of a panel from an A6 one I created by repeated stamping of the pattern.


There are a few extra stamps that come with the set and I used the smallest semi circle to stamp across the panel in Twisted Citron and Peacock Feathers DI. Once stamped, I matted it on a panel of matching green card and added to a plain white base card, stamping the sentiment in black.

My second design uses the other half of the panel but this time I coloured some of the quadrants with Copic marker in a mix of black and yellow.


The sentiment is from Sentiments Outlined, which I coloured using the same Copic markers. Using my guillotine I cut it into strips before cutting away around the end letters and then adding to the patterned panel. This was was then simply adhered to my base card.

So that's all from me but please check out what all the other BAs have been up to.


Julie -
me


See you same time tomorrow for more retro inspiration.

Thursday, 12 January 2023

Introducing ... Mid Century Modern Purrfect Day and MOD Background Builder Circles

Morning and welcome to day 3 of the latest release from Uniko. Today sees us focusing on a cute new stamp set, Mid Century Modern Purrfect Day. Here's my take using the cute puss cats.


When I first saw the set I wanted to use the cats to create a heart shape with their tails, but as they weren't a mirror image of each other I had to sit and have a think.
I ended up using the mirror stamping technique for one of the cats, stamping the outline one onto the back of a larger stamp, any Background Block stamp is perfect for this, before stamping it off onto the paper. I coloured the cats with Copic marker and fussy cut, by fussy cutting them I was able to make a more heart shaped shape with their linked tails! After I'd done all this, I realised that if I had just cut the second outline out and coloured the wrong side of the cat, it would have worked just as well! 

A panel of white card was inked with Chipped Sapphire DI, keeping it light where I was going to place my die cut moon. The moon is simply a die cut circle with a light inking of Weathered Wood DI. the moon was added to the inked panel and the two cats added, I did cut off the very bottom of each cat that over hung the panel before adding it on pads to the A6 base card to which I'd already stamped the word Purrfect. A few tiny silver gems to one of the cats completes.

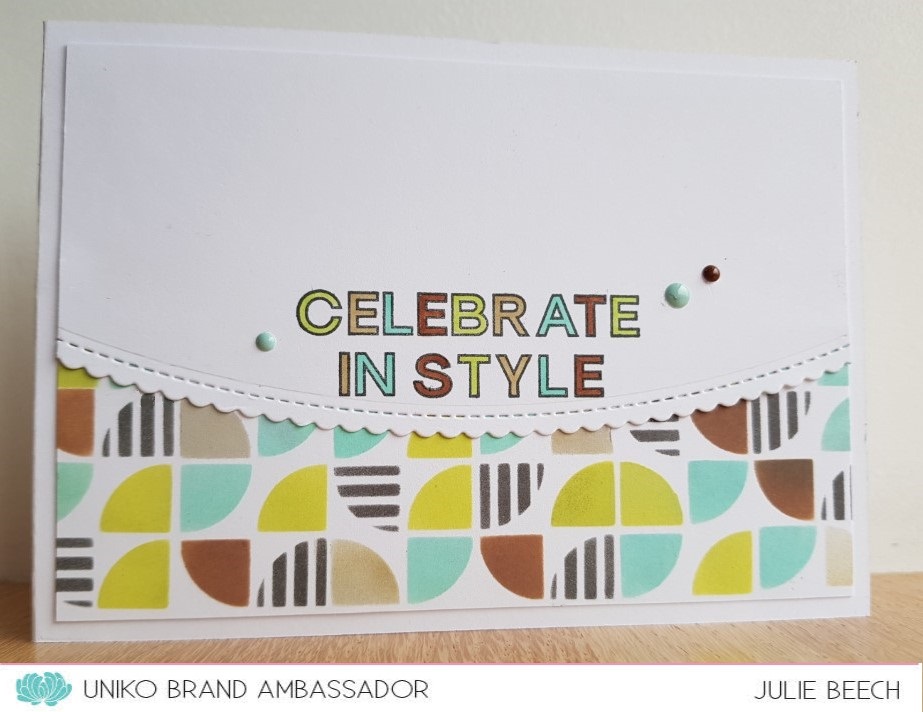
Now to the stencil, MOD Background Builder Circles. Still keeping with the retro theme this can be used to create a whole panel of pattern or just a small area, it's all down to you! Here's what I made with half an A6 panel I created.


I chose the colours after seeing them as wall art on Pinterest. I would never have thought to use them but I really like how they go together. I used a mix of DOx and Altenew inks, masking off as I went. Each shape was given it's own colour to make my life easier but can you spot where I got it wrong?
The finished panel was added to a base card and the scalloped edged panel, stamped with the sentiment from Sentiments Outlined. The sentiment was coloured with matching Copic markers and a few Create a Smile enamel dots added to finish.

For more inspiration why not check out the rest of the Uniko team over on their blogs?
Tomorrow is launch day and you'll be able to buy the whole release as well as the usual chance to win it by taking part in our blog hop!

Thursday, 25 July 2019

Introducing Wild Sentiment stamp and Animal Print Stencils

Well hello and welcome to day 4 of the new release from Uniko.
Today we are showcasing the three wild themed stencils and the Wild stamp set.


This card uses the Tiger stencil and the Wild sentiment stamp set. The baby tiger was drawn freehand and coloured with Copics before fussy cutting.
To start, I took a panel of flesh coloured card and secured the stencil over the top before inking with a mix of Black Soot, Vintage Photo and Spiced Marmalade DOx. Once the stencil was removed, I added a few hi lights with a white gel pen and cut it with a stitched rectangle die. 
The large Wild sentiment was stamped in black then coloured as the tiger cub with Copics  and black fine liner then fussy cut.
My die cut panel was stuck to an off white card blank adding the letters in an arc above the cub. The original stamp was a little too big to fit my panel. guess I should have checked first before cutting! Anyway, I rather like the arched lettering and completed the sentiment with a black heat embossed 'THING' from the same set.


My second card uses the Giraffe stencil, so of course it features a giraffe!


This cute chap was made from various die cuts which I then inked with Vintage Photo, Gathered Twigs, Black Soot and Fossilised Amber DOx., some through the stencil, some not.


After assembling, I added some punch cut strips of grass to a panel of white card, placed the giraffe on top stamping happy birthday in black, a die cut black 2 and wrote today freehand with a black fine liner. The panel was then popped up on fun foam over a 5 x7 white base card.
    

My final card uses the zebra stencil and one of the Sentiment Outlined stamps plus a bit of ribbon and DP from the stash.


The stencilled panel was created by inking through the stencil with Black DOx ink, the DP added, followed by a length of black ribbon. My sentiment was embossed with WOW black glitter EP a few sequins added and finally my panel was added to a white base card, simples.

So that's it from me for today but I'll be back tomorrow morning with a complete run through of the whole July release and the introduction of the release blog hop.

Whilst you wait, why not check out the rest of the DT and our talented GD Karen Baker.

Julie - that'll be me

See you tomorrow.

Wednesday, 24 July 2019

Re-introducing Nautical Treasures AND Introducing... Background Blocks Nautical Stripes, Fleur De Lis & Anchors stencils

Hello and welcome.
Today sees the first of the introducing posts for this month's Uniko release.
Today we are going all nautical!


This card uses the Anchor stencil and the Nautical Treasures stamp set.
I created the background by inking through the stencil with Versamark onto royal blue card and embossing with a clear semi dull EP.
My life belt was simple to make, just a ring of white card cut with two stacking dies and a bit of red Copic colouring and string added to the back!
My banner was stamped in matching blue using the sentiment from Nautical Treasures.

My second card uses the Fleur de Lis stencil and Background Blocks Nautical Stripes.

The stencil was used with white embossing paste over white card and the block stamp inked in blue across the bottom of my base card.
I trimmed the finished stencilled panel when dry and added some gold mirror across the bottom and a die cut oval sentiment using Outline Sentiments in matching blue ink.
     

That's all from me for today, but check out what the rest of the team have been inspired to create

We are also joined for this release by the talented Karen Baker .

Julie - that'll be me

Come back tomorrow for some more fab new release inspiration.

Joining in over at:-

   For your blog
                                                                                         Use a stencil

Monday, 22 July 2019

Introducing - Background Builders Classic and Sentiments Outlined

Well, have we peeked your interest with the sneak previews of the July release?
Well. today the DT are showcasing Background Builders Classic and Sentiments Outlined.

Here's an idea using both.


I wanted to create a faux layered look with this OLC. 
Using one of the strips from the Background Builders Classic, I stamped along the edge of an A5 white note card, then stamped one of the greetings from Sentiments Outlined.
Using a bevelled edge ruler and a Copic C3 marker, I drew a line down the left of the stripes to suggest a shadow, then after colouring the outline sentiment with Copics in a rainbow palette, I added a shadow on each letter with the same C3 pen. 


I'm sure the different strip stamps will be really useful in building up patterns, check out what the rest of the team have come up with here, or follow the links below.
We are also joined for this release by the talented Karen Baker  as well as the rest of the DT.

Julie - that'll be me

Come back tomorrow for some more fab new release inspiration.