Saturday, 16 October 2021

Color Hues #28

Good afternoon. It's the middle of the month so time for a new colour combo at Color Hues.
Here's my take on the new colours.


Red and Kraft just shouts Scandie Christmas so I decided to include some gnomes alongside a Nordic stencil background and a punny sentiment.
The Gnomes are from Stamping Bella and the stencil used for the background and sentiment are Funky Fossil.
I love these cute gnomes, especially the grumpy one, and couldn't resist buying them awhile ago after a Copic colouring class. I've missed getting together and crafting in a group, hopefully it wont be too long before we can get together again, I only need level 4 to complete the basic programme.
Any road, after stamping the gnomes, I coloured them with Copics and fussy cut them and attached them to a die cut white panel, the middle one popped up on pads. The background, I already had left after the Uniko/Funky Fossil Instahop, so just used up a couple of bits to make my central panel, you can't see the join under the gnomes, but I did attach one the wrong way up to begin with!! The stencil was laid over a panel of kraft card and Ranger Texture Paste added. I still have a few bits left so they may make an appearance later!
So where will these colours take you, as always we'd love to see.
For more red and kraft inspiration, check out the rest of the team here.

Thursday, 14 October 2021

Perfectly CAS and The Flower Challenge's 5th Birthday

Good evening, it's time for a brand new challenge over at Perfectly CAS.
Here is my take on this month's theme.


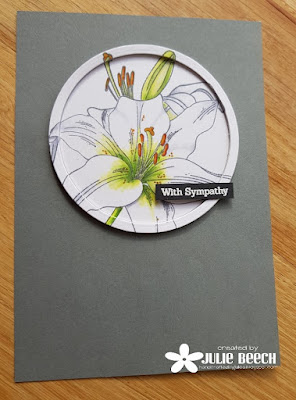
Sympathy cards are never the easiest of makes so I find it best to have a couple in my stash for those unwelcome moments.
I chose to use the Lilies from Uniko's Pure Floral set, the theme at the Flower Challenge and kept it very simple. I can't believe it the Flower Challenge's 5th birthday!
On a panel of white card, I stamped and masked my bunch of lilies and coloured them with Copic markers. I then die cut the bunch with a circle die and then again with a slightly smaller circle die to create a frame. The sentiment, also from Uniko was stamped on black and heat embossed with white EP.
To assemble, I die cut a piece of copy paper with the large die and set to one side. Using both circle dies, I cut a matching frame from fun foam and then attached it to the copy paper. The stamped and coloured panel pieces were then added to make a topper and the sentiment popped in the bottom right. The topper was then added to a 5 x 7 dark grey card.
By using a larger card, I was able to get away with a bigger panel and still keep the design to 1/3rd of the whole. Although it's tempting to add some detail to the background, I resisted and so kept it CAS. Remember white space doesn't doesn't need to be white!
So where will the theme take you? We'd love to see you in our gallery.
For more sympathy inspiration, check out the rest of the DT here.

I'm joining in over at:-

Tuesday, 5 October 2021

Autumn Trees

Good morning, it's time for a brand new challenge over at Cardz4Guyz
This time our theme is -

A Birthday Card in Autumn Colours

As I need a card for the OH's birthday soon, I thought I would make one for that occasion. He is a bit of a tree nut, planting quite a few in our hedgerows since we moved here to complement the veteran trees that were already here. In fact an academic is coming on Thursday to inspect them as the venerable oaks are under threat from a nasty creepy crawly bug and he wants to check on their status!
Anyway here is my tree themed card in autumn colours.


I've used this stamp from Crafty Individuals a few times as you can get a really lovely autumnal effect using the marker and spritz technique.
To start, I took an A6 panel of rough watercolour paper and inked the stamp, which I'd stuck into my MISTI with a Pritt Stick, with some Mustard Seed DI and then spritzed with water before stamping. I then added a variety of autumnal colours with my Zig watercolour markers and stamped again before the first layer was dry, this allows the colour to blend together without leaving harsh edges. I left the panel to dry, then went in with Altenew's Sea Forest Ink all over the stamp. I hand painted the trunks with a dark ochre Zig marker when totally dry, adding more green marker and water to the base of the trees. When dry I added some dark shadows towards the bottom of the trees with the ochre marker on the stamp. 
The frame was cut from off white textured card using an MFT die and popped up over the panel with some fun foam, before being attached to a 5 x 7 matching off white base card. The sentiment from LOTV was stamped in Altenew's Mangrove Root ink.
So where will our autumnal colours take you? If you need more inspiration check out the rest of the DT here.

Joining in over at:-

Anything Autumn

Sunday, 3 October 2021

September 2021 Reveal, Release, Brand Ambassador Blog Hop & GIVEAWAY

Well today's the day that you can get your hand's on the new Uniko release. What have you thought of it so far, fab isn't it. They are all available to purchase HERE on the website now.

So here are a few ideas combining the new release with some old favourites too. My first card features Background Builders Winter Wonderland.


Background Builders: Winter Wonderland £10.00
Copyright Uniko Ltd 2012 - To Date

For this card, I took my inspiration from the Northern Lights or Aurora Borealis. I've only ever seen them on TV but it must be quite a sight to witness them for real! There is something otherworldly about them I think. 
On a panel of white card I created my 'Aurora' using DI in Tumble Glass, Broken China, Evergreen Bough and Faded Jeans, not worrying too much about blending, I was looking at more of a streaky look. When dry, I added some stars with a white gel pen, stamped the text and silhouetted border over the top, then drew the outline of the hills onto black card using the stamp as a guide and cut it out. The hills were then glued in place and the finished panel trimmed down to leave a border on an A6 white base card. I was unsure whether to stamp a sentiment but in the end went with one of the small ones from the new Christmas Sentiment set.

This second card uses one of my sentiment panels I made using Christmas Sentiments and some of the older Christmas greeting stamps.


Christmas Sentiments £5.00
Copyright Uniko Ltd 2012 - To Date

The new sentiment set is a fabulous addition to anyone's Christmas stash and I decided to use them together with other Uniko Christmas greeting stamps to create some background panels. I used one earlier in the week, here, but for this card I used one of my strip backgrounds and white EP. The finished panel was cut down the middle and mounted onto a panel of white card with a stitched open scalloped border and simply popped it up on pads. A great design to mass produce as once you have the background panels made it's a pretty simple process to repeat the design!

My next card uses one part of the Pattern Building Christmas Tree, together with Background Builders:Vines, Winter Additions and the flower center from Kindness Blooms. It's a take on this card I made for a BA inspiration back in April. 


Pattern Building Christmas Tree £10.00
Copyright Uniko Ltd 2012 - To Date

The reindeer is made using the BB Vines-Winter Additions for the antlers, the nose is the flower center and the eyes are freehand. The mass of fairy lights are the string of lights from the set and two half strings added on either side!The lights were coloured with Zig water brush pens and then some glossy accents were added on top, as well as a touch to his red nose. The sentiment from Christmas Sentiments completes.

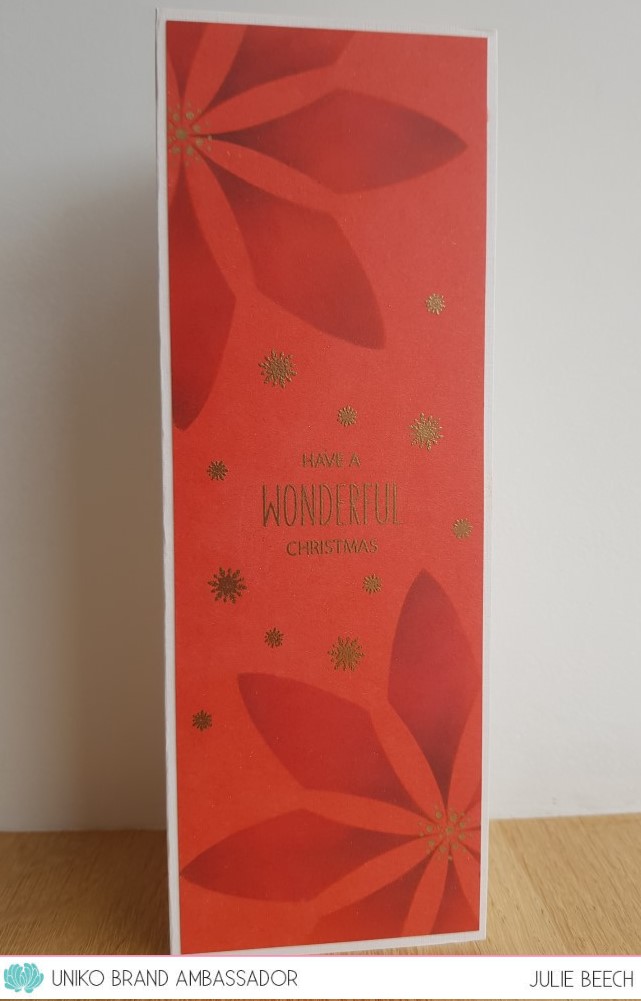
Finally, I've used the Flower Power #1 stencil to create a slimline Poinsettia card. 


Stencil - Flower Power #1 £3.50
Copyright Uniko Ltd 2012 - To Date
A panel of red card was stenciled in opposite corners using some Candied Apple DOx, followed by some shadows added with Vintage Photo DI. The poinsettia centers were added with a gold pen and the sentiment and stars added with Versamark and then heat embossed with gold EP. The star stamp is part of the new Background Builders set and the sentiment made up from Christmas Sentiments and Doodle Flower. The trimmed down panel was added to an off white base card. Simply an A5 piece of card folded lengthways.

Not enough inspiration? How about some more from the rest of the Brand Ambassadors. 
As usual we have our Brand Ambassador Blog Hop & GIVEAWAY! Simply hop along leaving comments along the way for your chance to win the ENTIRE* Release. You have until midnight BST Sunday 10th October 2021. A winner will be announced the following week.
*An alternative prize will be offered if you have already purchased any or all of the release.

So what are you waiting for, lets hop...

                  Julie - That's me

Saturday, 2 October 2021

Autumn Colours

 Good evening folks. Max is back with us and his breath is SO much sweeter after his trip to the Vets yesterday! He had more than a few teeth out too so was feeling particularly sorry for himself last night. Anyway, this afternoon he was back barking at the hikers who were crossing the field and taking their time to get through the kissing gate! It would appear that normal service has been resumed!

Where did last month go? Well as it's now October it's time for a brand new challenge at HLS CAS. Here's my take on this month's theme.


To begin I took an A6 note card and masked off a square in the top centre with Post-It notes, before adding DI in a range of autumnal colours., including Spiced Marmalade, Mustard Seed, Barn Door and Seedless Preserve. Before removing the masking, I stamped the leaflets using a STAMPlorations stamp with Versafine and heat embossed with gold EP. After removing the masks, I stamped the Uniko greeting with Altenew's Mangrove Root ink.
The trees here are still in full green leaf, it must be the warm weather we've had recently but I can't wait for the colours of Autumn to erupt.
For more One Layer inspiration, check out the rest of the team here.

I'd like to join in over at:-

  
                                                 no option for me