Wednesday, 2 November 2022

Introducing Uniko's... Stencils Large Snowflake #1 and Large Snowflake #2

Morning all, time for another stencil introduction at Uniko, well actually 2 Festive/Winter ones.

First off is this fab Large Snowflake #2 with the matching mask. For my card I've teamed it with a couple of stamp sets that feature snowflakes, Snowflake Serenade and Stunning Snowflakes.

Taking a panel of white card, I stamped the large element from Swirling Snowflakes a couple of times, embossing with white EP. I then filled in some of the gaps with snowflakes from the same set and Stunning Snowflakes and heat embossed those to match. The large snowflake stencil was added over and inked with Altenew's Ultramarine, fading out to Iceberg ink. Placing the mask into the stencil, I then carefully removed the stencil to leave the mask in place and inked with Weathered Wood DI over the top, blending out from the center to reveal the embossed snowflakes. 

The sentiment from Pattern Building Christmas Tree was stamped in Ultramarine too and added along with a few silver sequins. The finished panel was trimmed and added to an A6 base card to leave a slight border.

In my second card I started by inking over the mask of Large Snowflake #1 with Altenew Galactic Stream, blending out to Aqualicious on white card. Placing the stencil over the inked snowflake, I then stamped some more snowflakes from Snowflake Serenade and Stunning Snowflakes in Dew Drops through the opening, except for the central one which I stamped with Galactic Stream.


Again a few sequins and the sentiment from Pattern Building Christmas Tree,stamped in Teal Cave complete the card. Trimmed down again it was added to another A6 base card to leave a slight border.

That's all from me for today but why not check out what the rest of the Brand Ambassadors have been up to? I'll be back tomorrow with the full reveal.

 Anita

Jane

Julie - that's me


I'm joining in over at:-

                                                  Winter

Tuesday, 1 November 2022

Color Hues #52

Good afternoon!
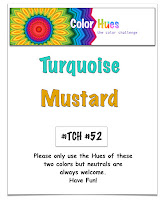
It's the 1st of the month so it must be time for a new colour combination over at Color Hues.
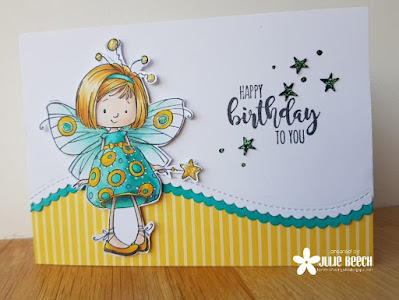
This time Hannelie has chosen a cheery one and here's my take.


I had to think about this combination, are we thinking Dijon or English mustard? Well I chose the English, of course!
I selected a few different images but finally settled on this Whimsey Stamps Mazarine fairy image that my friend Jane stamped for me before all this lockdown nonsense happened. We both attended one of Faye Wynn Jones Copic colouring classes way back in March 2019, Jane bought a few stamps as did I and we swapped a few stamped images of our purchases. I have been keeping them for the right occasion but decided I better use at least one of the cute Mazarine fairy images.

To start, I looked through my stash to find some turquoise and mustard DPs, one digi from NitWits I thought would do wasn't right but I did find this really ancient piece of mustard yellow self stripe. I think it's from Papermania and dates from my early days of crafting, back in the late noughties!
So I chose the Copics to match and coloured the fairy before adding some Crystal Stickles, to her wand and antennae. After fussy cutting, I put her to one side and concentrated on the card base. 

Using an MFT die I cut my top panel from white card, then using the left over cut another which I coloured using the darkest of my turquoise Copics. This is a great way to incorporate the same colour into your design without the hassle of finding matching card. On the white die cut panel I stamped the Uniko sentiment to one side, adding a few black, punched stars and hand doodled dots and slipped the coloured die cut under the bottom edge. I added some more of the Crystal Stickles to the stars and dots, it has a turquoise look on dark card that doesn't show up on lighter backgrounds. The mustard DP was added to my base card and the finished panel added on top, my fairy was then attached with foam pads.

So where will these colours take you? There's lots of inspiration over on the blog from the DT and our lovely GD for you to feast on.
Looking forward to seeing you in our gallery.

Joining in over at:-

Add some doodles

Uniko Introducing... Stencil Flower Power #6

Good morning again, a busy day here on my blog. I've another new stencil to introduce you to from Uniko. This time it's a floral one, Flower Power #6 stencil and masks. For my card I've only used three of the stencil parts to create an all over design.


To start I masked off the rest of the stencil except the small outline flower. I then inked through onto a panel of white card with a soft layer of Mustard Seed and Pink Flamingo DI, scattering the blooms across the panel. Next I masked off all but the small detail flower and repeated using more pressure this time. To get the  leaves in place I used the small flower mask and the small leaf stencil with some Mown Lawn DI.
My sentiment was one I had left over from an earlier make using the sentiments from Doodle Flower, double mounted on white and matching grey. I like to stamp a few sentiments at once when there are multiple stamps in them, it's just so easy in the MISTI when you have them set up!

That's all from me for today but why not check out what the rest of the Brand Ambassadors have been up to? I'll be back tomorrow with another stencil introduction.

 Anita

Jane

Julie - that's me


Recollection

Good morning.
The 1st of the month and a new challenge at Cardz4Guyz. This is the month of remembrance, with Armistice Day and Remembrance Sunday in a just over a week, so Caz has chosen the theme of -

REMEMBERANCE and/or POPPIES

Here is my take using Penny Black's Recollection die and a STAMPlorations sentiment.


I do love a poppy image and my friend Loll was kind enough to gift me this, along with a beautiful card she made with it, now sitting on my shelf as I type. It was such a kind gesture and I have been saving it up for just this challenge!
It doesn't have a leaf die to go with the flower, so I used an MFT leaf die that looked a bit like a poppy leaf. Each element was cut from MM paper and coloured with DI in a watercolour method, before inking over each part again with a brush blender. I also crinkled up the petals to give it a little bit of added dimension before sticking to a die cut panel, smooshed in Stormy Sky and Salty Ocean DI.
The sentiment was stamped in Memento Paris Dusk and the completed panel was added to an A6 top fold card with pads.

For more inspiration please check out the rest of the DT here. We'd love it if you joined in this week too.

Joining in over at:-

Monday, 31 October 2022

Uniko Introducing... MOD Background Builder Stencil

Morning all!
The first of our November release at Uniko features a very versatile background stencil. Here's how I used it.


Trying to think outside the box, I decided to use my new WOW embossing pen I picked up from Lavinia Stamps shop in Ruthin, where the OH took his car for a recall from Subaru. He just happened to mention that there was a craft shop around the corner so I 'volunteered' to accompany him on his hour and a bit journey!!
I first drew around the stencil with a pencil on a panel of MM paper, then painted the opening with Zig watercolour markers. I tried using the WOW pen alone but was more successful following the soft pencil outlines!! After embossing with some white EP, I spritzed the panel with water and dabbed the excess inky water with some kitchen paper. I think I ended up with more on the kitchen paper than the MM panel!! I do like the mottled effect I got though, even if there was a little leakage.

The panel was die cut using a stitched rectangle die, mounted on a matching base card and the sentiment added. The sentiment was made up from words from the Doodle Flower set, stamped on a matching card circle, mounted on a die cut vellum one.

 That's all from me for today but why not check out what the rest of the Brand Ambassadors have been up to? I'll be back tomorrow with another stencil introduction.

 Anita

Jane

Julie - that's me