Thursday, 3 January 2019

Surprize Party Guest at Seize the Birthday

Afternoon peeps.
I'm back today with a card and a little bit of news.
To start here is my card, I was very much in festive mood when I made this birthday card.


The reason for creating it was because Nancy of STB asked if I would be their surprise party guest over at Seize the Birthday for the next couple of months! 
It was so out of the blue but of course I said yes, STB is one of my favourite challenges!

This time the theme is -

CONFETTI


But as usual so long as it's a birthday card your welcome in the gallery!


I'd seen quite a few black and gold New Year images on Pinterest such as this one, which together with the theme prompted me I to make this OL card. 
To start, I placed a top fold, black, A6 base card under the Uniko Confetti stencil and securing with a little bit of tape. To leave room for the sentiment, I masked off part of the stencil with some Post It tape, then inked over with Versamark and then carefully removed the mask. I chose some sparkly EP and heat embossed the confetti.
Using my MFT small alphabet dies, I cut out BIRTHDAY from some gold glitter paper and stamped the happy from the Happy Christmas in the Uniko Simply Said Christmas set  in Versamark and heat embossed with white EP.
I do like black and gold together, it always looks classy and is very celebratory!
So for more inspiration, please check out the rest of the STB team here and join us.

Joining in over at:-

newchallenge
Party Time

As You Like It Challenge
Anything Goes

Wednesday, 2 January 2019

Caseing Jennifer Mcguire

Good evening and Happy New Year!
New year, new month so new challenge over at HLS CAS.
Here is my inspiration card for this month's theme.


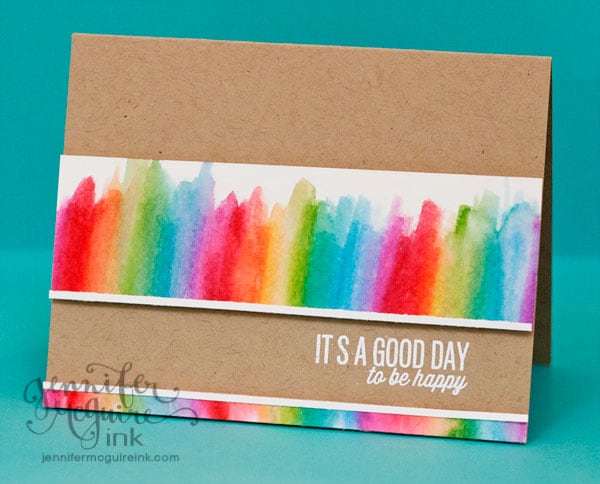
I don't use washi tape much at all and if it wasn't for my bestie who bought me some I wouldn't have much at all! I always struggle using it too, so had to go looking for inspiration and found it over on Jennifer McGuire's YouTube channel here.
Instead of the distress marker panel, I laid down some strips of Washi tape onto some white card then trimmed it down to size. The sentiment is one from STAMPlorations, stamped and embossed with white EP. A very simple design in the end.

For more CAS inspiration please check out the rest of the team here and then why not join us.


Joining in over at:-

Grab our logo
Thanks a bunch

Wednesday, 26 December 2018

Congratulations Mr and Mrs

Well hello, hope you had a fab Christmas with friends and family.
All is now quiet chez Beech after a hectic but lovely couple of days with the kids and grandkids.
I've now got time to share a card I made for the wedding of the best friend of my son.


I didn't know what the brides colour scheme was so went down a traditional red and soft pink route.
I must admit to having been inspired by this fab card by Therese Calvird. I loved the bold die cut Mr and Mrs against the grey background. Her's was an A6 card but mine was a 5 x 7 so I needed to make the layout a little different. 
I decided to use those same die cut letters from the Altenew bold alphabet set and include a larger bouquet of roses, in fact I added a small one in the bottom left to balance the design. 
Despite having tons of coloured card in my stash, I have found it really difficult to find the right colours for these layering dies, so used my Copic markers to colour white die cuts before building up the layers. 
I liked Therese's idea of popping the letters up on red fun foam which matched the colour of the flowers, giving them a little more room to spread out on the larger format. A few Pretty Pink Posh clear sequins and a congratulations banner completed the design. I'm so glad that I bought these dies as they are so easy to use and create such great effects.

As it's review of the year time over at Altenew I thought I could share it there as the colours match the February colour swatch.


Simom Says Stamp Wednesday Challenge
wed-newchallenge-header
Anything Goes

Tuesday, 18 December 2018

Tartan Happy New Year

Good morning, back to share a card I made for the new challenge over at Cardz4Guyz. 
The theme this time is :-

NEW YEAR - NEW BEGINNINGS

So,  I thought about making a tartan inspired card. Scotland seems to celebrate the New Year or Hogmanay more than we do here.


The background to this card was made using the stamp strips from Uniko's Background Builders Christmas 2018 set. I was inspired by fellow Uniko DT member Sarah P to create the background after I saw this fab card. 
I used a panel of red card, a gold liner pen and three of the strips, the 3 stripes, diagonal lines and the wrong side of the Ho ho ho!
The diagonal line strip was laid across the panel and inked in Versamark before heat embossing with white EP, repeating to get the required pattern.
The 3 line stamp was inked in Altenew's Hunter Green and stamped in a tartan pattern followed by the Ho Ho Ho stamp which I reversed to get a plain image in Altenew's Ruby Red. When dry I added some gold lines with a fine gold marker and a straight edge.
The panel was then trimmed down to size and added to a white base card. 
From some gold glitter paper, I cut the 2019 and added it to the same cut from red fun foam.
On a banner of black card, I stamped the sentiment from Simply Said Christmas and heat embossed with white EP and then popped it up on a strip of foam.

For more masculine themed cards pop over to the Cardz4Guyz blog.
Hope we can prove to you that making cards for the blokes in your life is easier than you think.

Sunday, 16 December 2018

Another one layer Christmas card

Afternoon peeps. Just taken the dog out before it got too dark, still not long now before the days start to lengthen!
Here is another Christmas card to share with you involving lots of masking.


I love a one layer card but they do require some planning!
I started by masking off a rectangle with Post-its on a white base card and added a torn piece at the bottom to make a snowdrift. It was then inked up with DI before stamping some trees in the same. colours. The main tree was stamped in black and I added some of the same DI over the branches. The snowdrift looked too bright so I knocked it back with a touch of  Vintage Photo. Some white chunky EP was scattered over the scene and heated carefully so it didn't blow everywhere!
Finally I added a simple sentiment.
I'm still in the process of decorating the main tree in the lounge, it got too dark to see what I was doing, but the one in the snug is finished. It was one that we grew from a seedling planted nearly 10 years ago and it was sad that it had to be cut down but it had to be done though as the others were being crowded out. This is the third cull from the plot and there is something very satisfying in decorating your own grown tree. The last two came with roots but this was too large a root ball to get out without disturbing the others. My Grandson and OH cut it down last week but the weather was so vile that we left it soaking in a bucket until Thursday. 

Joining in over at:-

Grab our logo
Christmas Trees