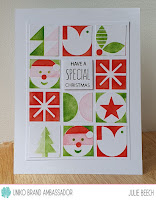
Good morning, today we start the introductions for the Christmas in July release from Uniko. Today we are focusing on a fabulous stencil that will pair well with the previously released Bauhaus stencils or just on it's own as I have done here.
My first idea shows what you can do if you cut up the squares and rearrange them into your own pattern.
When I first got the stencils, there are 3 parts to this one, I covered an A5 panel of white card by inking with the stencil. Each layer was a different colour, I used Mowed Lawn, Candied Apple and Worn Lipstick DI, but I masked off some elements to change up the design, leaving the bird and parcel ties white and the 2nd half of the tree a pale shade of green. From the finished panel I cut a couple of 3 x 3 squares and then cut up the rest into 1 inch squares.
On a panel of white card, I assembled the inchies along with a die cut white panel stamped with the greeting. The white panel was then cut down and added to an A6 base card.
This second card uses one of the 3 x 3 squares I mentioned above, mounted on matching green and red card and then onto a small, square, white, base card.
I've kept the design clear of any sentiment, it's quite obvious that it's a Christmas card!
The other square and inchies I will keep for use later.
What do you think? For more ideas about how to use this fab new stencil set check out the BAs and Bev below.
Anita
See you back here tomorrow for more Christmas in July fun.
Joining in over at:-


These are just as cute as they can be! Thanks for playing along with us this week at Just Us Girls!
ReplyDeleteOoo I love this with the individual blocks cut out and also how you made it square on the second card. X
ReplyDeleteThese cards are so adorable Jules!! xx
ReplyDeleteThis is a fun stencil and your Christmas colors make it so happy and warm. I am heading over to look at these stencils because your cute card has me wanting them. Thanks for sharing with us at Just Us Girls!
ReplyDeleteLove the cards you created! Great idea to use the cut squares on your first card, and the second one with the layered panel looks awesome too! Pretty colors!
ReplyDeleteThese are both so cool and so beautifully stenciled! Great job lining up those inchies, too. Thanks for playing along with us at JUGS!
ReplyDeleteYou showed the versatility of that stencil by using it in two different ways, Julie. The colors are bright and cheery. Thanks for sharing your card with us at Just Us Girls.
ReplyDelete