Wednesday, 28 August 2019

Uniko DT inspiration

Morning all.
Just popping by to say that I'm up on the Uniko blog today with a card combining stencilling and flowers. 


Check out the Uniko blog for all the details.

Tuesday, 27 August 2019

Celebrate, It's your Birthday!

Morning peeps, hope all you folks in England and Wales had a fab BH weekend, for once the weather was more than kind!
It's time for a new challenge at Cardz4Guyz, this time we have the theme of -

CELEBRATE!

So lots to go at there, weddings, engagements, exam success or simply a birthday!

Here's my card.


What says celebration more than balloons, so I've gone with a simple row of stencilled ones and a camouflaged CELEBRATE die cut!
Nothing much else to say about this card, rainbow stencilled Balloons using the Uniko Balloon stencil, Celebrate die from STAMPlorations and a stamped banner sentiment from Uniko's Birthday Greetings. The celebrate die cut was popped up with a die cut celebrate from white fun foam and a few freehand squiggles to suggest strings complete!

Lots more inspiration to be found on the Cardz4Guyz blog though.
Check it out then what are you celebrating, just make sure its for a fella!

Joining in over at:-


Friday, 23 August 2019

August Altenew Challenge

Good morning, just.
The forecast for today was sun but the clouds are grey and no sign of the sun at the moment.
Still that's just what the OH would like as he continues pointing the field side of the barn. Its a bit like the joke about the Forth Road Bridge, the painting/pointing never ends! We live in a very old barn conversion, probably dating from the late 18th century, but so far we haven't managed to trace its origins as it was once upon a time part of the huge Bridgewater Estate. We have found Tudor bricks at the base of some of the old walls but they could just be recycled from a near by manor house.  Still, lime mortar pointing old handmade bricks takes time and patience, which thankfully the OH has!

Anyway I've been in the craft room chilling with a little watercolour therapy.


I've used the outline stamps from Altenew's Hibiscus Bouquet in a no line watercolour technique.
Love the colour and the large outline blooms are a favourite for colouring. Not much else to say about it really.

I've a couple of artichokes in the veg garden that were left a little too long and have flowered, but I don't mind as the bees adore them. They put their heads down and kinda get lost. I counted 6 on one head the other day.


The first photo shows at least 4 bees in heaven, the other 2 are on the other side! 

As summer begins to wind down, hay is being cut and baled in the far field, 2 more near the house still to do, but hopefully the rain will stay away long enough to get those fields done too. I do love the scent of newly mown hay but the wind has been in the wrong direction to get much of a sniff so far!

Joining in over at:-


Take It, Make It Challenge


Saturday, 17 August 2019

Revisiting Big n Bold Wish, Blog Hop and Giveaway at Uniko

Good morning Uniko fans, its time to give a little love to a previously released stamp set.
This month the set we are revisiting is the Big and Bold stamp set and matching dies.
Here's my inspiration for you.


BBWishDDiesBIG&BOLDWishPP


I've used the candles, 'Make a' and 'wish' stamps together with both the matching wish dies.
It's another idea sparked by too much You Tube watching earlier in the year!
Always on the look out for a different card idea I stumbled on this idea by the very creative Jennifer McGuire, a double Z fold card

So apologies for the next few paragraphs, hope you can follow all the instructions!

To start I cut a panel of bright blue card measuring 5"x 10" and scored it at 21/2" and 5", followed by
a second piece of white card cut at 4" x 9", scored at 4" and 61/2".
The blue panel was then stencilled using the Confetti stencil and a contrasting blue ink then put to one side to dry.
On the white panel a line of candles was stamped along the bottom of the large square section in Versamark and embossed with white EP, before colouring with my Zig water brush pens.

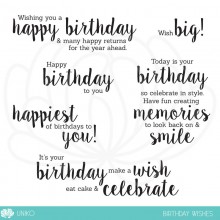
When dry, I stamped this greeting from Birthday Wishes in black on the middle panel, the last panel was kept blank for a handwritten greeting.


BirthdayWishesPP

From a scrap of vellum I cut the largest of the wish dies and from a scrap the same blue card as the background, I cut out the second size wish. Placing the leftover outer from the blue in my MISTI, I positioned the 'wish' stamp in the space and then closed the MISTI door. The blue wish die cut was then placed back into the outer and stamped with Versamark and embossed with white EP. I find this the best way to ensure that the stamping is centred on the die cut. 
After gluing the two layers together I attached them above the candles and stamped the 'Make a' in black.


To complete, 2 panels of silver mirror card were cut measuring 41/4" by 21/8" and 4/1/4" square.
The small panel was glued to the top small blue section and the larger to the large blue square section.
The white section was attached, large square section to small silver one and small white to large silver.
If you struggled to follow this and you would prefer more visual instructions, check out the video here.

So for the chance to win the complete Big and Bold Wishes stamp set and matching dies, just leave a comment here then hop along leaving comments as you go. You have until Saturday 24th August at midnight BST to leave your comments

Julie - that'll be me


I'm joining in over at:-


Tuesday, 13 August 2019

If Tha Want Sumat Doin, Then Do It Thi Sen!

So for all you non Yorkshire readers, the title of this post is, If you want something doing then do it for yourself! A perfect thought for the new challenge over at Cardz4Guyz which is -

DIY

I did a dialect quiz on Yorkshire day to see if they could guess which bit of Yorkshire I come from, the result said West Yorkshire, probably because I lived there longer than my birth county of South Yorkshire! Still it was only a bit of fun.
This fun digi from LOTV was perfect for the latest challenge at Cardz4Guyz and probably also for my OH's birthday in a couple of months!


He has a man cave attached to the house which on a good day looks very like this image. I'll leave you to imagine what it's like on a bad one!

Having printed the DIYer out, I coloured it using Copics, before using an MFT scalloped edge die along the bottom edge.
A  panel of DP from the bits box was placed under the illustrated panel and the sentiment from Uniko added. The edged panel was then added permanently with a panel of fun foam to raise it up. I left a border around my 5" x 7" base card but I'm not sure whether I should have taken the design to the edge, still too late now!

Although the colouring took quite a while, the design is quite simple.
There's even more inspiration over on the Cardz4Guyz blog, so why not check it out.

Joining in over at:- 


    Take It, Make It Challenge


Friday, 2 August 2019

Daisy, Daisy ......

..... give me your answer do, as the song says.
Daisies are one of my favourite summer flowers.
I love the wild ox eye daisies that spring up in my wild flower area year after year, their flowers are so cheerful, the white petals shimmering in the sun as they dance in the breeze.
So, they are just the thing to use for August's challenge at HLS CAS -

USE A THIRD

Here's how I used them


It's much easier to design a CAS card when you stick to keeping your design to just 1/3rd of the front panel.
I simply die cut a panel of white card, inked some Salty Ocean DOx in the bottom third then added some die cut and watercoloured daisies by Joy, to it. My sentiment, STAMPlorations Balloons and Banners, was stamped on a white die cut banner and placed within the bottom third, leaving 2/3rds as lovely 'white' space. The finished panel was added with pads to a white base card. 
Simples.

So for more inspiration check out the rest of the team here, then why not join in.

Joining in over at:-


As You Like It Challenge
Favourite flower