Tuesday, 29 December 2020

C4G - Black/silver or black/gold

Hi and welcome to that strange period between Christmas and New Year, nicknamed by some wag as Twixtmas!
Hope you had the best Christmas that you could with all the Covid restrictions and that Santa brought at least a small something you wanted. My OH bought me, amongst other things, a Tim Holtz Alcohol ink puffer, even though he had no idea what it was! We facetimed the offspring and grandkids but it wasn't really the same.
With all of us having to stay put perhaps you'll have time on your hands to join in our new challenge at Cardz4Guyz.  Our theme for the New Year period is :-

BLACK and SILVER or BLACK and GOLD

Here's a card I made towards next year's Christmas stash, I'm hoping that making SUCH an early start wont see me having a last minute rush!


I made this bauble from a card circle scrap found in my stash which I stamped with Altenew's Plentiful pine in grey, black and gold EP. I used the second layer as it has more open space, my art teacher said you should always leave spaces in your trees for the birds to fly through! I added a die cut hanger from gold mirror card using a bauble die and mounted the completed bauble on pads over a black base card. The thread hanger was drawn freehand with a gold glitter pen and the gold embossed sentiment is from Uniko.
For more masculine inspired inspiration check out the rest of the team here, then why not join in?

Sunday, 20 December 2020

Sparkly Christmas

 Just popping by to share a card for a couple of challenges as its rather grim outside at the moment, dark and rather wet! So after walking the dog, blissfully before the deluge, and a bit of fettling, I'm in my craftroom.

Over at Allsorts they are all sparkle and shine and the pic over at Time Out is all silver and sparkly snowflakes too.


Quite a simple card, a die cut aperture cut with an ancient Sizzix original die and these cute bunnies, Nellie Snellen I think.
Lots of sparkly silver in the background peeking through and also forming a mount behind the Copic coloured bunnies. Couldn't resist adding some dimension to the bunny's tail with white puffy paint. I used the retained die cut snowflake, rotating it to lie in between the arms of the die cut background. All layered up on a 5"square base card. Sentiment is Uniko.

Joining in over at:-
Sparkle and Shine


Winter Wonderland


Wednesday, 16 December 2020

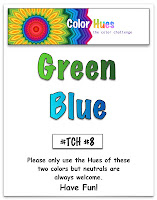
Color Hues #8

Afternoon folks, Christmas is getting nearer but if you are a little short of quick Christmas cards, how about this idea for the latest challenge at Color Hues.


A simple one layer card made using Uniko snowflakes and the colours from Color Hues! I made it along with a batch of other cards that featured here.


Using a selection of Altenew inks in blue and green, 3 blue and 3 green. I forgot to make a note of what I used but I think it Iceburg, Eastern Sky and Azurite for the blues and Bamboo, Parrot and Olive for the greens. I randomly stamped my base card with the snowflake stamps with a mixture of the shades to create the flurry effect. The sentiment, also Uniko, was stamped with the darkest of the blue inks.

For more green and blue inspiration, check out the rest of the team here.

Tuesday, 15 December 2020

STAMPlorations, a challenge reminder

Afternoon folks, I'm back here to remind you that you still have time to join in the December challenges over at STAMPlorations. Here's my card inspiration for the Theme and photo prompt challenge.


Still in festive mode I used the Christmas Elf set and a couple of shimmery gems on black.
The legs were stamped with Versamark onto the black card panel and then again on to some white card with black ink. I coloured them with Copics and the fussy-cut them along the black outline. The Versamark stamping showed me where to place the cut out legs, which I glued flat.
The sentiment was stamped and heat embossed with white EP before I coloured in the elf section with green marker. I did try to be clever and emboss just the elf in green but I forgot that my bright green was transparent so didn't show up against the black! A couple of gold glitter gems on his boots complete.
The finished panel was attached to a base card.
For more ideas and inspiration from the STAMPgirls check out the blog. where you'll also find all the Ts and Cs.

Sending Christmas Cheer

Good morning all. Are your Christmas preparations on schedule or are you playing catch up?
I must admit that we are having a very low key Christmas this year. Usually we gear our celebrations around the grandkids but they are staying put as the Covid restrictions for Christmas in the UK make getting together rather difficult, there would be one set of Grandparents missing out so my daughter decided to stay at home with the kids and OH so that no one would have to choose. Hopefully we will be back to something more like normality by next year.  We are also not doing the full blown Christmas turkey lunch, my OH has requested fish finger butties, in his dreams!!! The trees are up though, including one of our home grown ones, rather misshapen as it was impeded whilst growing, but it does fit into the sung around the bookcase!
Anyway, its Tuesday so there's another challenge for you from Cardz4Guyz, just in case you need inspiration for a last minute Christmas card. Our theme is -

SNOWMEN/MAN

Here's my singular snowman!


I used this cute LOTV digi snowman, I bought the set last year but didn't get around to using them 'til now!
As the challenge over at the Male Room is for tartan and or plaid, I decided to paper piece his scarf, gloves and hat band with some red tartan NitWits DP, shading with some Copic markers. I used the same markers to colour the rest of him, then fussy cut him out.
There's a new challenge for lovers of embossing folders called Let's Squash it. I love EFs and have a box stuffed full with them and this card was the perfect opportunity for me to join in this month as the theme is to use fussy cutting or die cuts with an EF. Here I've embossed my base card with my favourite Cuttlebug folder, falling snow I think its called, die cut snowdrifts and the fussy cut snowman.
For the sentiment, I went with something different, using a mixture of Uniko sentiment stamps.
That's about it really, a simple design perfect for a masculine recipient. For more snowmen related inspiration, check out the rest of the DT here.

Here are my two trees side by side.


Joining in over at:-


Cuttlebug EF, fussy cut snowman and Avery Elle die cut snowdrifts

Monday, 14 December 2020

Cutie Pie White Christmas

 Morning all. Just popping by to share a card I made for my OH for Christmas using a freebie stamp of these two cute hedgies. They were part of a set free in a mag a couple of years ago, that I've already shared this year and although small, pack a cute punch! I was inspired to enter the latest challenge at The Cutie Pie Challenge where their theme is White on White.


This a 5 x 7 card and as the image is tiny in comparison, it took a bit of thought to get the layout to work. I used my fave EF folder to create the snowy background, after I'd cut out a heart shape for my sentiment. A few die cut snowdrifts courtesy of a set of Avery Elle dies were added to the base of the panel and the fussy cut, Copic coloured hedgies added on foam pads. The sentiment, also from the free set, was stamped in the heart and then popped back into its aperture, reminds me of a line from Last Christmas by Wham that was playing on the BBC red button channel as I turned off  the recoding box last night!  You know where he says 'This year I'll give it to someone special.' 
The completed panel was then added to the base card.

According to one of the local papers, we could get a sugar sifting of snow on Christmas Day, at least we wont be fretting about how everyone will get here as we are going solo this year, what with all this pandemic stuff, Christmas greetings will be of the virtual kind. 
It would be fun to have a little snow but I wouldn't want inches, the sheep have still to be looked after! We can get easily cut off as we live a good 1/4mile from the road, which in itself is only a lane. Our drive has a bit of a dip that fills up with snow, given half a chance!! We were cut off for days a few years ago and could only get out in the car by driving across frozen fields after the wind had blown the snow onto the track. At one point I did suggest that the OH could get the tractor out to visit the supermarket for essentials but we did manage without in the end.


Anyway there's sunshine and showers at the moment and plenty of time for the Met office to change their minds!

I'd like to join in over at:-

Christmas

White Christmas

Have yourself a merry little Christmas -option based on a song/carol

Saturday, 12 December 2020

Christmas fun at Uniko

 Morning all, time for a little bit of festive fun in theses strange times.

Uniko is having a Christmas party and we want you to join in.

This is a crafty party of course! Join in the party by sharing your Christmas cards, tags, projects or scrapbook pages using Uniko Clear Stamps, Stencils or Designer Dies. See the Party Rules on the Uniko blog.

How about some prizes as an incentive to join in?

First Prize £25 eGift Certificate
Second & Third Prize Winners Choice of £10 In-Stock Clear Stamp Set
Random Lucky Comment £5 In-Stock Clear Stamp Set

Here's a card or two to inspire you to join in.


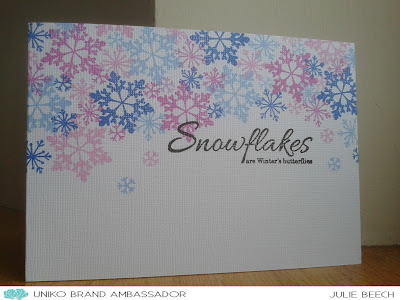
Lots of snowflake stamps used here with shades of blue and green and a blue sentiment, a quick and easy OLC.  Or perhaps you more of a magenta and blue person?


This card was made the same as the green and blue one as a quick OLC for overseas posting, only this time I used up some old linen effect card bases, continuing my quest to use up my old but very useable card stock. The card base was made from a Papermania pad I bought a  a while ago and found too flimsy and the white too bright for my everyday use but it needs to be used, so why not now! 
It has a textured surface but I quite like how it affects the stamping, creating a texture on the images.
For both cards I used snowflake stamps from various sets, including Snowflake Serenade and Stunning Snowflakes.  Using a variety of shapes and sizes of stamps in different shades of two colours to create my snow flurry. The colours for the second card are from the current challenge at Color Hues. Adding the sentiment from Stunning Snowflakes in black.


Pop over to the Uniko blog to see what the rest of the BAs have made to inspire you, don't forget to leave a comment as you hop along.

So what are you waiting for?
Pop over to the Uniko blog for all the Ts and Cs and why not join in?

Joining in over at:-


Wednesday, 2 December 2020

Slimline Christmas card

 Afternoon peeps, just popping by to share a Christmas card I made for a couple of challenges, that if I hurry up, I wont miss!


I apologise for the photo, the light here the last few days has been awful for taking pics. In fact yesterday I had the lights on well before 3pm!
The challenge at As You Like it, is Snowmen or Penguins, well I went for penguins, I love this cheeky image from LOTV and their images are fab to colour with my Copics too. I did buy it with my daughter and family in mind as my SiL loves penguins but there were so many cute penguin images on their site I bought some a load more, well they were on offer,wink!
I used an off cut of NitWits Ho Ho Ho DP, left over from a previous project with a couple of blue stripes added with a Copic marker to match the image colours. I more or less followed the sketch at Fusion but I suppose the pic was an influence too. Unusually for me I went with a slimline design as I have loads of envelops this size from way, way back when they were popular before and I've run out of the normal C6 ones! To add a little bit more sparkle, I added some stickles to the snow and strips of red glitter paper to the top and bottom of the image.

Joining in over at:-
Snowmen or Penguins

Tuesday, 1 December 2020

Color Hues #7

 Good afternoon, back again with a card for the latest challenge at Color Hues.


I decided to go for a bit of blending to create a background for my Christmas tree using the prompt colours.
On a panel of white card, I inked up with DIs in Picked Raspberry, Seedless Preserves, Blueprint Sketch and Chipped Sapphire and blended them together. Where the pinks overlap with the blue you get a purply shade and the end result is a pretty sunset background. 
I saw the technique for the tree pop up in my Pinterest feed but decided to make my own take on it as I ended up with too big and bulky a tree!
I used an ancient foliage punch to cut numerous white branches from a piece of scrap white card and layered them up to create my tree.
Using some white linen cardstock, I made an A6 top fold card and cut another panel slightly smaller with an aperture using a Sizzix oval die. Using foam tape I added this oval frame to the background to which I had added a small strip of white card for the snow. Once the frame was in place I added in the tree and a few dots of white gel pen to the sky to suggest snow. The sentiment from a Woodware set was stamped with dark blue to complete.
OK, that's all from me for today but please check out the rest of the team for more blue and magenta inspiration.

I'd like to join in over at:-
#158 Christmas


The night before Christmas?

Good morning peeps, back in short order for another new challenge, this time its for Cardz4Guyz.
This time we have the very seasonal topic of:-

TRADITIONAL CHRISTMAS

What does that mean to you, is it all about the traditions, the tree, the prep or the colours? However I'm sure there will be plenty of non traditional Christmas celebrations this year due to the pandemic.
Anyway, there are still cards to be sent out, so this challenge was the perfect opportunity to make another for the stash.


What's more traditional than hanging up a stocking?
Must admit we used to have a pillow case at the bottom of the bed when I was little and Santa now leaves the pressies under the tree, but I thought this cute hedgie hanging up his stocking was too good to leave off. It reminds me of the traditional poem, The night before Christmas.

I watched the very talented Therese Calvird on her You Tube channel for her Same but different Christmas series again this year. She's full of fab Christmas inspiration, traditional or not. I was inspired by her video where she used all those snippets of card you have saved because you couldn't bare to throw them away as it may come in useful! Therese used a fancy die to cut her strips but I just used my paper trimmer and some scrap copy paper to lay them out on. I got carried away one very wet Saturday afternoon when the footie news of my team wasn't great, and made a whole batch of backgrounds. I'm sure some of them will surface in further posts.
The hedgie stamp was free with a mag but I think that the designer is Margaret Sherry as he is very like her Penny Black ones. I coloured him with Copics before fussy cutting him and mounting on pads over my strip background. A simple stamped sentiment with gold EP completes. I veered away from my normal top fold A6 notecard shape and went for a square for this, using some card from my stash. With lockdown curtailing retail therapy, I am trying very hard to use some of the vast supply I have accumulated over the years. I have even thrown out some DP that I didn't think I would use after it had resided in a box for over10 years! 

So what makes your Christmas traditional? We'd love to see your take on the theme in our gallery.

I'd like to join in over at:-

Feature a Creature

Starry, starry night

 Morning all, its going to be a busy day here on my blog as three of my DTs are due a post. This is the first one off the block.

So my first post is for STAMPlorations where a brand new challenge for theme and photo prompt is up and running. Here is my inspiration card based on the theme of shimmer and the holiday themed photo.


I started by using the Stitched Winter Landscape die to cut a panel of white card to create the horizon of my scene. Using my Versamark pen and mini ink pad I edged the trees, house and snowbank and added WOW White Puff twinkle EP. After heat embossing that I turned my attentions to the background. Using DI in Blueprint Sketch, Chipped Sapphire and Black Soot, I inked a panel of card, keeping it darker towards the top. When dry I added some stars by sketching in some areas of white with a pastel pencil and gel pen. When that was dry I went back with a soft cloth and buffed up each 'star' to soften the effect, I was trying to make the stars look as though they were shimmering. To finish I added the sentiment from Christmas Bell Medley in dark blue ink to the bottom of the front panel and attached it to my background then to an A6 side fold card.
That's about it from me but please check out the rest of the STAMPgirls here for more inspiration.

Joining in over at:-

Snow


Friday, 20 November 2020

Uniko Challenge

 Morning all, time for a new challenge at Uniko
Here's my take on this latest challenge.


Who doesn't like a bit of sparkle at Christmas?
To start this design, I took an A6 panel of light blue card and created the halo effect by ink blending with a selection of DIs. I used Tumbled Glass, Salty Ocean and Peacock Feathers, working in from the edge to the middle and back out again. Once dry I added some gold embossing paste through the Let it Snow stencil around the edges of the inked panel. 
The BELIEVE was cut from sparkly, gold, glitter paper using alphabet dies and glued flat to the center of the inking. The rest of the sentiment from Most Wonderful was stamped and embossed in gold EP.
I thought it needed a little bit more sparkle and dark contrast, so stamped some snowflakes from Snowflake Serenade  in Altenew's Teal Cave ink and heat embossed some with sparkly gold EP.
To complete, I trimmed the panel down to create a border and added it to an A6, white, side fold base card.
Here's another card I made using the same halo effect but this time I used shades of red DI, Festive Berries, Barn Door and Aged Mahogany on red card.


 Not as many snowflakes over the inking this time and one large holographic one for added sparkle. Recognise it? It's the large snowflake die with the points cut away! I thought it was a little too large for the effect I wanted. The small, stamped, snowflakes from Stunning Snowflakes were stamped with the Aged Mahogany, 1st and 2nd generation stamping.
My sentiment banner is from the Pure Florals - Poinsettia set, gold heat embossing on black, which I glued flat onto the gold snowflake and the popped the whole snowflake up on pads over the background.

For more seasonal inspiration check out the rest of the team here, then why not get your sparkle on and join in. If you aren't into sparkle then we'd still like to see your festive makes.

I'd like to join in over at:-

I chose red and gold

                                                          Christmas


Wednesday, 18 November 2020

Watercoloured Poinsettia

 Morning, its beginning to look a lot like Christmas in my craft room, what with all these Christmas themed cards, but needs must, the stash is not as full as it usually is at this time of year.
So using a few challenges I came up with this card.


I used Penny Blacks Scarlet Majesty for this off the edge, CAS, no line watercolour design.
To start I inked the image with a pale ochre ink and stamped onto Mixed Media paper. The colour and detail was then added with a paintbrush. I used DI for the main blocks of colour and added detail with some Zig markers. I cut the original stamped panel using a rectangle die and then added the gold embossed sentiment from Uniko. I found some satin gold paper in my stash that matched the embossing so used it to create a very thin frame before adding it to an off white side fold base card. I'm trying very hard to use all the odds and ends I've accrued over the years rather than have to buy in new, especially as shopping trips are somewhat curtailed at the moment. There's still a lot to use up so I must try harder!!!

Joining in over at:-


Anything Goes or Tic Tac Toe, Die Cut (panel), Embossing(heat) Clean and Simple

Tuesday, 17 November 2020

Kraft die cut thanks

Morning all. How's lockdown #2 going down with you? Must admit nothing much has changed here chez Beech other than my hair appointment next week is a no go! Still, its not the end of the world and I'm sure Kerry will ring me to rebook when she's able. The old fringe may need a trim between now and then though!

As its Tuesday it means a new challenge for you at Cardz4Guyz . This time our theme is:-

THANKS/THANKSGIVING

Here is my masculine take on the theme.


This incorporates both themes with a card using die cut letters and a stamped pumpkin.
I like the idea of replacing letters with images, I did a Christmas one where I replaced the O in HO with a Christmas pudding!
Once I'd got the idea in my head, decided to use a kraft and orange colourway to keep it masculine, popping up the die cut letters with fun foam ones. If you glue them together and leave a little bit of the foam showing it adds detail without it being over fussy. Its another favourite technique I've used before.
My pumpkin is from a STAMPlorations set, Thankful and Blessed, which I stamped, coloured with Copics and then fussy cut. I decided to add a leaf after I'd cut it out as I thought the pumpkin was a little bare!
Around the edges of my kraft base card, I stamped an old Magnolia stitched border in Memento Desert Sand, I didn't want it to stand out too much and distract from the main sentiment but it dried a lot lighter than I wanted but decided I would have to leave it as it would not be practical to change it. 
That's about it really for the moment but please check out the rest of the DT for more masculine thanks inspiration.

Joining in over at:-

CAS on Friday - Use a big sentiment