Showing posts with label Snowflake Serenade. Show all posts

Thursday, 7 December 2023

Introducing Uniko Ink and Flip Snowflake Stencil

Good morning peeps. It's the final day of introductions for Uniko's mini December release. Today we are focusing on the Ink and Flip Snowflake stencil. This the second in Bev's Ink and Flip series.

Here's the first idea I had with my first try of the new stencil.


On a panel of white card, or so I thought, I inked through the stencil with Blueprint Sketch DOx. What I actually realised half way through was that it wasn't plain card but a panel I'd stamped on with a text stamp with Versamark then not used!! Once the ink went onto the panel it gave a very subtle ink resist effect. I quite liked this effect so carried on with the panel!

Once I'd created my snowflake, I decided the white was too much of a contrast, so blended a soft layer of the same ink to knock it back. I used a WOW embossing pen to scribble 'frosty' lines and heat embossed using silver EP. The panel was then trimmed down, added to a white base card and the layered sentiment, made from Doodle Flowers and Christmas sentiments.

This second card is a much subtler effect. I used Peacock Feathers DI this time and started by using the mask from the Large Snowflake1, inking over the mask before inking through the Ink n Flip stencil.


Again I knocked back the white by dragging some of the inking over the white areas and trimmed it down to fit my base card.
The sentiment from Snowflake Serenade was first stamped in black then keeping it in the MISTI, I cleaned the stamp, added WOW embossing pen to the wonderful and stamped again, adding silver EP and heat embossing. The completed sentiment was then fussy cut and added with foam pads. 

That's it from me for the moment, but I'll be back tomorrow with our Blog Hop and Giveaway!
In the meantime, check out the rest of the team for some of their ideas using the new stencil.

Thursday, 16 November 2023

Color Hues #76

Afternoon all. 
Halfway through November already, these weeks are whizzing by and I'm nowhere near sorted with my Christmas card stash. Well the new Color Hues pairing has given me the opportunity to make a least one more card for the stash! Here's my take on the new duo.


My inspiration for this card was one I saw on Pinterest using a Gina K stamp. I loved the bauble effect, so decided to make my own version of it using my Uniko stash.
To begin, I drew around a circle die cut lightly with a pencil to create the bauble on a panel of red card and then stamped an arrangement of snowflakes with in it. I tried to keep it symmetrical but it is slightly off! Each stamp was inked with Versamark then the image heat embossed with Metallic Gold EP. To infill the spaces, I used a WOW embossing pen and more gold EP. 
To make the image complete, I used a freebie stamp and freehand drew the string and bow with the WOW pen before heat embossing with gold EP.
I had envisaged a one layer card but I ended up trimming the panel down before adding some ink blending around the edges to put the bauble in focus. I used a mix of red DIs, Festive Berries, Fired Brick and Aged Mahogany.

So where will these new festive colours take you, you don't have to go down the Christmas route but it would be a good excuse to expand your Christmas stash!
For more red and gold inspiration why not check out the rest of the Color Hues team here along with our GD Claire.

Joining in over at:-

Get ready for Christmas


Use Red (Thanks Chris for the heads up)

Wednesday, 2 November 2022

Introducing Uniko's... Stencils Large Snowflake #1 and Large Snowflake #2

Morning all, time for another stencil introduction at Uniko, well actually 2 Festive/Winter ones.

First off is this fab Large Snowflake #2 with the matching mask. For my card I've teamed it with a couple of stamp sets that feature snowflakes, Snowflake Serenade and Stunning Snowflakes.

Taking a panel of white card, I stamped the large element from Swirling Snowflakes a couple of times, embossing with white EP. I then filled in some of the gaps with snowflakes from the same set and Stunning Snowflakes and heat embossed those to match. The large snowflake stencil was added over and inked with Altenew's Ultramarine, fading out to Iceberg ink. Placing the mask into the stencil, I then carefully removed the stencil to leave the mask in place and inked with Weathered Wood DI over the top, blending out from the center to reveal the embossed snowflakes. 

The sentiment from Pattern Building Christmas Tree was stamped in Ultramarine too and added along with a few silver sequins. The finished panel was trimmed and added to an A6 base card to leave a slight border.

In my second card I started by inking over the mask of Large Snowflake #1 with Altenew Galactic Stream, blending out to Aqualicious on white card. Placing the stencil over the inked snowflake, I then stamped some more snowflakes from Snowflake Serenade and Stunning Snowflakes in Dew Drops through the opening, except for the central one which I stamped with Galactic Stream.


Again a few sequins and the sentiment from Pattern Building Christmas Tree,stamped in Teal Cave complete the card. Trimmed down again it was added to another A6 base card to leave a slight border.

That's all from me for today but why not check out what the rest of the Brand Ambassadors have been up to? I'll be back tomorrow with the full reveal.

 Anita

Jane

Julie - that's me


I'm joining in over at:-

                                                  Winter

Saturday, 12 December 2020

Christmas fun at Uniko

 Morning all, time for a little bit of festive fun in theses strange times.

Uniko is having a Christmas party and we want you to join in.

This is a crafty party of course! Join in the party by sharing your Christmas cards, tags, projects or scrapbook pages using Uniko Clear Stamps, Stencils or Designer Dies. See the Party Rules on the Uniko blog.

How about some prizes as an incentive to join in?

First Prize £25 eGift Certificate
Second & Third Prize Winners Choice of £10 In-Stock Clear Stamp Set
Random Lucky Comment £5 In-Stock Clear Stamp Set

Here's a card or two to inspire you to join in.


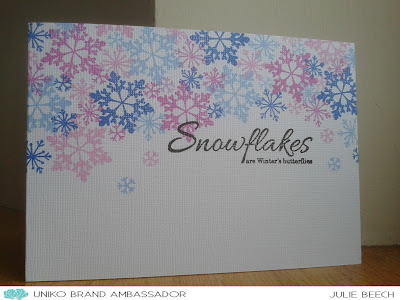
Lots of snowflake stamps used here with shades of blue and green and a blue sentiment, a quick and easy OLC.  Or perhaps you more of a magenta and blue person?


This card was made the same as the green and blue one as a quick OLC for overseas posting, only this time I used up some old linen effect card bases, continuing my quest to use up my old but very useable card stock. The card base was made from a Papermania pad I bought a  a while ago and found too flimsy and the white too bright for my everyday use but it needs to be used, so why not now! 
It has a textured surface but I quite like how it affects the stamping, creating a texture on the images.
For both cards I used snowflake stamps from various sets, including Snowflake Serenade and Stunning Snowflakes.  Using a variety of shapes and sizes of stamps in different shades of two colours to create my snow flurry. The colours for the second card are from the current challenge at Color Hues. Adding the sentiment from Stunning Snowflakes in black.


Pop over to the Uniko blog to see what the rest of the BAs have made to inspire you, don't forget to leave a comment as you hop along.

So what are you waiting for?
Pop over to the Uniko blog for all the Ts and Cs and why not join in?

Joining in over at:-


Friday, 20 November 2020

Uniko Challenge

 Morning all, time for a new challenge at Uniko
Here's my take on this latest challenge.


Who doesn't like a bit of sparkle at Christmas?
To start this design, I took an A6 panel of light blue card and created the halo effect by ink blending with a selection of DIs. I used Tumbled Glass, Salty Ocean and Peacock Feathers, working in from the edge to the middle and back out again. Once dry I added some gold embossing paste through the Let it Snow stencil around the edges of the inked panel. 
The BELIEVE was cut from sparkly, gold, glitter paper using alphabet dies and glued flat to the center of the inking. The rest of the sentiment from Most Wonderful was stamped and embossed in gold EP.
I thought it needed a little bit more sparkle and dark contrast, so stamped some snowflakes from Snowflake Serenade  in Altenew's Teal Cave ink and heat embossed some with sparkly gold EP.
To complete, I trimmed the panel down to create a border and added it to an A6, white, side fold base card.
Here's another card I made using the same halo effect but this time I used shades of red DI, Festive Berries, Barn Door and Aged Mahogany on red card.


 Not as many snowflakes over the inking this time and one large holographic one for added sparkle. Recognise it? It's the large snowflake die with the points cut away! I thought it was a little too large for the effect I wanted. The small, stamped, snowflakes from Stunning Snowflakes were stamped with the Aged Mahogany, 1st and 2nd generation stamping.
My sentiment banner is from the Pure Florals - Poinsettia set, gold heat embossing on black, which I glued flat onto the gold snowflake and the popped the whole snowflake up on pads over the background.

For more seasonal inspiration check out the rest of the team here, then why not get your sparkle on and join in. If you aren't into sparkle then we'd still like to see your festive makes.

I'd like to join in over at:-

I chose red and gold

                                                          Christmas


Saturday, 7 November 2020

25 Days of Christmas Tags

Hi and welcome to a post that is all about Tracey's 25 Days of Christmas Tags extravaganza. Today Uniko are the featured company, so the BA's are joining in with some ideas for you.
Here's my take using some of Uniko's 'snowy' sets!


I don't do shabby chic really but I do love and admire those made by others and after seeing a card on Pinterest, I was inspired to turn the idea into a tag, but in my own way!

I die cut a couple of circles from white card, a stitched one and a slightly larger plain one. I wanted the texture of the stitching and the only other die I had that was slightly larger in diameter was a plain one! Basically just use what you have!
Using the smaller circle, I masked off sections and secured it in my MISTI, before adding the stamping and inking. I went with a brown and blue colour palette, using shades of brown from Altenew's Warm Gray set and the blue was Tumbled Glass DI. 
The stamped snowflakes are from Uniko's Stunning Snowflakes and Snowflake Serenade sets. The large die cut one is also Uniko, the large Sparkling Snowflake die, which I cut down to fit the tag, adding a punched snowflake from the stash on top. I couldn't find any sparkly card the right colour, so added Versamark all over the die cut and added some WOW white sparkle puffy EP., the smaller snowflake was edged in Tumbled Glass DI.


The middle panel was stamped using the Christmas Background Builders set and the bottom right with two stamps from the Background Builders Classic set, plus a couple of punched snowflakes edged in DI.
To finish, I added clear Nuovo drops in Grey Mist in between sections and in groups of 3 over the right hand panels, silver stickles to the brown snowflake centers and pearls to the die cut ones.
Once dry, I sandwiched the silver die cut hanger between the two circles and added a bow of blue, brown and jute string.
There's lots more Uniko tag inspiration over on the Uniko blog as well as LOTS of tag inspiration over on Tracey's blog.