Showing posts with label Winter Foliage stencil. Show all posts

Sunday, 3 November 2024

It's Beginning To Look Like... Uniko October/November Reveal, Release, Brand Ambassador Blog Hop & GIVEAWAY!

Good morning, time for a few more ideas using the stamps from the new release which are available on the Uniko page now.

My first card is simply another way to use the Framed Fairy Lights.


Once the lights were stamped with Versamark and heat embossed with white EP, I added dark blue watercolour to the background and coloured the lights with Zig markers. The panel was trimmed to the edge of the embossed frame and added to a note card, a simple white embossed sentiment from the set completes.

My second card uses the BB Snow Flurry and Christmas Pop stamp sets to create this little scene.


The Trees were stamped with Versamark and heat embossed with white EP before cutting out, the snow flurry was simply stamped in dark blue ink and cut to leave a small border. A small panel of matching white card was scored using a scoreboard and added to the Snow Flurry panel and the trees added on top. The sentiment from Peace on Earth was with Versamark and Silver EP.


This next card was inspired by a comment my daughter made when she was over about it being the lines of a carol so why not include some music in the design.


On a panel of white card I stamped the JOY from Big n Bold with Versamark and heat embossed with gold EP. I then added the text and music in black and a couple of holly sprigs for added festive charm. I hope I haven't infringed any copyrights with my stamped snippet of score!!

My final card uses that fab poinsettia stamp. 


I have to admit that this should have been used in a card earlier this week but life got in the way as well as an inky splat on the OLC I was making!! Anyway I decided I had spent too much effort on colouring it to not make a card and while pondering what to do I came across the Case a DT member at JUGS. When I saw Elizabeth's card I knew I could use my poinsettia!
I used the same orientation as her card, the circle aperture, the floral motif, red and green colours along with gold embossing on the flowers but put my own spin on it.
I stamped the poinsettia with  Altenew Silver Stone ink first as I wanted to colour it with Copic markers and they don't mix well with EP, so I left the stamp in my MISTI whilst I coloured it.
Once coloured, I placed it back into the MISTI and stamped over it with Versamark and embossed with gold EP and fussy cut it out, that got rid of the red inky splodge!
The top panel I had in my stash and I used the Festive Foliage stencil to emboss a panel to put behind the opening. The Merry, instead of a die cut, was stamped, embossed with gold EP and fussy cut and the Christmas part stamped onto the embossed panel. 
My fussy cut poinsettia was added to the aperture so that a few sepals were hanging over the edge and then the whole panel was added onto a base card with foam tape. I know the original card had layers of die cuts to give dimension but you can't do that with fussy cutting so easily, the foam pads have the same effect.

So that's all from me but please check out the rest of the team to see what they've been up to. Don't forget to leave some love along the way for a chance to win the entire release!!! The winner will be announced on November 11th 2024.

So what do you think about the new release? Looking forward to seeing what you all think in the comments!

Joining in over at:-


Monday, 29 July 2024

Merry Monday at Uniko

 Good morning. Hope you had a fab weekend and are well placed for the week ahead.
I'm doing a BA post for Uniko today that focuses on kraft Christmas cards.
Here are the three I made using some Uniko goodies.


All the details can be found over on the Uniko blog.

Joining in over at:-


Christmas in July

Tuesday, 25 October 2022

Uniko BA Inspiration and a Paper Players Sketch

I'm up on the Uniko blog with some BA Inspiration using the latest challenge at The Paper Players.
Here are a couple of cards I made.


I love a sketch, they are a great way to get inspired when your mojo is not quite working as it should!
For this I started by stamping the small outline rose and two of the leaflets from Pure Florals Rose, in Versamark and embossing with gold EP. Using some Candied Apple, Mowed Lawn, and Pealed Paint DI smooshed onto my craft mat, I water coloured before fussy cutting out. A little shadow was added using one of my Zig watercolour markers.

The central strip was stamped using a selection of Simply Said sentiments in Altenew Evening Gray on a strip of paper, before adding to an A6 base card. A piece of textured white card from my stash was mounted onto some gold card and the Floral Vines sentiment stamped and embossed with the same gold EP. The rose spray was then added to the top panel and attached over the central strip.

My second card uses the poinsettia from Season of Beauty, Christmas Sentiments and the Winter Foliage stencil.


Details of this card are over on the Uniko blog.
 
Joining in over at:-

Monday, 22 August 2022

Uniko BA Inspiration

 Afternoon crafters, I'm sharing a couple of cards I made for a BA post over at Uniko using the Winter Foliage stamp, die and stencil together with the Christmas Wishes stamp set.

I was inspired by the latest challenge at CAS Christmas Card Challenge where their cue word is PINE, hence the use of Winter Foliage!

Here are the two cards I created, full details are over on the Uniko blog.


Joining in over at:-


Friday, 15 November 2019

A New Challenge @ Uniko

Morning all.
Are we really half way through November? Christmas is going to be on us before we realise at this rate!
Anyway if you need some inspiration for your Christmas cards then perhaps the latest challenge at Uniko will help. Here's my card -


This was influenced by the new challenge and a card I saw by the wonderful Therese Calvird.


When I saw  the pic it reminded me of a die cut tree I have in my stash that is a fun take of a Christmas tree by STAMPlorations. At first I thought I could stamp the sentiments onto the tree panels but in the end I decided to use some scraps of green and stamp the sentiments from various Uniko sets on those and then use the tree die cut to help placement. I cut one tree out of brown card and starting from the bottom, adding the green sentiment panels.
The star at the top was stamped using the star from Jolly Christmas, embossed with sparkly gold EP and fussy cut. A snippet of red ribbon around the pot completes the tree.
The background was made using the trapped colour technique. Using  the Winter Foliage stencil, I inked through with Versfine onto a panel of watercolour card inked with Antique Linen that I'd left to dry fully first.
Carefully removing the stencil, I added clear EP and heat set. Once cool, I spritzed it with water and removed the excess ink with a paper towel.
I trimmed the dry panel down and glued it to a white base card before popping up the tree on pads.

OK, that's it from me but for more inspiration from the Uniko team check here.

Saturday, 26 October 2019

Uniko Christmas Release Inspiration and Blog Hop

Morning all.
If you've been reading Bev's blog posts over the last week or so, you'll know that she has released a few brand new Christmas inspired stamps and also some dies, some to coordinate with existing stamp sets and some to stand alone. 
So as is tradition we are having a blog hop and giveaway, YAY!
So comment here before you hop along to the next stop for a chance to win and get some Christmas Uniko inspiration as you go. You know it's never too early to start those Christmas cards!
So grab a cuppa and settle in 'cos this is a long post!

My first card uses a stencil launched last year and a brand new large die cut snowflake. I spent many years looking for a large die so Bev has answered my prayers!


First I took a panel of white card and stencilled around the edge with Salty Ocean DOx and the 'Let it Snow' stencil. I started off pale and increased intensity as I went around. I also added a light colouring of the ink closer to the centre to take away the whiteness of the card. When dry the different layers give a sense of depth.
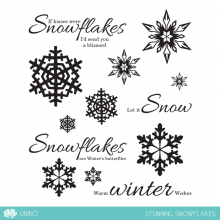
I trimmed the panel to just a shade smaller than an A6 base card and edged the cut edges with a little Salty Ocean DOx. Centring the die, I cut the snowflake but was careful to keep the small cut outs for replacing later. The inked and die cut panel was glued to an A6 white base card and then a blue fun foam snowflake was added back into the opening, adding back the small diamonds from the first die cut. The snowflake was then glued over the fun foam one, matching the pattern. My sentiment is from an older snowflake set,  Stunning Snowflakes, stamped in black onto a white panel.

My second card uses Background Blocks- Scandinavian Christmas and Winter Foliage stamps and matching dies.


To start I stamped the BB Scandinavian Christmas and heat embossed with white EP, then cut a circle  from it with a die. I inked this circle with Salty Ocean DOx, keeping the ink darker towards the edges. To darken the edges further, I added some Blueprint Sketch DOx to the very edge.
On a separate piece of white card, I stamped the evergreen bough from Winter Foliage twice in Altenew Olive, adding further contrasting green with my Zig pens before die cutting with the matching die.
From a scrap of matte silver card, I cut an ornament hanger and attached it to my inked circle, then threaded it with some silver chord and added a silver bow. 
I arranged the foliage branches in the top left of my base card, added my 'bauble' on pads and stamped a sentiment from Festive Sentiments in blue.

My third card uses the new Winter Foliage stencil and the gorgeous poinsettia from Season of Beauty.


For the background panel I used the trapped colour technique, inking through with Versamark onto a panel of W/C card inked with Antique Linen DI, embossing with clear EP then washing away the DI with a paper towel and water.
The poinsettia and leaves from Season of Beauty, were stamped then fussy cut with a few dots of glossy accents in the center, a banner sentiment completes. 

My next card uses Winter Foliage stamps and dies, the new Festive Sentiments Outlined as well as Christmas text from Season of Beauty and other festive sentiments.


Using my MISTI, I arranged the sentiments to cover an A6 panel before stamping on red card and embossing with clear EP. The white panel was cut using a border die before the foliage and sentiment were stamped. The pine cones from Festive Foliage were stamped and die cut and slipped under a wrap of jute twine. The white panel was then popped up on pads to complete.

Finally, I've used the new dies Big n Bold Snow, with the Let it Snow stencil and Big n Bold Snow sentiment 'Let it'.


Using the stencil, I inked Weathered Wood DI with varying levels of intensity over a panel of white card, then cut three of the snow words from it, I used grey fun foam to cut three more snow words and stamped the Let it in dark grey ink. The main panel was glued to an A6 white card base, gluing the inked and foam words together but retaining the small inked bits to one side. The popped up words were glued in place and the retained bits popped flat into the appropriate spaces to complete the look.
And breathe, told you it was a long post!

Now you can check out the rest of the team's inspiration, but you may need to refresh that cuppa!
Julie  - that'll be me
Linda

Be sure to comment along the hop for your chance to win the ENTIRE Release! You have until Midnight GMT 2nd November 2019 to leave a comment and a winner will be announced shortly after.

Happy hopping!


  FestiveSentimentsPPMostWonderfulPP

StunningSnowflakesPP