Showing posts with label Simply Said Christmas. Show all posts

Friday, 11 July 2025

Christmas in July Uniko's FB VIP Challenge

 Morning all. As it's the 11th of the month it's time for a new challenge over at Uniko's VIP FB page. All through July we at Uniko are celebrating Christmas in July, so that's our theme for this months competition. Here's a very simple OLC using Winter Foliage for your inspiration.


I apologise for the pic, it was either too dark or too bright for a photo today!

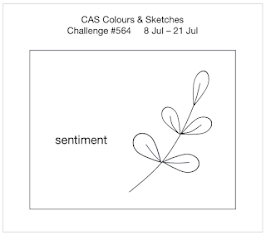
I used the sketch at CAS Colours and Sketches along with the OLC option at ABC Christmas Challenge as inspiration, it's also Christmas in July at CAS on Friday. All elements are simply stamped using DIs, but I used a small blending brush and more Peeled Paint for the evergreen bough. A simple gold embossed sentiment completes.


Joining in over at:-

O is for OLC

Christmas in July

Thursday, 3 November 2022

Uniko's Stencil Release Day & GIVEAWAY!

Good morning it's release day over at Uniko. 
Here a few more ideas using the November release stencils.

First off the block is the MOD background Builders.
For this example I've used some more purchases from Ruthin, some WOW foil and WOW Bonding powder.


Don't you just love the sheen, well until you try to take a pic that is, then it's an absolute nightmare!!

The bonding powder is so easy to use, inking through the main part of the stencil with Versamark on black, the bonding powder is added and heated, as with EP, before adding the foil and running through any old laminator. I did try to make a pattern with a mix of rose and plain gold foil, cutting small pieces of the rose gold and then overlaying a larger piece of gold, then running it through a laminator in a piece of A4 copy paper folded as a carrier. You can see where one of the small pieces shifted 'twixt desk and laminator but it still looks so pretty!! The sentiment was done the same except it was first stamped with Versamark. I only bought a couple of colours of foil so may have to hunt out a few more, it is addictive.

My second card uses the Flower Power stencil, concentrating this time on just the leaf elements


After masking off the solid leaves a random selection of leaves were inked with a light covering of Spiced Marmalade, Festive Berries and Vintage Photo DI before inking again with the detail leaf stencil and the same colours. Gaps were filled with dots from the large detail leaf stencil. Another of my Doodle Flower sentiments complete.

My next card uses Large Snowflake #1 and the Large Snowflake die.


Using the Large Snowflake #1 stencil over navy card, I spread white embossing paste and left to dry. I found this silver die cut snowflake in the stash and thought it a great way to amp up the design. I simply added it over the embossed snowflake, followed by a sentiment from Christmas Sentiments on matching navy card.
Finally here's a card using the other Large Snowflake stencil #2.


Simply inked in Altenew's Aqualicious ink over pale turquoise card, then again slightly off with Unicorn pigment ink to create the shadow. A few sequins from the stash and a sentiment from Simply Said Blocks Christmas complete

That's all from me but the rest of the team have come up with some fantastic ways to use these fab new stencils, so why not check them out on their own blogs.
Be sure to leave a comment on all our blogs or social media post as Bev will be randomly selecting one lucky winner to receive all of the stencils being released today. You have until Midnight Wednesday 9th November to leave comments and I will announce the winner Thursday 10th November 2022. 

Saturday, 2 October 2021

Introducing... Pattern Building Christmas Tree

Good morning. Its time to reveal the last of the September release sets from Uniko. 
Today we are showcasing the Pattern Building Christmas Tree. Here's my take!


Whilst thinking of my design, I was rifling through my background box and came across a sentiment stamped background, this one is from a batch I made back in October 2019! I thought it showed off the strips rather well, I seem to be on a roll with stamped backgrounds.
To decide the size and shape of the tree, I laid out different elements in decreasing size order on an A6 scrap of paper. Choosing some scraps from the bit box, I cut some strips and laid those out too in a pleasing colour pattern, before stamping each element onto the strips of card and then reassembling onto the panel. To get a different look, all you need to do is change the order of the strips or the colours used or the background!

So that's it for the introductions, tomorrow we will be back with our BA Blog Hop and Giveaway, but if you want to check out more ideas for this set, check out the rest of the BAs first.

Tuesday, 11 December 2018

Uniko December Release

Good morning and welcome.
If you've been following the Uniko blog, you'll know that it's release day over there!
Three fab stamp sets AND two gorgeous stencils too.

Here are a few ideas for the new sets, so get a cuppa and settle in for a show.


This birthday card uses the latest addition to the Pure Florals range at Uniko. This time its a peony with additional script 'sending' and addition small sentiments.

Pure Florals: Peony £15 Clear Stamp Set

I started by stamping the large bloom and then a couple of the buds with Altenew Industrial Diamond ink, before colouring with Copics and fussy cutting. I wanted some texture for my base card so stamped some wood grain with a stamp from the stash and heat embossed with white EP. From some gold mirror card, I die cut a frame and arranged the blooms on the base card adding a gold embossed vellum sentiment strip.

My next two cards are made with the gorgeous Let it Snow stencil.


I used a selection of DI and DOxs to ink through it onto a panel of white card which I then used to form the main panel of the first card, then cut the letters for the second from the leftovers.
I chose a matching pink base card and added two thin strips of silver under the edges of the stenciled panel and added a die cut joy with a banner stamped using Simply Said Christmas on black and heat embossed with white EP. The die cut joy, from the Works, was cut from silver glitter paper and also from fun foam before being added to the base card. 
I used the bold alphabet die set from Altenew to cut the noel after I saw a card on You Tube by Therese Calvird. I love the contrast between the dark shimmery grey card base and the pink and white letters. A couple od die cut snowflakes that were sitting on my desk were added for accents.

Let It Snow Stencil £3.50

This fourth card uses the same stencil as well as the stunning Snowflake Serenade stamp set.


You can't really see the very subtle pattern of the stencil which I placed over a panel of dilute DI ink and left to dry, think I removed it too soon, but it worked with the delicate swirl of the holly leaves and snowflakes of the stamp which I simply embossed in silver over the top. Using a stitched rectangle die, I cut the panel down to size and mounted it on a pale blue card base. I added a few more of the die cut snowflakes from the stash and stamped and embossed the sentiment from the same set in matching silver EP.

Snowflake Serenade £9 Clear Stamp Set


Back to stencils for these next two cards, this time using the In the Forest stencil.


Again I inked a panel of white card through the stencil with an assortment of three green DOxs, Forest Moss, Twisted Citron and Mown Lawn but treated each half slightly differently.
The first half had the stencil replaced over it and Versamark inked over and then embossed with clear EP. Make sure you get a good coverage as when you add the blue DOx over the top, it will colour the green underneath! I found a previously die cut panel and placed the inked panel underneath, adding a white die cut Rudolph on foam with a red diamonte for his nose. The silver twinkle embossed sentiment  is from the Snowflake Sentiment set.
The second just adds a couple of die cut snowdrifts beneath the simply inked panel and a simple sentiment from Festive Sentiments.

In The Forest Stencil £3.50

My final card uses the Wonderful day stamp set, but only some of the tiny stamps!


I was still in need of a few more Christmas cards so decided to turn what is essentially a birthday stamp set into a Christmas one by using the berry style sprigs and laurel sprays.
I used the colours at The Paper Players and the layout at CAS(E) this sketch for my inspiration as after all these cards I was sorely in need!
I used some Altenew inks to stamp the foliage on a strip of white card and stamped and embossed with gold EP the Merry Christmas from the Festive Sentiments on a panel of red card.

                                                    
Wonderful Day £9 Clear Stamp Set

So that's it from me but there's tons more inspiration for you over on the rest of the DT's blogs.
Hop over and check them out, leave a comment and have the chance to win some Uniko goodies. 
All the details are on the Uniko blog.

Julie -that'll be me

Joining in over at:-


                                             free for all


                                              Greens


                                              Die cuts are my choice

Monday, 29 October 2018

Introducing... BIG & BOLD Merry & Background Builders: Christmas 2018

Morning all.
It's the last of the introductions from Uniko's Christmas release.
Here's my card featuring Background Builders 2018.


I used two of the strips to create this following the layout from CAS(e) this Sketch with the addition of a sentiment from previously released Simply Said Christmas.
The strips and sentiment were stamped then embossed with white EP on a red die cut panel, mounted on green and finally popped up on foam over a white base card.

Also featured today is the Big and Bold Merry set.


For more inspiration check out the rest of the DT here-

Julie -that'll be me

I'm joining in over at:-

Sunday, 28 October 2018

Introducing...Winter Botanicals: Sweet Broom & Quilted Stencil

Good morning.
Its day 3 of the Christmas launch over at Uniko. Today we showcase a stencil and addition to the Botanicals range.
Well I don't know about you but its getting rather parky around these parts. We even had a hailstorm on Friday, winter is rapidly approaching. So that was the inspiration for this card using the Quilted stencil. 


I teamed it up with the previously released Winter foliage set to create a WOW card.

To create the quilted effect panel I inked through the stencil on the diagonal with Weathered Wood DI over white card, then removed it and added shading to create more depth using the edge of the stencil and more of the DI. Following the pattern created by the stencil I added soft colour, working off the sharp edge of the stencil towards the stenciled card, careful not to add too much. When added in one direction, I turned my piece 90' and repeated to get the shadow effect. 
I stamped the holly foliage with the same DI and embossed it with clear EP before fussy cutting. The berries were stamped and embossed with silver EP and a few die cut branches complete the spray.
To add a little extra bling I added some small PPP sequin gems to the center of each cross. My sentiment from previously released Simply Said Christmas was stamped and embossed with silver EP.
My quilted panel was mounted on some silver glitter paper and the spray attached before adding to my white base card.

Also previewed by the DT is the new Winter Botanicals: Sweet Broom stamp set.

For more details check out the rest of the DT here.

Julie -that'll be me
Sarah P

Pop back tomorrow for the final preview before the full release and blog hop.

Joining in over at:-
Grab our logo
pearls and or gems


Saturday, 8 September 2018

Mix and Match small stamps and a few extras!

Good morning peeps.
It's week two of my GD stint over at JUGS, so here is my card for your inspiration.


Now can you guess what is hand drawn?
I wanted to make a wreath but I couldn't get the full coverage with the stamps I had about so after stamping the first 4 sprays with the Uniko Originally Organic Additions and the flowers from Big and Bold - Hello, using my homemade wreath maker, I drew in a few more leaves, some berries and a tiny flower and coloured every thing in with Copics. The greeting, also from Uniko, Simply Said Christmas was stamped and embossed with gold EP. My finished panel was then mounted on a panel that I'd previously edged with a Versamark pen and embossed with the same gold EP. Both panels were then mounted on a white, 5 x 5 square base card. 
Go on, be brave and add some hand drawn elements to your project, we'd love to see them.

By the way, if you are a subscriber or you just pick up a copy of Craft Stamper, you'll spot me in the October issue in part of an article featuring Uniko stamps!


Joining in over at:-


Merry Little Christmas Challenge Blog
AG