Pages

Thursday, 30 June 2016

Kathryn's Birthday Wishes

Afternoon everyone in the UK and Europe, good evening to friends in  the east and morning to all our  American friends.
Yesterday saw the start of STAMPlorations 3rd birthday celebrations. Today were are back with more fab inspiration using the STAMPlorations celebration stamp sets.
Here is mine using the brand new Kathryn's Birthday Wishes stamp set.


I used a couple of stamps from the Balloons and Banners set as well as the cute little girl and large balloon from the Kathryn's Birthday Wishes.
I first stamped the little girl on some scrap card, coloured with Copics and fussy cut. Placing Kathryn on my top panel from which I cut a balloon aperture and then embossed with a EF, I marked where I wanted the balloons to go. They were then stamped and masked to create the group on a piece of card under the aperture. The happy birthday from Balloons and Banners was stamped on a banner die cut and tucked under Kathryn. The coloured balloon panel was glued flat to the base card then the top panel was popped up on pads.

For even more fab inspiration please check out the STAMPlorations blog and join up to win some fab prizes. All Ts and Cs are there on the blog.

3rdbirthdaybloghop-p.png


I'd like to join in over at :-


Tuesday, 28 June 2016

Embossed Stenciling

Good morning.
Gosh time is flying by, it's time for a new challenge over at Cardz4Guyz.
This week Sharon has chosen the theme of-

CAS- Clean and Simple

In other words, not too many layers, few embellishments and lots of blank space!


Sorry about the glare but it's the best I could do with the glossy embossing and the weather conditions yesterday!
I'd seen this card on the internet


a while ago and loved it's simplicity. I thought it would make a fab masculine card one day. My card is really a CASE of Lisa's card.
Using a STAMPlorations stencil, Shutters and with a small Versamark ink pad, I inked through it onto a scrap of dark grey card and then embossed with clear EP. I don't have a chunky birthday die cut so used one of my favourite Wplus9 happy dies and used the faux metal embossing technique on it. As the happy is smaller than the birthday I made my card in portrait mode. The silver embossed Birthday is also from STAMPlorations, Balloons and Banners.
Job done.
Please check out the rest of the team and have a go. Embrace your inner CAS!

I'd like to join in over at:-

"Less is More"
Recipe - Use a stencil

Sketch2015-001
As You Like It Challenge
Your favourite die.
Love this happy die set from Wplus9, it is so useful to give definition and depth to my CAS cards.

Sunday, 26 June 2016

Snowflakes in June

Hi, hope you are having a fab weekend.
Just having a little chill time in the craft room after a visit from my Grandson. He came on Friday, after we had been out for tea for his Mum's birthday. Nich and Joe were off to a child free wedding on Saturday, so we had him 'til this morning.
I think he had a great time and so did we, except for the early mornings! Even with all the fresh country air he is still up before six!
Any how here is a card I made as a response to the MUSE Christmas Visions challenge.


It was very quick and easy to put together.
Here is the gorgeous Muse card by Elizabeth Stewart.


I took the blue glitter background, I only had this pale blue, the all over pattern, I used a Creative Expressions cover plate and the vellum stamped sentiment with an underlay of the same blue glitter card.
My first idea was to fit the coverplate into the glitter card but that was before I realised how many teeny tiny pieces there were, it would have taken me 'til Christmas!
So I kept it very simple so very quick and layered it all up on a white base card. The square embellies were in my stash and had been for years so I thought I would use them up. The white embossed sentiment on vellum, is from a free Polka Doodles set that has been in the stash for an absolute age and I wrapped it over some left over glitter card 
OK, that's it from me.
I'd like to join in over at -

             Sketch2015-001

Thursday, 23 June 2016

Congrats, have a wonderful day!

Good morning folks. 
It's been a busy week in my craftroom, with all these posts and what!
I thought I could have a quiet end to the week as I had made my card for this week's Cardz4Galz inspiration post, WRONG. Yep I'd written the wrong theme on my calendar! Anyway I managed to grab a little time to make something just in time.
This week our theme for you is -

PINK and BROWN

Here is my card for your inspiration.


I used Memento Rich Cocoa to stamp my sketchy blooms from Altenew's Painted Flowers, as well as the stamped part of the greeting on a die cut white card panel. Painted Flowers is a three part stamp set, background, shadow and outline, so I did the outline stamping first as I wanted the layout down first before I added the colour. I then stamped the solid flower in Angel Pink and the shadow in 2nd generation Rose Bud. For the little buds I stamped some Rose Bud onto a block and used a water brush to add a bit of colour. I hope you'll forgive me for a little bit of green foliage, I suppose I could have stayed with the brown shades but honestly I forgot, I did leave the small leaves uncoloured though!
I die cut a CONGRATS using an ancient Cuttlebug plate and a piece of v pale pink, almost white glitter card. A few sequins completed my card and the finished panel was glued flat onto a white base card.
OK, that's it from me. Please check out the rest of the team for more pink and brown inspiration.

I'd like to join in over at -


Grab our logo
How does your garden grow


Tuesday, 21 June 2016

Best Fishes

Hi and welcome backi again. This post is to announce the latest challenge over at ATSM has started.
This week our theme is -

CAS (Clean and Simple)

Just my thing so again I was struggling to decide on one theme for my inspiration card.
As usual I decided to look at a couple or more challenges and then I looked on my desk and came up with this.


I'd still got my DIs out from a previous make but the card I made (here) wasn't suitably CAS  for entry to the latest challenge over at Less is More - Faux Bleaching but when I saw that AAA was asking for googly eyes, that clinched it!
I inked a large circle of card with Mermaid Lagoon and Twisted Citron then inked up some of my Pink Petticoat fish. I used just the small fish and coloured them with Copics before fussy cutting and adding a googly eye each. They were then glued to the background then using a watercolour brush I painted bubbles coming from each of the fish's mouths then waited before mopping up the water with a bit of clean kitchen towel. The water bleaches away the colour, magic! For more texture I took an old tooth brush and dipped it into clean water then ran my thumb down the bristles to make a fine spray of water droplets. In again with the towel to lift the water away and it was finished.
I used my favourite aperture layout and stamped the greeting from the set plus the all of us from a Wplus9 set.
This week we are sponsored by


Robyn's Fetish Digital Stamps And More is proud to sponsor of Addicted to Stamps and More. Robyn's Fetish Digital Stamps And More, a division of I Did It Creations, was created and is owned by Robyn Weinrib. Robyn offers a wonderful variety of digital stamps and digital papers, designed to meet the needs of all digital paper crafting addicts for every occasion. 
Prize: 3 digital images (does not include designer papers)
Please check out the rest of the fab DT for more inspiration and then why not join in.

I'd like to join in over at -


"Less is More"
Faux Bleach

Thanks, You're a Star

Morning all again.
This time its to announce the brand new challenge over at Cardz4Guyz.
This week our theme is -

AT THE MOVIES

Here is my card.


I didn't go with a movie title but more along the actual cine film itself route!
Thank you cards for men are always rather difficult so I thought I would try and make one as the theme at CAS-ual Friday's is thanks with the addition of twine and Time Out's is masculine with the option of mixed media.
The film strip stamp is from Kaisercraft and I stamped it a couple of times at a jaunty angle across my die cut panel. The thanks I was going to use was a little too large for the frame so this stamp is from a Marianne banner dies set and the 'You're a Star' was a freebie from a mag, which I cut up to fit the space. It looked a tad stark even for a masculine card so I added some red twine and a few black adhesive beads. The panel was then popped up over a white base card.
Done and dusted. For more movie related inspiration please check out the rest of the DT and why not join in.

I'd like to join in over at -


Grab Our Badge!
Masculine with the optional twist of mixed media

Steampunk Sally

Good morning all.
This is the first of my Tuesday posts to announce that their is a new challenge starting over at Cards und More.
This week our theme is -

FASHION

Here is my card for your inspiration.


This week we are sponsored by 

who is offering 2 digis to our winner chosen at random.

I chose to use this image which is - STEAMPUNK SALLY.
I'm not into steampunk myself but I know quite a few people are and it is a great way to express your fashion sense, if that's your thing. Even our local cobler had a steampunk hat on the other day when I was in!

After printing out the image I coloured it with Copics and fussy cut her. The background was made by embossing a panel with a cog EF and inking it with Wilted Violet and Chipped Sapphire DI along with some die cut cogs in a selection of gold, silver and black card. The sentiment from LOTV was stamped on a banner edged with Wilted Violet.

OK, that's about it for the moment. See you back in an hour for another post!

I'd like to join in over at -

Blog Badge
H is for Hand coloured image

Challenge Badge
CHALLENGE #36: ANYTHING GOES

Monday, 20 June 2016

Extra Cutieness

Morning all.
I hope you've all had a great weekend.
I'm not usually around on a Monday morning but I'm here today to share a little bit of good news.
Last month I entered my 'Veg Patch' card in the Cutie Pie Challenge and would you believe it, it won, so the lovely girls at Cutie Pie asked if I would guest for this month's reminder post.
This month their theme is -

SPLISH, SPLASH, SPLOSH

Anything to do with water is the main idea! So here is my card.


I've had this Whimsey stamp for ages, I picked it up in a bargain bucket, and this is it's first inking.
I know I've said that I should try and escape the C6 format but I do like its simplicity and as I wanted to create a watery background, decided to stay with it!
The background panel was made by inking a piece of linen card with Mermaid Lagoon and Twisted Citron DI, after I had stamped the mermaid where I wanted it. The extra bubbles were created by splattering water over the inked background then rolling a wodge of paper towel to lift off the ink. I also lifted the centers of the stamped ones with a damp paintbrush. The frame of linen card was added on pads then the mermaid was stamped again on smooth white card, coloured with Copics and fussy cut before placing it over the register stamp on foam pad. A few dew drops and the sentiment complete.
OK, that's all from me. Please check out the rest of the Cuties and why not join in.

I'd like to join in over at -

Please grab our logo
Feature a Creature (Hope the water snail counts!)

Take It, Make It Challenge
Get Inky

.

Saturday, 18 June 2016

Celebrate, it's your birthday

Good morning all.
It's the weekend and hopefully the deluge has stopped. The rain on Tuesday onwards has been torrential, the yard flooded in one corner and the down pipes couldn't cope. Luckily we weren't flooded inside unlike many around here.
Anyway its time for a new challenge over at Fantasy Stampers. This time our theme is

TEDDY BEAR'S PICNIC

So we would like to see your stamped projects using teddy bears, cute, grumpy, large or small.
Here is my card for your inspiration.


This stamp is from the Fizzy Moon collection called simply Beer!
I used the layout from this weeks Freshly Made Sketches and kept it pretty simple.
I'd seen a card using the technique of cutting clouds out from the background then offsetting the clouds allowing a bit of blue background to show. Tried it but thought it didn't quite work but I did like the idea of the clouds cut and replaced into the textured panel.
I started by using a MFT background plate to emboss the background then cut the clouds and stitched rectangle. The bottom is a scrap of NitWits DP edged with a MS punch and then cut with the same stitched rectangle die from MFT. Fizzy was stamped, coloured with Copics and then mounted on the panel with pads. The sentiment is from STAMPlorations, Sentiment Builders: Celebrate. I stamped the celebrate on a scrap then fussy cut it but stamped the rest flat on the panel.
OK, that's all from me. So if you are into proper stamping we'd love to see what you come up with. Don't forget that we cannot include digi stamps in our top 3.
For even more inspiration check out the rest of the DT.

I'd like to join in over at -


Friday, 17 June 2016

STAMPlorations a reminder

Its Friday, its 2 o'clock, well here anyway, so its time for a reminder that the STAMPloration's June sketch and theme challenge still has a couple of weeks to run.
Here is my card for the DT inspiration.


I used the sketch and the theme but you can use either if you prefer!


For my card I started off by inking the top panel through my ARTplorations stencil, Dots All Over quite randomly with Versamark then embossing in a silver pearl EP . The bottom panel I embossed with the same stencil by running it through my Big Shot with the tan mat to give it a subtle texture.
As I was making an anniversary card I wanted to include some silver, so added a strip between the two white panels.
I'd seen Anja's gorgeous inspiration card over at Tag You're It, so decided to take it as my inspiration for my detail. I die cut a tag and washed some Mermaid Lagoon DI in a w/c manner, then die cut a leaf stalk and twig. The butterfly, Blossom Like a Butterfly was stamped on vellum then fussy cut. I felt it needed a little colour so washed some Wilted Violet over the back. This made the vellum pucker up and I thought I'd made a mistake, but it actually worked in my favour as it made the butterfly a little more sturdy. The sentiment is made up of a magazine anniversary freebie and the HAPPY is from the Banners and Balloons set.
All the panels and tag were then glued flat onto a C6 base card.

OK, that's all from me. For more fantastic inspiration, please check out the rest of our fab DT where you will also find out all the Ts and Cs, then why not join in.

I'd like to join in over at -


For your blog
Butterflies

Tuesday, 14 June 2016

Rock Out

Good Morning all.
My doesn't time fly were are almost halfway through the year already!
Well the British summer weather has reverted to type, wet and grey!
Still the raised beds certainly appreciate these heavy downpours, even if the dog and I don't!
Anyway rain means more time to craft and it just so happens that there is a new challenge over at Cardz4Guyz.
This week our theme is

MUSIC

Here is my card for your inspiration.


I had a lot of fun playing with this one layer card. The other day I came across a technique shared by Jennifer McGuire (here). It allows you to create a white hi light behind a solid stamp. She used a greeting but I decided that this Visible Image stamp would work just as well.
To get this effect, you stamp the image in black then stamp to one side with Versamark just off register then again over the black image then heat emboss in clear EP. 
Then it was time to get inky and make the background.
The stencil for this card is one from STAMPlorations, Retro Circles and I chose to use a couple of blue DIs, Blueprint Sketch and Salty Ocean. First I covered the whole card with Salty Ocean then overlaid the stencil and inked again and repeated with Blueprint Sketch towards the edges, it gives a halo effect restricting the darker colour to the edges. A quick polish with a bit of tissue over the central image and a couple of sentiments stamped in black and the card was finished.
OK, for more inspiration please check out the rest of the DT and then why not join in this week?

I'd like to join in over at.


Music

        OLS
                                                         Stencil

Take It, Make It Challenge
Let's Get Inky

Thursday, 9 June 2016

Molly Cools Off

Morning all.
Is it really a fortnight since our last challenge over at Cardz4Galz?
Well it must be as its now time for another!
This time our theme is -

FUN IN THE SUN

When I made this card my Grandson had been messing around in his paddling pool and we had been sitting on the patio having a cooling ice cream, so that's how this card came about!


This Molly Bloom stamp is really old and I'm not sure of the name as is the paddling pool, also by Molly Bloom.
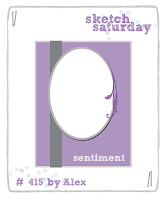
I sort of used the sketch from Sketch Saturday but laid it on one side and of course I used my favourite aperture over a snippet of NitWits DP.
Molly and the pool were coloured with Copics before being fussy cut.
The top panel had an oval aperture cut in it, then it was embossed with a new EF I picked upon the way home from Port Sunlight! The strip on the sketch was turned into grass by using a couple of snippets of NitWits DP from the bits box, edged with a MS punch. I didn't put a sentiment on as it looked quite busy already.
OK, that's it from me, pop over to the blog for more fab inspiration and why not join in?

I'd like to join in over at -

CREATIVE INSPIRATIONS
Spring into Summer