Pages

Wednesday, 28 December 2022

Watercolour Holly

 Good morning, just popping by to share a Christmas make in this quiet time 'twixt Christmas and New Year. It's another of my watercolour experiments, this time using clingfilm and watercolour washes.


The holly berries were masked with masking fluid, before the leaves and background painted with washes of watercolour. Before it dried, I added some scrunched up cling film, it's a bit like the technique I've used with Brusho but on a smaller scale. When dry, the cling film and masking was removed and the berries painted. To finish the panel, some branches were painted in with a rigger brush and some snow, splattered white acrylic, added. The frame was simply added over the top and attached to an A6 base card, a sentiment strip completes.


Joining in over at:-

Christmas

Festive Foliage

CAS

Tuesday, 27 December 2022

Dachshund Through The Snow

Good morning!
Hope you all had a fabulous Christmas and that Santa brought you lots of what you wanted. If he didn't, well I hope that it was still a great time with your loved ones. We got an extra Christmas present, my eldest grandson caught Chicken Pox from his younger brother!!
Anyway, over at Cardz4Guyz we've got a brand new challenge for you to keep you busy in the twixtmas period!!
This time we would like to see your take on:-

A WINTER THEME

Here's my take. I made it before the holidays when there was a hard frost and the overnight temperature on the roof,  according to the solar hot water panel, was down as low as minus 11'C!!!!! As I type, there are still plenty of frosty corners that the sun doesn't reach. I've used this fun LOTV digi- Dachshund Through The Snow, the doggie reminds me of our Max, though not a dachshund nor would he let you put a coat on him! 


The background was lurking in my scraps box, leftover from an earlier project and too good to throw away, works well with this cute boy with his dog and sledge from LOTV.
If I remember correctly, I stamped an arrangement of tree branches with Versamark and heat embossed with white EP. Using some Salty Ocean, Blue Print Sketch and Peacock Feathers DI more branches were stamped over. When dry I blended some of the Salty Ocean over the embossed and stamped branches.
After printing off this cute LOTV image, I coloured with Copics and fussy cut him and the pooch out, laying him on pads over the background. A sentiment from Uniko was stamped on the snow and then the whole panel was added to an A6 note card.

For more masculine winter themed inspiration, check out the rest of the team here.

Joining in over at:-


Clean and Simple

Wednesday, 14 December 2022

Another Festive Penguin

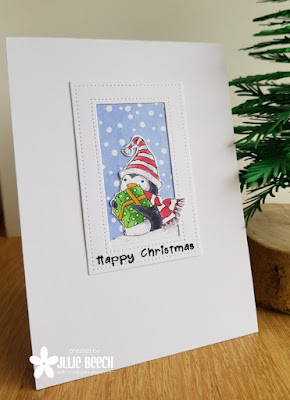
Evening. Only just over a week left before the big day and over at Perfectly CAS we are asking you to show us your CAS Christmas makes. Here's one I posted out at the beginning of the month featuring another of the cute penguins from LOTV.


I found him in the bottom of the printed but not coloured box, a leftover from a sheet I printed last year. The itsy bit of DP is also from a LOTV pad from many years ago that was in the scrap box too! I slipped it behind a die cut frame and sat my Copic coloured, fussy cut, gift toting penguin inside with just his scarf hanging over the edge. Sentiment, Woodware, stamped along the bottom edge of the frame and then added to a white A6 top fold card. SIMPLES.

This design has lots of 'white space' , in other words no embossing or pattern over at least 2/3rds of the design, please make sure your entry complies. I know that CAS means different things to different people but we are a CAS challenge that requires the patterned area to be 1/3 or less.

If you are still unsure, please check out the rest of the DT for more fab Christmas CAS inspiration.

Tuesday, 13 December 2022

Ossie Owls

Good morning, I don't want to scare you but Christmas Day will soon be here, hope you have all your prep done because I haven't! Anyway I've another card to share for the brand new challenge at Cardz4Guyz. This time it's -

Something beginning with O

As soon as I saw that, I thought of owls and as I had the Lawn Fawn owl out after thinking to use it for the last challenge, I just had to use it!


I used to make owl themed Christmas cards as a joke for my old next door neighbour and Owls fan but sadly she is no longer with us but I do have a couple of kids that are still Owls fans. Not the fluffy creatures but the football team, Sheffield Wednesday. I have my late father to thank for that, personally I support the other football team in the city, Sheffield United. Their nickname is the Owls because they used to play at Owlerton a district in Sheffield. They are also called Wednesday as that was the only day they could get together to play back in Victorian times.
I started with a panel of white Copic friendly card and stamped an array of owls over it. I coloured the scarves in the colours of Wednesday, blue and white and the away colours of blue and yellow.
My die cut sentiment panel was already in my stash, so I just added a matte of gold card and a couple of small die cut holly sprigs which I coloured with Copics. The panel was then added to the card on pads.

So what will you come up with? We'd love to see your takes in the Cardz4Guyz gallery.

Joining in over at:-
Use die cuts

Sunday, 11 December 2022

Watercoloured Poinsettias

 Hi, just popping by to share a card for a few challenges whilst I've got a moment or two to spare!
It's a CASe of one here I did many years ago using this fab Penny Black poinsettia and a Stampendous background stamp.
If you are a regular visitor you will have noticed that I have been indulging my artistic side with some watercolour themed cards and this is no exception!


On a panel of textured card, I stamped the three poinsettias, masking as I went, with Altenew's Limestone ink for a watercolour effect. Masking these off with outlines cut from Post It notes, I then stamped the text panel with Versamark and heat embossed with white EP. The sepals were then watercoloured using a mix of DIs smooshed onto an acrylic mat. After colouring the area around them was painted with plain water and the green DI added to give a textured effect. The tiny yellow flowers were added using a couple of Zig watercolour pens. Trimmed down, the finished panel was then added to an A6 red note card.

Joining in over at:-


I love ..... Watercolouring!

Anything Stamped with option of Winter Wonderland 
(no option for me)

Wednesday, 7 December 2022

HO Cubed!

 Morning all, it's looking very wintery outside this morning. The heavy overnight frost is glistening in the bright sunshine, it's cold but it looks so pretty. Even the dog was happy to go out and was quite reluctant to turn back!

Anyway, thought I would just share this card for the latest challenge over at The Paper Players. It features one of the fun MFT Santas.


On a red card base, I stamped my Uniko Background Blocks Falling Snow twice, masking off the bottom, to create my background and heat embossed with white EP, added a circle of black card, stamped the simplest of the sentiments and finally the Santa, Copic coloured and fussy cut. Simples!

Joining in over at:-

Friday, 2 December 2022

Guinea Pig Conga

Evening all.
December is here and it's time for a new challenge at HLS Birthday, where it's always -

ANYTHING GOES

Here's my card to celebrate the festive season!


I love this guinea pig conga stamp from Colorado Crafts, so much fun to colour too.
I thought that the guinea pigs could easily be mistaken for hamsters so it was the perfect card to celebrate the lovely Darnell's birthday earlier in the year!

After stamping the conga line, I used Copics to colour and then added some clouds behind with an MFT stencil and a soft brush with Salty Ocean DI. The sentiment is from the same set but the ink I used for it was new, so very juicy and easily smudged, so I added some clear EP and heat set. My completed panel was trimmed and then added to an A6 side folding note card, simples.

I know it's a busy period for a lot of you but there are still birthdays to celebrate, I always feel sorry for December and early January birthdays as they tend to get lost in the celebrations around Christmas and the New Year! So why not make time and send a December baby some birthday love?!

If you are in need of some birthday inspiration, why not check out the rest of the team here?

Joining in over at:-


Four Legged Friends

Anything other than Christmas

Thursday, 1 December 2022

Color Hues #54

Good afternoon, it's December already! How can that happen, it was the heat of mid summer so recently it seems. Anyway, time for the final Color Hues colour combo of the year. Here's my take.


This card is a CASE of a card I made a few years ago here, using a freebie magazine die and part of a Uniko sentiment. 
To start, I die cut a panel of navy blue card with an MFT die and then cut away the bauble with the freebie. Below the opening I stamped the sentiment and heat embossed with white EP. The panel was then added to an A6 matching base card and the aperture filled using a black fun foam bauble and the original cut from the panel, slipping a length of gold chord behind the die cut and panel. A bow tied from the same chord was added on top. The JOY word was cut using a Tim Holtz Sizzix alphabet die from cream card and added across the center, an IO gold die cut snowflake completes.

We are keeping this challenge open for the whole of December, so if you get a little bored with all the festivities you might want to slip to your craft room for some respite and join us.
For more fab inspiration from the DT and our guest GD check out the Color Hues blog here.

Joining in over at:-

A Greeting Card

Tuesday, 29 November 2022

Fishing Penguin

Good morning folks. As we head towards the end of the month there's a brand new challenge at Cardz4Guyz. This time our theme is

BIRDS

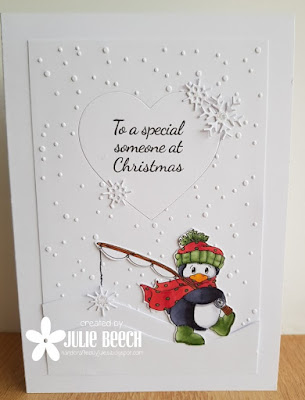
Now it's up to you but as Christmas is hurtling towards us you may want to consider what I did and turn the theme into a Christmas card. Not Robins or Cardinals but a PENGUIN!


This cutie is from Hobby House crafts and I cut him out from the printed panel to sit him in a snowy landscape after I'd coloured him with Copics. I didn't cut the fishing line with the snowflake but added my own snowflake and doodled line! This will probably end up for my OH as he loves fishing. 
I used a layout I've used a couple of times before, with the die cut stamped heart in the middle of the dry embossed snow background. To ring the changes, I added a few extra snowflakes and a tiny bit of sparkly Stickles to their centers.
So how will you interpret the theme? We'd love to see your take in the gallery at Cardz4Guyz.
There are lots of other masculine bird themed cards on the blog if you need anymore inspiration!

Joining in over at:-

W is for White and/or
X is for Extra Special 

Tuesday, 22 November 2022

Simple Watercoloured Trees

 Good morning, I'm up over at Uniko today with a little bit of artsy Christmas card BA inspiration using Christmas Pop Trio stencil and Christmas Pop stamp set.


I've used the simple outline from the stencil to draw the triangle with a soft pencil and some freehand drawn pots to create these little water coloured trees.

Here's a close up of them all, and a link to the Uniko site for all the details on how I made them.


Joining in over at:-


Wednesday, 16 November 2022

Color Hues #53

Afternoon folks. Halfway through November already and Christmas is about to sneak up on us but before that we have a brand new colour combo from Color Hues. This time it was my choice and I went with a very festive colour theme. Here's my card using my two colours!


The other week, I had a video pop up in my You Tube feed that inadvertently sent me down a rabbit hole of water coloured goodness. Following a link on my side bar took me to a video about painting berries and foliage for a Christmas card and nothing says scarlet and green more than that! 
The video by Wendy Powell Jones, showed you how to create a cluster of berries and foliage in a loose style, then turn them into cards. So I thought as it was bucketing down with rain last Sunday and feeling the after effects of my flu booster, I would have a play. I did 3 sprays and the one here was the brightest and fit best with the scarlet and green theme.

I drew some small circles freehand to represent my berries on some MM paper and masked them with masking fluid, along with a few splodges to create some open space amongst the foliage. When dry, I got the w/c paints out and mixed up 3 shades of green using Cadmium Yellow and Prussian Blue, a dark, a mid and pale one. I then roughly washed in some foliage shaped areas using a wet in wet technique and left to dry. 

Carefully removing the masking fluid, I added some Cadmium Red to the circles, then some shadow using a hint of Paynes Grey added to my red, careful to leave a spot of paper showing as a hi light. More Paynes Grey was used for the berry stalks and twigs. To add some festive snow, I used some Stampendous chunky white EP scattered over the image and heated from below.
The finished panel was trimmed down and an MFT die cut frame added on foam tape. The sentiment is from a Uniko set, Festive Sentiments. The whole was then glued to a 5 x 5 off white card.

So where will my colours take you? We'd love to see, of course you don't necessarily need to go down the festive route. Why not check out the rest of the DT and our GD for more scarlet and green loveliness?

Tuesday, 15 November 2022

Waste Not Want Not!

Good morning, time for a new challenge at Cardz4Guyz. This time our theme is 

THANK YOU CARDS

Here's my take.


For this quick card, I used a leftover panel from an earlier project from my stash, hence the title of the page! My leaf panel uses the embossed resist technique, you can find out the details of the technique here.
I started by taking a piece of A6 dark cream card and stamping a selection of solid leaf stamps and embossing with clear EP, then inking the panel with Scattered Straw DI and when dry added further clear embossed leaves. Next I inked the panel with Spiced Marmalade DI and repeated the embossing. Finally I added some leaves with Memento Morocco ink. It was then time to iron off the embossing to leave the finished panel. The rusty red looks a bit more subdued in the finished panel except around the edges of the orange embossed leaves, not sure why.
The original panel was cut with an MFT stitched rectangle, this left over was glued flat on a cream base card. Thank You was then stamped in Memento Rich Cocoa.

So where will go with this new theme, we'd love to see your takes in the gallery, just don't forget to keep it masculine! Should you need more inspiration there's plenty over on the Cardz4Guyz blog.

Joining in over at:-

#441

Monday, 14 November 2022

Brusho and White Embossed Snowflakes

Good evening folks.
Time for a new challenge over at Perfectly CAS. Here's my take on this month's theme.


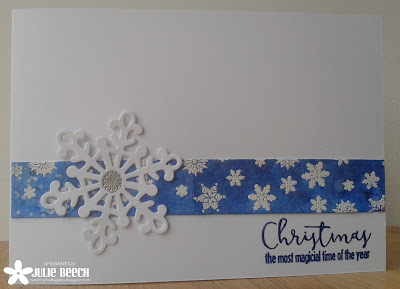
I started by making my inky resist panel using an old STAMPlorations snowflake background stamp and stamping several times in Versamark along a strip of white card before embossing with white EP.
I then sprinkled some Prussian Blue Brusho and spritzed with some pearlized water to get the twinkly, mottled effect. It doesn't show very much in the photo but IRL it does! I trimmed it down and added it to an A6 white base card, then stamped my HLS sentiment in blue to match. A die cut snowflake from the stash was added, after I'd added some sparkly, silver EP to the center. Simples.

For more CAS inspired makes, please check out the rest of the DT and then join us in the gallery!

Joining in over at:-

Sparkle

Thursday, 3 November 2022

Uniko's Stencil Release Day & GIVEAWAY!

Good morning it's release day over at Uniko. 
Here a few more ideas using the November release stencils.

First off the block is the MOD background Builders.
For this example I've used some more purchases from Ruthin, some WOW foil and WOW Bonding powder.


Don't you just love the sheen, well until you try to take a pic that is, then it's an absolute nightmare!!

The bonding powder is so easy to use, inking through the main part of the stencil with Versamark on black, the bonding powder is added and heated, as with EP, before adding the foil and running through any old laminator. I did try to make a pattern with a mix of rose and plain gold foil, cutting small pieces of the rose gold and then overlaying a larger piece of gold, then running it through a laminator in a piece of A4 copy paper folded as a carrier. You can see where one of the small pieces shifted 'twixt desk and laminator but it still looks so pretty!! The sentiment was done the same except it was first stamped with Versamark. I only bought a couple of colours of foil so may have to hunt out a few more, it is addictive.

My second card uses the Flower Power stencil, concentrating this time on just the leaf elements


After masking off the solid leaves a random selection of leaves were inked with a light covering of Spiced Marmalade, Festive Berries and Vintage Photo DI before inking again with the detail leaf stencil and the same colours. Gaps were filled with dots from the large detail leaf stencil. Another of my Doodle Flower sentiments complete.

My next card uses Large Snowflake #1 and the Large Snowflake die.


Using the Large Snowflake #1 stencil over navy card, I spread white embossing paste and left to dry. I found this silver die cut snowflake in the stash and thought it a great way to amp up the design. I simply added it over the embossed snowflake, followed by a sentiment from Christmas Sentiments on matching navy card.
Finally here's a card using the other Large Snowflake stencil #2.


Simply inked in Altenew's Aqualicious ink over pale turquoise card, then again slightly off with Unicorn pigment ink to create the shadow. A few sequins from the stash and a sentiment from Simply Said Blocks Christmas complete

That's all from me but the rest of the team have come up with some fantastic ways to use these fab new stencils, so why not check them out on their own blogs.
Be sure to leave a comment on all our blogs or social media post as Bev will be randomly selecting one lucky winner to receive all of the stencils being released today. You have until Midnight Wednesday 9th November to leave comments and I will announce the winner Thursday 10th November 2022. 

Wednesday, 2 November 2022

Autumn Birthday Wishes

Good evening. The clocks here have gone back so it's a little darker at tea time and finally the trees are colouring up, those that are still on the branches that is!
We start a new month at HLS Birthday with a brand new challenge, as usual it's-

ANYTHING GOES

well so long as it's birthday themed!! Here's my card for your inspiration.


I was inspired by a video on Copic colouring by Marker Geek Elaine, one of the Stamping Bella ladies. I didn't have the stamp she used but I had this one of Uptown Quinn and her Boots. The image was stamped and the background drawn freehand around her. All the colouring was done using Copics, not something I'd done before so I stuck pretty close to the video where I could without copying it. Not to blow my own trumpet but I was fair chuffed with the end result!
The coloured panel was trimmed down and added to a 5 x7 white base card that I had added some brown card strips and some NitWits DP, a Uniko sentiment completes.

We'd love to see your birthday cards in our November gallery, just follow the link. While you're there check out the rest of the team!

Joining in over at:-

#700 Let's Celebrate any Occasion