Pages

Sunday, 27 February 2022

Release Day at Uniko and a BA Blog Hop and Giveaway

Good morning. 
Well the day has finally come when you will be able to get your hands on the 10th Birthday release  from 10am GMT over on the website HERE.
Here are a few more ideas for you, using the new stamps and stencils.

My first card uses BB Splatter and Cogs, with quite a masculine result.


On a panel of black card, I stamped the splatter stamp with Versamark and added platinum EP. Before heat embossing, I brushed away some of the thicker areas, as I only wanted a suggestion of the pattern in the background, before I heat embossed. The BB Cogs was then stamped over the top and embossed using Brass WOW EP. The trimmed down panel was added to an A6 black note card and the Everyday Sentiment added with the same brass EP.

Just to prove that grunge isn't just for masculine cards, here is the same BB Splatter used in the background of this very feminine card.


I used the colours at Color Throwdown, a mix of Altenew Forest Glades and Frayed Leaf ink and matching Copic markers for the leaves and a couple of pinky tones of Copic marker for the rose. The sentiment is from the very useful Everyday Sentiments.
After stamping the BB Splatter image a few times to create my background, I took a scrap die cut circle and inked it with Forest Glades ink, popping it up over the splatter with pads. The fussy cut Pure Florals Rose bloom and leaves were added along with the sentiment banner.

This next card uses the Flower Power#7 stencil and a range of pink DIs. The Everyday Sentiment was stamped on a panel of matching card and embossed with white EP. The colours and pattern remind me of a bedspread that was sold in M&S when I worked there in my holidays in the early 70's!


The finished panel was trimmed and mounted on a scalloped die cut square and inked with Kitch Flamingo DI and added to a white square base card.

My next card is very similar to the introducing post but this time the image is flipped and the panel trimmed to fit a square format, double mounted and added to a base card.


This next card was inspired some retro fabric I saw on Pinterest and another using the Fun Flower stencil and masks and Flower Power#7 stencil and masks.


I arranged the masks over a panel of white card and inked over with Mowed Lawn DI. I then used the masks and stencils to fill in the blooms. Some of the larger bloom masks moved a little but I quite like the white showing through in places. I used a mixture of blue and green DIs for the blooms.
The You from Big n Bold You sentiment set, was stamped and heat embossed with white EP on black and fussy cut, adding the large phrase with white EP on a black banner.

My final card uses the Balloon Frame set for this fun interactive birthday card.


I made one of these surprise pop up cards for a BA post a couple of years ago here and thought I would revisit it and CASE it! The original video by Jennifer McGuire, showing the process for the mechanism can be seen here.
To begin I stamped the panel and infilled the empty space with the small confetti stamp with a light grey ink and coloured using Copic markers.
On the large balloon, I stamped Time To from Birthday Sentiments and Celebrate form the new Everyday Sentiments in Versamark and heat embossed with white EP. The smaller inside balloon uses the same combination of sets to create a different sentiment.
Here's what it looks like in close up when you pull the tab!


So what do you think of the new release?

To celebrate we are having the regular BA blog hop and giveaway to finish of the month in style. 

Bev has one last GIVEAWAY today, simply leave a comment on all of the stops along the hop for your chance to win £10 eGift Code* to spend in store. You have until Midnight Sunday 6th March 2022 to leave your comments.

Due to an unprecedented amount of entries during the month long celebrations and quests, it will take us a little longer to check all of them and randomly select the winners. ALL winners including this GIVEAWAY will be announced here on the blog Monday 7th March 2022.

All the details of all the challenges are on the Uniko blog but here are the links to the other BA's posts for this hop, so you can check out how they have used the new release. So don't forget to leave a comment before you hop along to the other BAs for your chance to win.

Bev
 Julie -  you're here
 
Joining in over at:-


Saturday, 26 February 2022

Introducing Framed Balloons

Good morning Uniko followers, it's time for another introducing post. Today we are showcasing the new Balloon Frames stamp set. Here's my take.


I made a shadow box card after seeing one in a Jennifer McGuire's You Tube video, which reminded me of the framed balloons.
After making the basic card, I added the coloured panel which I had cut away in the middle to create my aperture. Another row of balloons were added, fussy cut from a partially stamped frame and mounted on white card, as I wanted it taller than the original to show through the opening. I drew the strings in freehand, perhaps I should have stamped the separate confetti stamp I used for the background over the white card though, as after adding the background it perhaps looks a bit odd. Too late to change it now!!
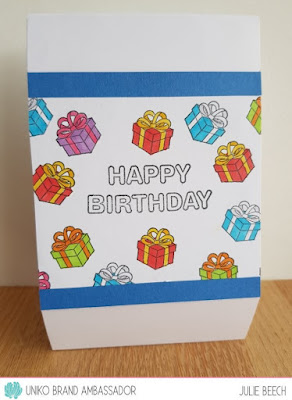
In front of the box aperture I stamped the Happy Birthday and coloured with matching Copics. The front was decorated with a panel stamped with the parcel stamp from the set and an outline Happy Birthday.


A couple of thin strips of blue card just add a bit extra interest.

There's lots more fab ideas from the other Brand Ambassadors over on the blog and we'll be back tomorrow with the full release and Brand Ambassadors Blog Hop.


Joining in over at:-

Friday, 25 February 2022

Introducing Fun Flowers Stencils and Re-introducing the Fun Flowers Stamp Set

Today sees the introduction of two fab stencils to complement the Fun Flowers stamp set which is also re-released this week.
Here's my take on the Fun Flower Spray stencil and mask.


The technique used here was one I saw the very talented Jennifer McGuire use. It involves dry embossing of the stencil, combined with faux letterpress for the background. I'd seen her You Tube video here and wanted to have a go, I was just waiting for the right stencil to use!
To begin, I took a panel of white card the same size as the stencil and attached the stencil to one edge with masking tape to create a hinge, then ran it through my Big Shot. When you lift the stencil a raised outline of the design is revealed!!
To create the background, I inked the underside of the stencil, without removing the tape hinge, with my brayer and Salty Ocean DI and ran it through my Big Shot again. Repeat as necessary to get the right amount of depth of colour.
To colour the leaves and blooms, I used a mixture of masking and masks and DI ink.
A simple sentiment from Everyday Sentiments stamped in black and the final panel trimmed before adding to an A6 white base card completes.

My second card uses both the Fun Flower Stencil and masks and the matching stamps.


This started off as a OL card but as I removed my masking tape it tore the surface of the card, even after I'd taken the worst off the sticky before! Anyway, waste not want not, I added a couple of white panels and strips of dark pink card to cover the faux pas.
Originally, I had masked off my central panel then stencilled in the blooms with Kitch Flamingo DI, then stamped over with Seedless Preserves DI. Placing the masks from the set, I added stamped green leaves with Twisted Citron DI.
The rest of the make you know! A simple stamped Everyday Sentiment on a white card panel completes.


I'll be back again tomorrow with more from the Uniko February 10th Birthday release.

Thursday, 24 February 2022

Introducing Big and Bold You and Flower Power #7 Stencil

Good morning, you ready for a few more items from Uniko's February release?
Today we are introducing another in the Big n Bold series and another in the Flower Power stencil set.
Here's my idea using both.


The Flower Power #7 stencil took me back to my youth, so went with a very retro vibe. The end product reminded me of some wallpaper I had in my bedroom in the early 70's.
To start, I took an A6 panel of white card placed it in my Misti and arranged the masks from the set across it, securing with tape and magnets. Over the top of these I inked Mowed Lawn DI. I then stencilled in some colour using the stencil part of the set. I added some extra layers to the large flower by making my own stencil from copy paper, then drew around each flower and layer with a black fine liner.
On some black card, I stamped and embossed the You in Versamark and heat embossed with white EP and fussy cut, leaving a thin black line to echo the outlined flowers. On a small strip I added Just For in the same EP. 
To complete the design, I trimmed my panel down to leave a border on an A6 white base card and added the sentiments. 
There's lots more fab ideas from the other Brand Ambassadors over on the blog and we'll be back tomorrow with another introducing post.


Wednesday, 23 February 2022

Introducing Background Blocks and Everyday Sentiments

Good morning Uniko fans. After yesterday's sneak peeks, today sees the introduction of three new stamp sets, a couple of new Background Blocks and a new sentiment stamp.
Here's my card using all three!


It was a little tricky to photograph as the embossing kept obliterating the rest of the panel, but once the sun went in it was fine!!
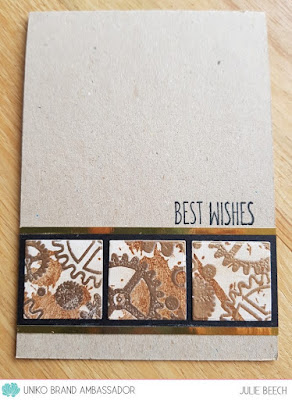
The small squares on this masculine card are made from a panel using both the new BB Cogs and BB Splatter. I was having a play to see what was possible and ended up with a panel of brass EP, heat embossed cogs on a white piece of card. Looking at the end result, I decided to add some grunge to the background by adding the BB Splatter over the top with Vintage Photo DI. As I wiped off the excess ink it smudged over the remaining white and I really liked the effect, so did it some more to cover the rest of the open white space with a faint hint of the Vintage Photo. I was already to use the panel on my kraft base card, when I noticed that the was a line or crease in it, so not wishing to waste it, I cut out 3 small squares with a die, mounted them on a strip of black card and added it to my kraft base card. To complete, I added two strips of gold mirror card above and below and stamped the greeting from Everyday Sentiments in black.

What do you think? These new BB stamps look to be perfect for cards for those men in our lives!


Tuesday, 22 February 2022

Lego Box Card

Good morning, I hope you've survived Storms Eunice and Dudley without too much disruption or damage. I did manage to get to the hairdressers on Friday as it wasn't too gusty by the time I went but I know that for many it was much worse. It wasn't as bad as the storm of 1961/2, when I remember seeing rubbish everywhere including a bicycle wheel slung around a neighbours chimney stack!
Anyway, with the weather bad, the garden has taken a back seat and there's been lots of time in the craft room.
Today see's the start of a new challenge at Cardz4Guyz, where we would love to see your masculine take on -

FANCY FOLDS

For my card, I went with a box card.


I made this for my SiL's 40th birthday in a couple of weeks, he does love his LEGO!
After making the base card from an A4 piece of red card, I added panels of green embossed card to represent the bases of LEGO and then made a variety of bricks from card. The lugs were punched circles popped up on rectangles and squares of coloured card with foam pads and then a white gel pen was used to hi-light them. They were arranged over the box card and a stamped sentiment added together with a die cut 40. A greeting panel was added to the rear of the tall panel.

So what fancy folds will you use to impress us? We would love to see your takes in our gallery.

For more inspiration, check out the rest of the team here.

Uniko's 10th Birthday Release Sneak Peeks

The 10th Birthday Celebrations are continuing and it's time to share the sneak peeks for the 2022 February Release and make an announcement!

We have a new member of the team joining us, the very talented Anita Bowden of Neet and Crafty! I'm sure you'll all make her very welcome.

This month we have 5 new clear stamp sets and 3 new stencil/mask designs. All the new products will be available to purchase on Sunday 27th February 10am GMT. 

First off, are a couple of Background Blocks with a decidedly masculine feel.


Next a new entry in the Big n Bold series and some very useful everyday sentiments


Finally, we've got a new entrant into the frame series, this time using balloons and a definite party vibe!

Bev has also re-released Fun Flowers as well as a couple of stencils that can be paired with the stamps


Finally there's another addition to the stencils with a fun retro flower stencil that can be used with the fun flowers

So what do you think? Are you as excited as the team was to get your hands on these fab new goodies?

All the new products will be available to purchase on Sunday 27th February 10am GMT but first, tomorrow and the rest of the week, you get to see what the Brand Ambassadors have been up to with them!

Wednesday, 16 February 2022

Color Hues #35

Good afternoon.
February is rushing on and spring will soon be here but first we have a new colour combo for you at Color Hues. A lovely classy combination chosen by Kristie and one of my favourites, here's my take.


A classy combo deserves a classy card and nothing is more classy than this Stamping Bella, Uptown Girl, Audrey loves make-up image.
For my layout I CASEd myself, switching the brown and orange of this card to the challenge colours.
My background DP has been in my pink drawer for many years, I think it's from a Forever Friends set, I can't tell as the front of the block is missing! I thought it a good background for this classy lady, together with the die cut panel, CheeryLynne and the sentiment Personnel Impressions, both from the early days of my card making! I picked up the colour from my DP for Audrey's accessories and matched the Copic colouring of her dress to the die cut. The MFT banner was stamped with the sentiment in matching navy ink.
So where will you take these new colours? If you need a little more inspiration, check out the rest of the DT and our GD here, if you join in you could be a GD for a future challenge.

Joining in over at:-

Monday, 14 February 2022

Faux Cloisonne

Evening folks, Happy Valentine's Day!
Were are half way through the month of February, so it's time for a new challenge at Perfectly CAS.
Here's my take on this month's cue card.


The ladies over at CAS Mix-Up would like to see Faux Cloisonne projects this month so I though that I would use that as my metallic element.

Cloisonne is the art of filling outlines of wire with enamel to decorate items, jewellery, vases etc. usually on a metal base, before firing to create a lasting design.
Think exquisite Faberge eggs, Russian silver, Chinese or Japanese vases and you get the idea.
Here's a cloisonne tea caddy that I found on Google that inspired my panel.


For my Faux Cloisonne, I used gold EP and metallic paints on black card.
The Macintosh Rose panel was stamped with Versamark on black card before heat embossing with gold EP. Once cooled, I added the colour using my metallic paints. Red for the flowers, green for the foliage and blue for the jewelled elements. The rest of the design I filled with a silvery white. Each cell created by the embossing was flooded with paint, just like the real thing!
Once I was happy with the panel, I cut it out and added it to a slimline, black card blank on pads. The sentiment from the same freebie set was stamped to match using gold EP.
So where will you go with our new theme? We'd love to see your takes in our gallery, but don't forget to keep them CAS.
There's more metallic inspiration from the DT over on the Perfectly CAS site.

 I'd like to join in over at:-


Clean and Simple (CAS) with option of Elegance

Tuesday, 8 February 2022

Joy Ride

Good morning folks. We've a brand new challenge for you at Cardz4Guyz.
This time we would like to see your take on the the theme of -

LOVE

Well it is coming up to Valentine's Day!
Here's my take.


I don't send Valentine's cards and neither does the OH, he said he could surprise me one day but then he would also be surprising himself!!! Anyway, I made this card which is not sentimental or mushy.

Using my MFT Die-Namics Joyride die set, I cut the car and assembled it but not the number plate, that I had to have a think about. The set comes with an assortment of fun messages that make up the plate but nothing I could use here, so I used the 2 letters from a couple of the plates and added a punched heart to a fussy cut yellow panel of card. I know the driver would get stopped by the police if they actually used the plate as is, but the red had more impact than the regulation black letters!
The background is made from some die cut green hills and trees, Marianne Designs, some NitWits DP and a strip of black card for the tarmac, with added white lines. All added onto an A6 base card.

So where will this theme take you, we'd love to see your masculine creations in the gallery. If you need some more inspiration, please check the rest of the DT here.

Joining in over at:-

With Love