Pages

Wednesday, 26 July 2017

No stamping Happy Birthday

Morning all.
Just a quick card today and a rather appropriate one.


Today is my birthday and we should have been out and about but the weather and a broken tooth put paid to that and our meal out is in the balance as eating is not easy.
Anyway I rang the dentist first thing and after  explaining that the Monday afternoon appointment was too far off, they said they would ring back later.
So while I waited I played in the craft room making this CAS card without any stamping, MFT small letters and pierced rectangle. Marianne balloon and part of a Happy Birthday die from The Range, possibly X-Cut. 
CASology are celebrating their 5th birthday so I decided to use their cue word BALLOON and LIM's no stamp challenge together with AAA's rainbow challenge for my inspiration. The balloons were coloured with Copics after the letters were die cut and I added some strings with a black fine liner.

I'm back from the dentist now with a temporary filling and an appointment for Monday with a locum dentist, as ours has sadly broken her ankle! Hopefully it will stop the ouch when drinking until they can sort it out. Think I will leave the celebratory meal until the temporary filling is a bit more settled.

Joining in over at-


Tuesday, 25 July 2017

Another die cut Santa

Evening all.
Looks like I will be spending my birthday at the dentist tomorrow. Would you believe that I broke a tooth whilst eating a salmon salad for tea! I think part of my filling came away as well as it feels cavernous at the back. 
At least the wasps that have been plaguing us in recent days appear to have been dealt the killer blow by the very nice Welsh wasp man who came this afternoon, rather later than expected as the pesky blighters have been keeping him busy along the Welsh border today. I hate the little black and yellow stingers, jaspers as my chemistry teacher from Bristol used to call them, they are horrible in any language. 

After my play with my new Santa die, I just couldn't stop making another card, this time I kept it pretty simple.


Plain A6 top fold card stamped with a few stars and a sentiment from Crafters Companion in sparkly gold EP. No shading on his beard just his face and hat coloured with Copics, simples. May be making a few more of these.

Joining in over at

The Diva's that cut ....paper!
Christmas in July

Merry Monday

Sunday, 23 July 2017

Santa Claus is Coming to Town

Afternoon peeps.
It's been a bit of an on and off day today. Rain then sun so as a result I took refuge in my craft room to play with a die I picked up at Hobbycraft last week. It's a fab Santa die from Sizzix that I'd had my eye on for awhile and as it was in the sale, well I just had to have it!

Here is the card I made based on the sketch at the Paper Players.


I decided to use some of my large stash of Christmas DP for the background and unusually for me it's a 5 x 7 base. After cutting out the pieces I added some detail with my Copics and mounted him up on pads over my sentiment strip. The sentiment is a combination of a Marianne and freebie sentiment.
The DP is an ancient pack of papers from DoCrafts which I thought matched both sentiment and image.

There are lots of challenges out there this month that have the same Christmas in July theme so here goes:-


Grab It   little red wagon
#26 Pattern Paper                     Christmas in July

Crafty Gals Corner
Christmas in July

Friday, 21 July 2017

STAMPlorations a reminder and happy summer holidays

Hi and welcome to a reminder that there is still time to join us for the July theme/sketch challenge over at STAMPlorations. It's our last one for a couple of months so we DT can have a break and recharge our batteries. 
Here is my inspiration for you.


I decided i better use some of my NEBUS stash, so got out my Lotus Love set and had a play.
I sort of used both the sketch and the theme, you could use either though.


After stamping, masking and embossing, I coloured the flowers with my Zig pens and then washed in some blue for the water. The embossed outline, I used clear over black, allows the watercolour to flow without getting where you don't want it to. I trimmed away the right hand side of the design and slipped under a piece of DP that I had floating around with some added black Copic colouring. The sentiment, from the Fond Expressions #2 set was stamped in black to finish.

For more fab inspiration check out the rest of the team here,
Join us, we'd love to see what you do with the theme/sketch.

If you are hoping over to the STAMPlorations shop then you might want to get an extra 20% off by using this code.


Joining in over at:-


Thursday, 20 July 2017

Stamping on Tissue Paper and Brusho

Good morning all.
It may be summer outside in this neck of the woods but over at Cardz4Galz there is a decided chill in the air, metaphorically speaking that is!
Our brand new challenge theme is -

CHRISTMAS/WINTER in JULY

I'd already made a traditional card for the challenge over at Cardz4Guyz so decided to go a little more contempoary with this.


I was determined to join in at CAS Mix up where they are playing with tissue paper, then I saw the latest challenge at Inkspirational and the ideas just came together. It even evolved again as as soon as I cut my top panel with circle dies, I saw baubles! I had originally decided to go with large stamped and embossed snowflakes but after  the idea of baubles took hold, I went with some smaller ones, stamped over panels of Brusho covered tissue mounted on card. 
I made the panels by sprinkling Prussian Blue and Turquoise Brusho onto my craft mat then spritzing with water, then laying my tissue paper over the top. Carefully removing the tissue I put it to one side to dry before gluing it onto circles of card slightly larger than the apertures on the top panel with PVA glue. I coated the top with more glue and added some fine Brusho powder to give extra texture. When totally dry, I gave them a good dusting of anti static powder and stamped and embossed the snowflakes in white. The position of the snowflakes towards the edge of each panel gives the idea of a sphere I think.
I sketched the neck of the ornaments with a black fine line marker and added water to pull out the colour and blend, then used the same pen to draw in the hanging threads. A Uniko sentiment completes the top panel which sits on pads over the tissue ones, which are glued to the base card.

For more inspiration please check out the rest of the team here.

Joining in over at -


Brusho and die cuts


Tuesday, 18 July 2017

One Layer CAS

Welcome to a post to announce the start of a brand new challenge over at ATSM.
Here's my card.


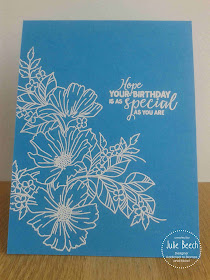
An extremely simple CAS card for our AG challenge


It was inspired by the latest challenge at LIM and AAA Cards, one layer and coloured card base.
I chose this gorgeous summery blue card and the fab STAMPlorations Blossom Sprays #2, simply embossed in white EP and a greeting from a free magazine set that I got a couple of months back.
The spray is so pretty it really doesn't need anything else!
For more inspiration check out the rest of the team here and why not join in this week?

I'm linking up at-


Muse Christmas

Morning all.
It's been a pretty hectic few days chez Beech. We hosted our Grandson's 7th birthday complete with  Marvel superhero bouncy castle and assorted friends and family. Luckily the weather was kind after a shaky start. The rain cleared by 10:30am and the first guests arrived just after 11. My Grandson's face was a picture when he saw what was in the garden, he missed the guy coming to erect it completely!
Anyway I managed to make a card for this weeks new challenge at Cardz4Guyz where our theme this week is -

CHRISTMAS IN JULY

Here is my inspiration card.


There are two ways to go with masculine Christmas cards, funny or traditional, I think. So I went trad with this fab Uniko poinsettia. The name always reminds me of an old school friend who called then pointsetters, visions of bright red gun dogs!
The main inspiration was the gorgeous card over at Muse by Jessica Frost-Ballass. I stamped the large flower head onto a plain white card base then embossed with Gold EP and then again on some scrap so that I could decoupage the center and pop it up on pads. The flower was then masked and some foliage added and embossed to match. I used my Zig pens to colour and used the faux metal technique on a die cut celebrate from STAMPlorations. A small greeting strip stamped in black from the same set as the poinsettia completes. 
For more inspiration just pop over to the main blog.

Joining in over at:-


Take It, Make It Challenge     Please grab our logo
        Anything Goes                               Anything with Flowers

Saturday, 8 July 2017

CASeing Jennifer McGuire

Good evening.
Welcome to a post to announce the start of a brand new challenge over at HLS Anything Goes with Dies.
As always, as it states in the title any project that uses dies is eligible, so for my card I decided to try a technique I saw on You Tube by Jennifer McGuire. I'm not sure where she gets all her ideas from but they are always fun!


Sorry the photo looks a little bleached out but the sun was so strong when I needed to take a pic!
Instead of cutting with the dies this technique uses them to emboss!
I wont go into explanations here because Jennifer does it so much better here.
I have to say that she makes it look so easy but this was my third attempt. The first cut through the background paper, I used W/C paper that had been coloured with Brusho and the second was a little messy, too vigorous with the Versamark inking!
The background card is a shimmery textured pale blue and the embossed areas were done in white.
The large dies are from Sweet Dixie and the smallest embossed one is from IO, the tiniest ones are punched from white card and vellum with a Martha Stewart punch. The sentiment from Uniko was stamped in the same white EP as the snowflakes and to finish I used some Inka Gold platinum wax mixed in water to paint over a few bits of the snowflakes which sadly don't show up on this photo as the sun has bleached out the contrast.

Please check out the rest of the team here and why not join in, we'd love it if you did.

I'd like to join in over at -


N for new, O for old
Old dies and card and a new technique and greeting stamp


No option for me

Friday, 7 July 2017

Happy Anniversary

Good afternoon folks.
I've managed to tear myself away from the TV and the Wimbledon coverage, lounger on patio and TV turned so I can see and hear from my seat through the open French windows, to make a card to announce the latest challenge over at STAMPlorations.


As you can see I also made use of the fabulous weather to take an alfresco photo.
I used the brand new sketch


but you could go with the theme and then there's always a mixture of the two!


I was inspired by the challenge over at Less is More where they want you to use the colours of your flag. Mine is red and white, the Cross of St George for England, so red roses and white background for me.
I started by cutting 3 of the rose die from the Trendy Spring Blooms Die in bright red card but not allowing the little bits to fall out before attaching double sided tape to the back to secure. Then using a darker slightly shimmery red card, I cut 3 more but pushed all the bits out! I then glued the darker outline over the more solid red one. The roses were then arranged on a white card base on which I had stamped the bar stamp from the Mixed Media Grunge set in red and the sentiment using HAPPY from the Balloons and Banners set and a mag freebie. A couple of white outline leaves completed the design.
Check out the rest of the team here and why not join in? All the usual Ts and Cs are there as well.

Joining in over at -

   CAS on Sunday
                                                       Flowers
                                                

Alphabet

Morning all.
The sun is out today and it's threatening to be another scorcher.
My hubby has been out on the tractor helping a friend bring in the haym love that smell, even in winter when I pass the hay bay on a sunny day that gorgeous aroma takes me back to sunny summer days.
I even managed to take a photo of my card for the new Alphabet Challenge Blog theme outside, the shadows were too strong from my usual spot on the window sill! 
This time it is

I for INSECTS

So butterflies, dragon and damselflies, bees, wasps etc. I went with dragonflies with mine. I even saw one the other day buzzing the top of my wild flower area, a sign that summer is really here.


I used a w/c resist technique, stamping these daint ones from STAMPlorations and embossing with white EP then sprinkling on some turquoise and purple Brusho. A spritz with water and sit back and let the magic begin. Once dry, I trimmed the panel of MM paper down to size and added a frame that was left over from an other project on pads. The sentiment was stamped in black on a scrap and attached under the edge.
I usually make lots of teacher thanks cards for my daughter to give to the TA's at work at this time of year but I'm not sure if she will need them this time as she has been off sick with hip problems related to her pregnancy. Still its there if she needs it.
Please check out the rest of the team here and why not join us.

I'm joining in over at -


Take It, Make It Challenge

Thursday, 6 July 2017

Never hide your wings

Good morning and welcoe to a post to announce the brand new challenge over at Cardz4Galz.
This time our theme is

BUTTERFLIES

Here is my inspiration card.


I made this for my daughter's birthday, she loves butterflies and blue with a touch of silver.
When she opened her card and showed it to my Grandson he said it was very pretty and Nannee was clever. Bless the little man, who is shortly to be celebrating his 7th birthday.
To start I made a panel on some M pare with Brusho which I sprinkled and then spritzed with water.
When dry I cut the solid butterflies from this and added white filigree ones over the top and arranged them on a die cut panel of white card. One of the solid butterflies, I cut from matching white card and placed it front and center so I could stamp the STAMPlorations sentiments over it. The butterfly bodies were cut from silver mirror card and trimmed down to suit my design. Inside is a simple happy birthday message. The finished panel was monted on silver and a plain white base card.
For more flutterby inspiration check out the rest of the team here and why not join in.

Joining in over at -

     Grab our Badge!
                                                        Layers