Pages

Tuesday, 31 January 2017

Caseing Ksenija

Good evening and welcome to a post sharing a card made for this week's challenge over at ATSM.
This week it is our theme of -

MAKE YOUR MARK

On this card I made my mark using stamping, ink blending and painting.


I took inspiration from the colours at Altenew and the pretty card of Ksenija at Time Out.
On a panel of off white card I stamped three branches from the Altenew Beautiful Day set in Rich Cocoa Memento ink. Using a water brush I pulled the ink from the stamped leaves into the centers, adding extra where needed. The small blooms were coloured with Copics and a sentiment was added, also in Rich Cocoa. My base card was inked with Fossilized Amber DI then over stamped with the tiny leaf stamp that matches the branch in the same DI. The small panel was then added lifting it up on pads.
For more mark making inspiration check out the rest of the team here.

I'd like to join in over at -


Grab Our Badge!

Birthday Smooches

Good morning folks.
Another grey day here and a few more ahead if the forecast is to be believed. Still at least the white fluffy stuff is keeping well away.
Today sees the start of a brand new challenge over at Cardz4Guyz. This week we would like to cards that have the theme of -

SOMETHING BEGINNING WITH C

Cars, cricket, crocodile, cats, cute, were among the words that came to mind but I settled eventually for C for Cow!


This fun character is from the Chubby Chums set from Paper Smooches as is the sMOOches sentiment. I decided he looked a little lost out in the field on his own so added a Wplus9 heart shaped balloon to go with the sentiment.
The background was simply a panel of MM paper with some Zigs scribbled over it and then spritzed with water and a little sprinkling of Brusho before it dried completely, allowing the crystals to give added texture. The layout is from the sketch at CAS(e) this sketch, the background panel overlayed with one of green with a grass effect edge. The stamped balloon looked a little flat so I added a layer of Glossy Accents. Simples.
For more fab inspiration check out the rest of the team here and join in, we would love to see you in the gallery.

I'm joining in over at -

 "Less is More"
                                      Balloons

CREATIVE INSPIRATIONS       For your blog
                                      Cute Critters                                             Hearts

Tuesday, 24 January 2017

Shoot, it's a Goal!

Morning folks.
There have been lots of grey days recently, but today is a bright crisp winter morning.
Anyway as the outside hasn't been beckoning I used the time for some extended crafty time to make this card for the new challenge over at Cardz4Guyz -

SHAPED CARDS


I used my Sizzix Thinlets hexagon dies to create the base card and white frame and a LOTV image 'Football Crazy', the hexagonal shapes echo the panels on the football. The base card was covered with another hexagon of NitWits DP, the frame was popped up on pads and a circle of matching card added flat in the center.
Using the colour of the DP as a start, I used Copics to colour the footballer before fussy cutting him and the ball out. The footballer was popped up on pads in the center circle and the ball flat on the frame. He looked to be floating so I grounded him by adding some grass with a few strokes of my Zig pens. When I finished and started to write this post I realized that my layout was not as I had remembered the Sketch Saturday sketch but if you rotate it 90" the layout looks more like it! Hope that's OK.
Anyway for more shape inspiration please check out the rest of the team here.

I'd like to join in over at -


Saturday, 21 January 2017

A New Home

Good morning.
Whilst eating my brekkie and browsing this morning, I came across the brand new challenge over at Less is More
Their theme this week is NEW BEGINNINGS and I immediately remembered a card I made just before Christmas. It was for the son of a friend who had just moved into a new flat with his girlfriend, so I went for a Christmas/New Home theme much influenced by a tag I saw a while ago here.
With all the Christmas whoha I forgot all about it but it seems the right time now to share.


I cut a strip of white card with my MB Countryside Landscape die and cut away the houses, which I then coloured with red Copic marker. The evergreen bough was done more or less the same way using a Lea'bilities die and green Copic marker. I die cut a panel of white linen card with my STAMPlorations wonky double stitch die and assembled the scene, adding a stamped sentiment and hanging threads with a fine liner. The finished panel was then added to the white linen effect base card.

I'm joining in over at -

Please display our banner
New Beginnings

Friday, 20 January 2017

STAMPlorations, a reminder

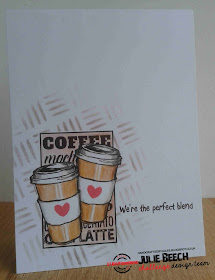
Back again, this time to share a OL card for a reminder of the ongoing Theme/Sketch Challenge over at STAMPlorations.


Not my usual style but as the latest challenge over at Less is More is 'Beverage' I thought I would stretch myself. 
I used this sketch for my layout

but perhaps you are more of a mixed media person so our theme is right up your alley.


My image was a freebie digi 'Latte for Two', that Shery shared a long time ago but there are similar stamps available here, which I coloured with my pencil crayons after first stamping a couple of hearts from the Balloons and Banners set. My sentiment was computer generated and the background, a Tribal Weave stencil, inked through with Ground Espresso DI, after first masking off the image.

That's all there is to it really, for more fab inspiration check out the rest of the team here where you will also find all the Ts and Cs.
Don't forget to use my discount code when you order stamps from the STAMPlorations shop.

I'd like to join in over at :-

"Less is More"
One Layer - BEVERAGE

     
                                                       Thanks Sarah for the reminder!

A new DT for me

Good morning.
The end of the wek is here and hopefully an enjoyable weekend stretches before you all.
I don't usually post at this time on a Friday but I can now share a little secret with you. When Fantasy Stampers suspended their challenge blog, Jan asked if I would be part of the Alphabet Challenge DT, so here I am.
This week it is 

W - for a Winter Walk

I must admit to liking a walk in the crisp winter fields, the sun sparkling on the frozen ground and perhaps the odd bit of snow on the trees. There's not been many days like that recently to take Max out in, it's been very damp and miserable. To add to the muddy fields, engineers from Rail Track are constructing an access point from which to repair the line and the only way down is along our lane! Although they have assured us that they will reinstate it, the muddy morass that it is at the moment does not help in keeping car, dog or feet free from yuck! 
Anyway here is my card.


To begin, I took a panel of white card and stamped some snowflakes and embossed them in white, then scribbled some of my icy blue Zigs over the embossing before spritzing with water to create the frosty sky. On a separate die cut panel I cut a scene with a Memory Box die, coloured the scene with more Zigs and a little bit of Stickles on the snow and roof tops. The sentiment, a mixture of MFT and Uniko, was stamped in Grey Flannel. The snowflake background was glued flat to the base and the scene was popped up on foam pads.
For more winter walk inspiration why not pop over to the main blog and then join in.

I'm joining in over at -

        Grab our Badge!
                                                           Winter Blues

Thanks for the reminder Cornelia!

Thursday, 19 January 2017

Bend it Like Beckham!

Good morning folks.
We have a brand new challenge for you over at Cardz4Galz.
We would like to see your take on the theme -

MOVIE MADNESS

I haven't really got a favourite movie so it was after trawling though my stash that I came across this LOTV stamp of the little tomboy Annabelle playing with her football that inspired this card. 


Anyway, the movie that came to mind was

It's the story of an Asian girl who goes against her parents and culture in order to play football.

This LOTV image reminds me of myself when I was a little un! My Dad used to play semi pro soccer in the late 40's and early 50's, even getting a trial for Arsenal after playing for the RAF during his national service. However my arrival put paid to his footballing days but he always had a gang of followers on the beach in the summer! Having no sons, I was the one that got to play with the boys on the beach and loved it. Back in the day girls didn't play football so I had to content myself with hockey.
I often wish that I could have taken soccer further, the nearest was playing in a team made up of friends that took part in a tournament whilst at college, it's so much easier for girls these days.

I used the layout at Sketch Saturday for this card, colouring the image with Copics. For the hair I used blonde colouring (E50, Y21, Y26, YR24 and YR27) as I was a little blondie back in the day, rather than the star of the film. I do find myself using this colour for hair a lot, my grandson also has a lovely head of blond hair!

OK, for more inspiration, check out the rest of the team and why not join us?

I'd like to join in with :-


As You Like It Challenge
Favourite Hair Colour and Why.

Tuesday, 17 January 2017

Rainbow hello

Good evening.
We've had a long break but finally we're back with a brand new challenge over at ATSM.
This week it is our

PHOTO INSPIRATION

Here is my card based on the photo


Love this pretty rainbow daisy like image.


I did think of going down the floral route but instead decided to try something that I saw quite a while ago on Jennifer McGuire's blog, using a lattice stamp and Distress pens.
My wonderful son bought me a full set of Zig markers for Christmas, so it was the perfect opportunity to try them out and see what all the colours were.
I stamped and heat embossed in white the Hero Arts lattice stamp on some mixed media paper and then went ahead colouring each cell in roughly rainbow order.
Once completed, I stamped a greeting on some black card, embossed in white EP and mounted the strip on a scrap of white before laying it over the coloured panel. A few beads of Glossy Accents completed it.
I found the colouring in quite therapeutic and lost myself in the activity, so tea was somewhat delayed. I did discover the stamp was slightly off square but I was able to trim the panel down to square it up, more or less!

For more rainbow inspiration, please check out the rest of the team here.

I'd like to join in over at -


Please do grab our logo to display on your own blog

Anything Goes

Bullseye

Good morning folks. I hope the weather near you is better than here, it's dank and grey and really quite depressing. Give me a bright crisp winter's morning any day!
This week at Cardz4Guyz we have a technique challenge for you this week.

TRIPLE MAT TECHNIQUE

Here is a link if you would like more info on the technique.
This is my card which uses a twist on this, called bullseye. You can find out more here.
It is sort of a reverse triple mat as the layers go in not come out, the inside of the finished card is as interesting as the front.


Here are some close ups of the layout.


I chose this technique because I didn't have any stamps that were masculine enough for the challenge!
This uses the SU set Wetlands and was coloured using my brand new Zig watercolour brush pens.
I wouldn't have attempted this before I bought my Misti as you can move the different layers around while keeping the stamp in the same place.
Go on have a go,we'd love to see what you make with this technique.
There's more inspiration over at the Cardz4Guyz page so have a look.

I'd like to join in over at -

Grab our logo
Wings on Things

Tuesday, 10 January 2017

Monster birthday wishes

Good morning and welcome to post that announces the start of a brand new challenge over at Cardz4Guyz.
This week marks our 3rd birthday so what would be a more appropriate challenge than simply -

HAPPY BIRTHDAY

Here is my card for today's celebrations.


Whilst seeking inspiration for my card I came across a similar card made from embossed card and punched shapes here and thought him rather sweet. I do love to make these cute monster cards for a change. I used the colours from Can you Case it? and the Ombre challenge over at Less is More as further inspiration.
To start I took two A5 panels of white card, actually 2 halves of a card that I'd messed up and inked up the reverse side in an ombre style with Tumbled Glass and Salty Ocean DI and on some scrap I inked up with Picked Raspberry DI. From further scrap bits and bobs, I cut some circles with assorted dies and punches. The only new bit of this was the base card, waste not want not! My stash of cut offs does not appear to be getting smaller but I can't bear to through a usable piece away.
I decided I preferred the darker area for the area around the mouth, so trimmed one of the blue panels with a large circle die and then the pink one, I cut the nose from the center as it was unseen. 
Using more DIs, I inked up the eyes in Hickory Smoke and Tumbled Glass and added white gel pen as hi lights to the nose and black pupils. Once the eyes were assembled and glued down I added some Glossy Accents around the mouth and cut a couple of buck teeth from more scrap. The sentiment from STAMPlorations was stamped in black and the finished 'monster' glued to my base card.
 Please join us for our 3rd birthday bash, we'd love it if you did.

I'd like to join in over at -


"Less is More"
OMBRE

Sunday, 8 January 2017

Joyous Christmas

Evening all.
Well the Christmas holidays are over for another year, even my Grandson is back to school tomorrow. Hope you all had a fab time and got lots of crafty goodies under your tree!
I did discover a distinct shortage of Christmas cards at the last minute, so this year I am trying to get at least one done a month, so here is January's made for the new challenge over at HLS Anything Goes with dies.


I've used a MB bauble die and a few Personnel Impressions snowflake stamps. 
To start, I cut a panel in white linen effect card and planned out where to place my dies. I wanted to inlay two of them and lay one on the top. 
After cutting I cut the centers again out of plain card (actually it was a slight textured piece in reverse and I didn't realise until I had inked them up!) and using my Misti stamped three snowflakes and then heat embossed them with white EP, inking over them with Salty Ocean and Blueprint Sketch DI to give some dimension.
I then cut 3 more of the baubles in silver mirror card and the berries from some silver linen card scraps. I now had all the pieces ready to replace in the base panel.
Turning the cut panel over, I stuck double sided tape across the narrow openings to keep them in place then replaced 2 silver die cuts in the openings. When I was happy they were flush with the surface I added more tape to the rear. The small berries were then replaced in the correct position.
The top bauble I found a little trickier as the tape had to be positioned so that it was invisible from the front. When done I placed it over the inlaid dies and added a sentiment in Grey Flannel. The whole panel was then trimmed and stuck to a white base card.


There's much more inspiration over on the HLS blog, so why not pop over there and check out the rest of the team.


I'd like to join in over at -

        Blank icon


Friday, 6 January 2017

A new year and a new theme at STAMPlorations

Good afternoon and welcome to my post to announce the start of the latest theme and sketch challenge at STAMPlorations.
Here is my card based on the theme, can you work it out?


It may be CAS but hopefully it uses

(Our definition of mixed media: using stamps and ink + at least 2 other elements (techniques and/or products)
but if you are sketchy sort of gal you might like to use this.

For my card I used stamps from a couple of sets, the candle from Kathryn's Big Wishes and words from Sentiment builders Happy, along with a CUTplorations word die 'Wonderful'.
On a panel of plain white card I stamped the candle 5 times across the width, then stamped it again on a selection of DP from the bits box. After fussy cutting them out I glued them flat onto the stamped outlines. Using Copic markers, I coloured the flames and as the wax drbbles down the side were so small I used my new Zig pens to colour, matching the DP
 The wonderful die was placed on the coloured image while I placed the stamped sentiment elements and the used my Misti to stamp in black. To cut the die I used some low tack tape to keep it in place then ran it through my Big Shot. Carefully removing the diecut and keeping ALL the small bits, I cut another two words from some white craft foam then glued one of them into the space adding back the middles of the letters o, d, e, f and l.Sticky tape across the back of the opening is my preferred method. .The original die cut was glued to the other foam die cut and then both attached to the first. The finished panel was the glued to a white base card.
Sounds much more complex that in actually is! So my MM elements were, paper piecing, die cutting, Copic markers and finally Zig pens.

For more fab inspiration check out the rest of the DT and our brand new set of GDs here, where you will also find all the Ts and Cs.

Shery has also very kindly given me a discount code for you to use when you visit the STAMPlorations store.


I'd like to join in over at -

"Less is More"
Dimension