Pages

Saturday, 30 April 2016

Use DP in a Clean and Simple Way

Evening all.
The weather so far this Bank Holiday weekend has been awful and checking out the forecast it looks like it is not going to improve any time soon!
Anyhow, it means that lawn mowing is on the back burner and I can spend more time in my craft room, YEAH.
I was inspred by a few of the challenges out there to make this card.


Over at Less is More they want you tto use DP in a CAS way, ATCAS's cue word is Plaid and the sketch over at CASe the sketch is intriguing,

I had a sort through my scrap box and came up with a couple of pieces that I wanted to use for my project. As they were scraps I planned the card using some plain copy paper first.
The plaid paper I had reminded me of a shirt so I made a bow tie from some matching green paper and added a few buttons. I used parts of a MFT blueprints die set to emboss the diagonal line as well as cut the white panel. Voila. 

A very quick card once I had planned what to do.

I'd like to join in over at -


"Less is More"
Designer Paper in a CAS style

Thursday, 28 April 2016

Shaker Card

Morning all, time for a new challenge over at Cardz4Galz.
This time we would like to see your projects on the theme of -

SHOW A BUTTON or TWO

So, simply use at least one button somewhere on your project. Simples.
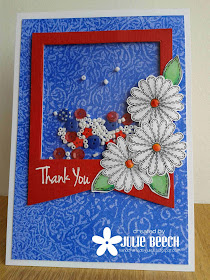
Here is my card.


I took inspiration from a few challenges out there at the moment. The colours from Allsorts. the layout from Sketch Saturday and the shaker idea from AAA Cards!
I'd got lots of ideas for using buttons but used these challenges to focus them.
I wanted to use this fab embossing technique I discovered recently (see the link here) for the background, so using a piece I had left over from an other project, I inked it with Blueprint Sketch DI. I love the texture you get with this resist technique without the uneven surface. A fishtail banner was cut in a piece of textured red card then I cut an aperture for my shaker. 
I stamped a few HLS stitched daisies for a focal point and added a greeting from the same set and embossed it in white. For the shaker I used a mixture of tiny buttons and some white beads I got in a pack from Home Bargains! After trimming the blue panel I mounted it flat on a white base card. I hope Allsorts will allow the tiny green leaves but the daisies looked a bit bare on their own.
 ,
For more fab inspiration please check out the rest of the DT and then why not join us.

I'd like to join in over at:-

Allsorts challenge blog

Red, White and Blue


Tuesday, 26 April 2016

Magazine Freebie

Hi and welcome to my post to announce the new challenge over at ATSM.
This week our challenge is

ANYTHING GOES

As usual I find it difficult to focus on this theme so I used a few challenges to inform my card design.
Here is what I came up with for your inspiration.


The layout is from Paper Players, the colours I took from the JUGS photo along with the iced pink rose cookies and the TIC TAC TOE over at CAS on Sunday.
Last week I bought a mag, Simply Cards and Papercraft, that was giving away  Altenew's 'Build a Rose' stamp set and matching dies. I was so keen to have a play, I made a stack of these pink roses using Memento Angel Pink, Rose Bud and Rhubarb Stalk. It was quite easy after a few goes but the die cutting was a little trickier. 
The background circle of blue was cut from an experimental piece I made using a fun technique I came across here, then inked in Salty Ocean DI.
To focus on the gorgeous roses I decided to use embossed white panels from a selection of EFs in my stash.
OK, that's how I did it, now it's your turn.

This week we are sponsored by

DRS Designs - a family owned company since 1950 - boasts hundreds of original rubber stamp designs. All images are available fully mounted, completely unmounted or mounted on cling cushion and are proudly hand crafted in the USA. 
Our rubber stamp collection includes a wide assortment of images including sentiments for all occasions, easy background designs and fun technique stamps such as our stained glass and plaid designs.
The DRS Designs website features a huge card sample gallery, online demos and tips, a secure shopping area and more. Be sure to visit our daily blog with posts from our fantastic design team for inspiration and ideas.
Prize: $10.00 gift certificate

Get those crafty fingers working! For more great inspiration please check out the rest of the DT


I'd like to join in over at:-


For your blog

Down the middle Girly/ Stamp/ Dry Embossing

WhooWhoo

Good morning and welcome back.
Once a month Tuesday gets very busy in the post department so if you were looking for my Cards und More post try here!
Over at Cardz4Guyz the latest challenge is to 

USE WOOD

Now that sort of flumuxed me for a while then I decided to thing laterally!
Here is my card for the team.


I decided that wood could be interpreted as the material or as the place. Then I thought of trees and  as I was walking across the fields I wondered about the little owls that usually nest in an old oak tree by the large shed as there were a couple of magpies hopping around looking for fledglings or eggs to nick. So that was how I came to use this cute Paper Smooches owl and sat him inside a tree made by stamping on kraft with Versamark and the embossing with clear EP. 
The hole was cut with a MFT die and then the panel was inked with Gathered Twigs DI. I was going to sit him on a die cut branch but instead used a MFT banner die and a Woodware greeting. The view from inside the tree was just a circle of white card from my bits box and a crescent shaped bit of Post it to make a moon, then inked in Stormy Sky DI and a few white gel pen stars. My little owl was coloured with Copics then fussy cut before popping him on the banner and the whole panel was then popped up on pads.
For more inspiration please check out the rest of the DT and why not join us, we'd love to see what you come up with.

I'd like to join in over at:-

Grab Our Badge!

Celebrations - optional twist of die cutting and/or fussy cutting

Double Post Tuesday

Morning all. 
Another month has gone by so it's time for another challenge over at Cards und More.
This time our theme for you is -

FOCUS ON THE CUTS

For this challenge we would like to see dies as the focus of your project. 
Here is my DT inspiration card.


For this design I decided to use a couple of challenges as my inspiration, the code word RAIN at ATCAS, Splish, Splash at Poppy Stamps and the umbrella picture at Fusion
The phrase SING IN THE RAIN came to me after a search for phrases to do with rain on the internet and thought that I could incorporate my MB umbrella die and MFT alphabet dies into the design.
I used a digital design program to plan where to place my dies and printed out the SING IN THE part on ordinary printer paper. Then I used this to plan the placement of the dies before going with the card topper. I wanted the 'g' to be part of the umbrella handle so cut the die in that position, then placed my letters underneath.
The alphabet letters were then coloured with Copics and placed back into the printed  card panel as was the umbrella handle which I cut in black. The umbrella canopy was cut again a few times in scrap card and finally in a pretty daisy DP. I stacked these all together and placed the stack back into the panel. 
When I'd done all the die cutting, I thought it looked a little bare so inked some 'rain' using a STAMPlorations Dots all Over stencil with Broken China  and Tumbled Glass DI.
So what will you be inspired to do, we'd love to see.
For more inspiration please check out the rest of the DT.


I'd like to join in over at -


0416 copy


Saturday, 23 April 2016

May all your dreams come true

Good morning all.
The weekend is upon us and the weather has decided to downhill, so what's new!
Over at Fantasy Stampers we have a new challenge for you.
This time our theme is -

MONOCHROME

Here is my card for your inspiration.


I took inspiration from my bloggy teamie at ATSM Carol's card at Tag You're it.
However as the theme was monochrome I went with the orange colour on her card and not having a dragonfly die cut, I used a couple of MB butterfly dies.
As I needed to use some stamping on this project, I used a Hero Arts lattice stamp instead of a stencil that Carol used, I think my Poppy Stamps tag is the next size down as well!
The lattice stamp was inked with Versamark then stamped through a torn paper template as I didn't want it covering the whole panel, then embossed it with white EP. I used three different oranges, Ripe Persimmon, Spiced Marmalade and Dried Marigold DI to ink the background and base of the butterfly and the palest for the tag and filigree butterfly. To add further interest I splashed some diluted DI and added some Glossy Accent dots coloured with matching Copic colour. I trimmed the top panel down then added it flat to a base card.

I did try the same design with a plain white tag and filigree butterfly first which I preferred, but thought that perhaps it wasn't monochrome enough!


Anyway, now it's over to you. 

PLEASE REMEMBER WE ARE A STAMPING CHALLENGE.
Any projects that do not show stamping cannot be considered for our top 3.

For more info check out the main FS blog where you'll also find the rest of the DT's inspiration cards.

I'd like to join in over at -


Morgan's Artworld - Monochrome
Simply Create Too - Stitching, real or faux
Fab n Funky - Winged things

Tuesday, 19 April 2016

Apple for the teacher

Morning bloggy friends.
It's Tuesday and it's 9 o'clock so it's time for a new challenge over at Cardz4Guyz.
This week Jan has chosen the theme of -

BOOKS and/or BOOK PAPER

This was a bit of a head scratcher for me but then I remembered a project using a page from an old book I had started last year while at my card class. However, after hunting through my craft bag for the bits I thought I had, I realised I must have binned them in my clean out over Christmas! 
Anyway I was quite taken with continuing with the idea so I had to think laterally before I came up with this.


I thought about making the apple card last June for my Grandson to give to his teacher but finally went with this, so the book page apple was on the back burner. So for this I used a Hero Arts definition stamp - Thank you to make my own book page. I really don't like gutting a book, sorry Jan.
I sketched an apple shape onto a Post it and then cut a load of them out from the thankyou paper using it as a stencil.
The apple colours were inked using Candied Apple DI at the bottom and Mown Lawn at the top. The leaf also Hero Arts, was stamped on a bit of left over 'book page' and coloured with Peeled paint and Mown Lawn. To make the apple 3D I folded each apple shape in half and glued them along the fold over the first which was glued flat onto the top panel. The stalk is a tiny scrap of brown card. I used a linen cardstock for the base and the center panel which I stamped with a greeting from a HLS set. The green gingham panel was cut with a MFT stacked pierced rectangle die as was the top panel. Must admit it looks a bit off center in this pic but it is dead center in real life!
OK, that's about from me.
For more fab masculine inspiration check out the rest of the DT and then why not join us this week.

I'd like to join in over at -

"Less is More"
Theme week - Use 3 stamps sentiment, definition and leaf

Friday, 15 April 2016

STAMPlorations, a reminder

Good afternoon all.
Just stopping by to remind you all that there is still time to enter the STAMPlorations  April Theme/Sketch Challenge.
Here is my card using just the theme this time.


Don't forget you can use either the sketch or theme or both!


For my themed card I went with a very subtle splatter effect around the flowers rather than filling in the background. I just diluted some Salty Ocean DI and after masking off the flowers, I used a paint brush to flick splatters in the area I wanted, all very understated! The flowers from Dee's Blooming Buds set were stamped on some linen textured card in Memento London Fog and then cut a rectangle from the middle using a MFT pierced rectangle die. Keeping the outer to one side and free from ink, I painted in the flowers with a mix of Picked Raspberry Shabby, Shutters and Fossilized Amber DIs. The sentiment is from Dee's Balloons and Banners set, stamped in black.
When the coloured panel was finished I trimmed the main panel and popped it up the central rectangle up on pads.

So that's my project, please check out the main blog for all those Ts and Cs and details of all the other DT projects as well as this month's fab GDs, Ashwini and Mac Mable.

I'd like to join in over at -


Thursday, 14 April 2016

Spring Blossom

Good morning all.
Just popping by to announce the start of a new challenge over at Cardz4Galz
You certainly took the last challenge by the horns, lots of fab entries, so what will you make of the topic -

USE AN EMBOSSING FOLDER

I love embossing folders (EF), as they give texture and depth to a project without adding too much fussiness. I found it really tricky choosing one from my collection but I thought that this spring flower one went well with my cherry blossom panel.


My inspiration for this was the challenge at Just Us Girls, smooshing, ATCAS inlaid dies and the MUSE card by my friend and teamie Anita Bowden. I liked how she'd inlaid her Crafters Companion die into a square of inked cardstock. 


For mine I decided to use an embossed background and go with a branch coming down instead of going up! I cut a branch in white then coloured the branch, flowers and leaves with Copics. The panel was cut from a smooshed panel using Inka Gold wax in platinum and Salty Ocean DI, I wanted to create a bright spring sky for my blossoms. After reinserting all the bits back into my panel, I decided it needed some more blossom, so added some more flowers using the small flower die from the set.
As I was using an embossed background I stamped the Happy Birthday on a tab and then glued it to the underside and popped the whole panel up on pads.
OK, that's about it from me. For more inspiration please check out the rest of the DT and why not join us.

I'd like to join in over at -


Wednesday, 13 April 2016

April Stencil Hop

Good afternoon and welcome to the latest Blog Hop with ARTploration stencils from STAMPlorations.

Here is my inspiration card using ARTplorations Daisy Dance and Bloom Sketches.

 preview-web-stencil-031-daisydance

I made the panel by laying on the stencil on a A6 piece of Hot Pressed W/C paper and inking the spaces with Versamark then embossing with white EP. The daisy blooms were then carefully stamped in the spaces and embossed in white. I had to it that way as the mask dictated where to stamp the blooms. To colour, I sprinkled Brusho crystals in Yellow and Vermilion where I wanted the colours, then spritzed the whole lot with water.
I stamped a happy from the Balloons and Banner set below the now dry angled panel and embossed in white EP, added a die cut Happy and then trimmed the panel to complete.


As usual, Shery is offering a stack of prizes so for full Ts and Cs pop over to the main blog but don't forget to leave a comment here before the end of April 17th and on the other fab DT's blogs too. You'll find links to all projects here. Winners will be announced on April 19th.

I'd like to join in over at -

CYCI#115    
                                                     My Choice- Heat embossing and Brusho

Tuesday, 12 April 2016

Die cut CAS

Hi and welcome to a post to announce the start of a new challenge over at ATSM.
This time it is time for our theme of -

CAS

Lovely jubbly, just my thing!
Here is my inspiration for you.


Out in the blog a sphere somewhere, I remember seeing a die cut rose only partially reinserted into the base, so I thought I would have a try using my Memory Box gardenia die in a similar style. I chose three matching pieces of card, sparkly grey, matt silvery grey and pale grey pearl. I cut out two lots of the die and then cut away the small linking bits of card to make a top panel in the sparkly card. 
Then useing the matt card, I cut two more outlines then replaced some of the die cit segments and fitted the die cuts back into the top panel. The base layer was stamped with a HAPPY from the STAMPlorations Banners and Balloons set and the ANNIVERSARY  came free with a mag and the top layer glued flat over the top.
This week we are sponsored by
Prize is a $10 gift certificate

and

Prize: 2 digital images

For more fab CAS inspiration please check out the rest of the DT and then join in.

I'd like to join in over at -

For your blog       
                                             Flowers